How To Install A Battery Backup To A Sump Pump

Okay, folks, let's talk sump pumps. These unsung heroes of the basement are our first line of defense against the dreaded flood monster! We're going to transform your trusty pump into a power outage-proof champion with a battery backup. Get ready to feel like a DIY superhero!
Gather Your Gear - The Avengers Assemble!
First, you need the right tools. Think of it as assembling your superhero team for this mission. We're not battling Thanos, but water damage can be pretty devastating.
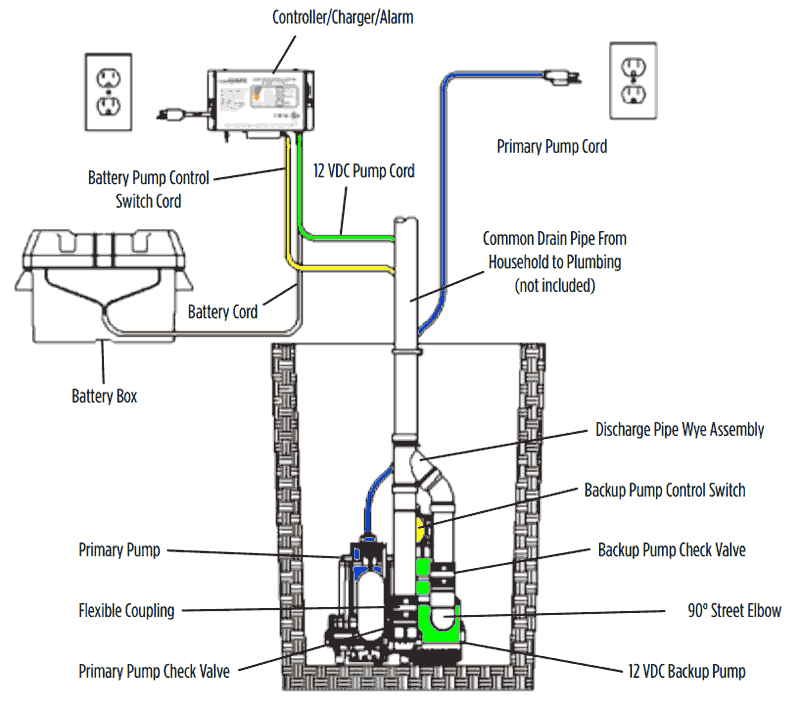
You'll want a shiny new battery backup sump pump system, obviously. This usually includes the backup pump, a battery (often marine-grade), a charger, and all the necessary pipes and connectors. It's like getting the whole superhero starter kit in one box!
Must Read
Grab some wrenches – adjustable ones are your best friend. A pipe cutter is handy for trimming any excess plumbing. You'll also need a level, because nobody wants a crooked sump pump installation!
Don't forget a screwdriver set! Both Phillips and flathead will come in handy. Finally, get a bucket (or two) to manage any stray water that decides to join the party.
Prep Like a Pro - Knowing Is Half The Battle
Before you dive in, let's get our bearings. Unplug your primary sump pump. We don't want any unexpected waterworks while we're working!
Take a good look at your current sump pump setup. Note how the pipes are connected and where everything is positioned. A quick snapshot with your phone is also a great idea.
Now, let's talk about the battery. Most batteries need a little pre-charge before their grand debut. Hook it up to the charger included with your system and let it juice up according to the manufacturer's instructions. Think of it as a pre-flight meal for your battery.
Installation Time - Let the Plumbing Games Begin!
Here's where the fun really starts! Carefully remove your existing sump pump. Don't worry, we'll put it back later, but for now, it's taking a little vacation.
Now, it's time to introduce the backup pump. Place it inside the sump pit, usually next to your primary pump. Most systems are designed to coexist peacefully in the pit.

Connect the discharge pipe from the backup pump to your main discharge line. This is where the pipe cutter and those trusty wrenches come in handy. Make sure all connections are tight and secure. No leaks allowed!
Now, connect the battery to the backup pump system according to the manufacturer’s directions. Usually, it’s a red cable to the positive (+) terminal and a black cable to the negative (-) terminal.
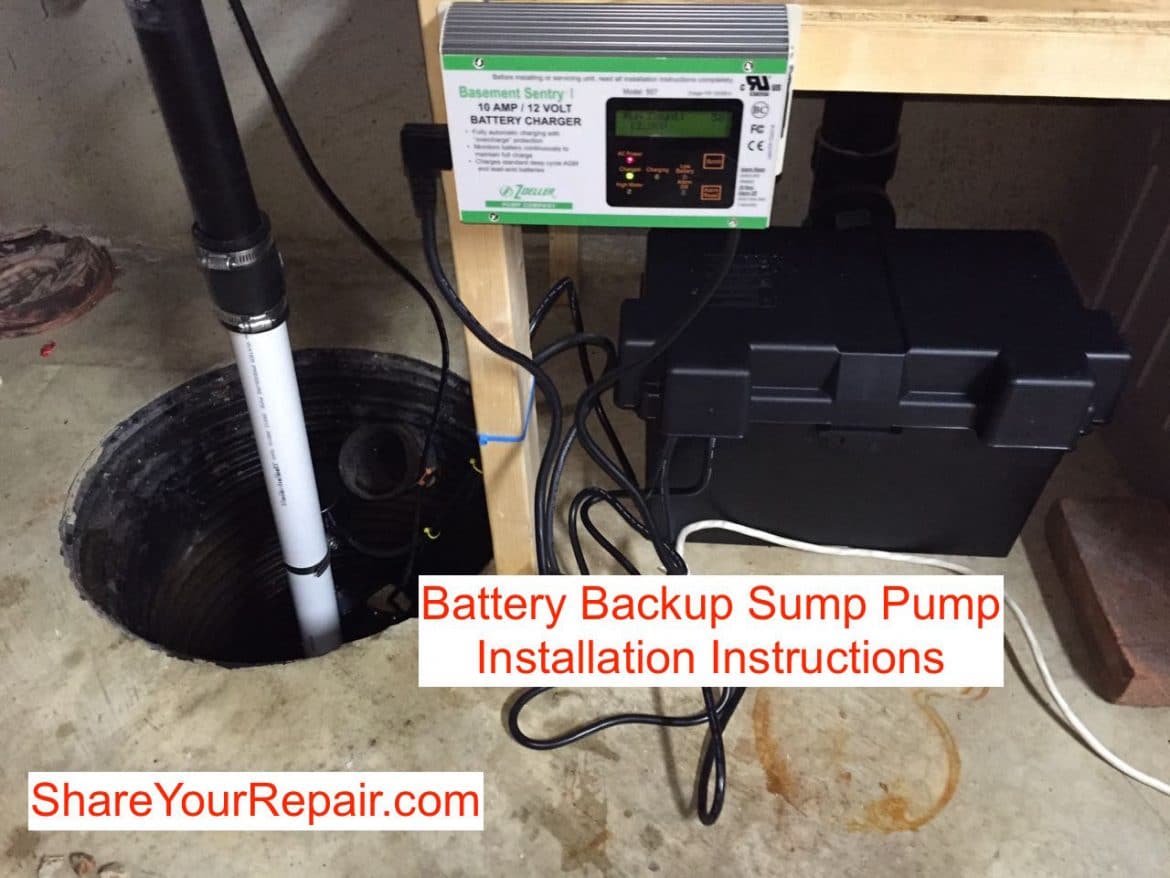
Position the battery and charger near the sump pit. Be sure it's in a dry place, away from any potential splashing or flooding. Think of it as giving your battery a VIP suite.
The Moment of Truth - Testing, Testing, 1, 2, 3!
Time to test your handiwork! Plug your primary pump back in. Everything should spring back to life as if nothing happened.
Here's the big test: unplug the primary pump. The backup pump should kick in automatically! If it does, celebrate with a little victory dance. You've earned it!
If the backup pump doesn't activate, don't panic! Double-check all your connections and make sure the battery is fully charged. Consult the system's instructions for troubleshooting tips. Even superheroes need a little help sometimes.
Fine-Tuning Your Fortress - Ensuring Smooth Sailing
Once you've confirmed everything is working correctly, it's time to tidy things up. Secure all the pipes and cables to prevent them from getting in the way or becoming a tripping hazard. Safety first!
Make sure the battery charger is plugged in and functioning properly. This will ensure your battery is always ready for action. Consider it a constant drip feed of superhero power.
Regularly inspect your sump pump system and battery. Check for any signs of corrosion or damage. Preventative maintenance is key to keeping your system in tip-top shape. A little love goes a long way!
Bonus Tip: The Power of Prevention
While your new battery backup sump pump is a fantastic safety net, don't forget about the importance of preventing water problems in the first place. Keep your gutters clean and clear of debris.
Ensure your downspouts are directing water away from your foundation. Proper drainage is like having a force field around your house.
Consider installing a water alarm near your sump pit. This little gadget will alert you to any potential flooding, even if your sump pump fails. It’s like having an early warning system for the water monster.
Pat Yourself on the Back - You Did It!
Congratulations! You've successfully installed a battery backup for your sump pump. You're now a certified basement protection champion. Feel free to wear a cape – you deserve it!
Knowing your basement is protected from flooding is a great feeling. You can sleep soundly knowing that even if the power goes out, your trusty sump pump will keep water at bay. No more nightmares about soggy carpets and ruined furniture!
Remember to regularly check your system and battery. With a little maintenance, your battery backup sump pump will provide years of reliable service. Now go forth and conquer any water-related challenges that come your way!

Troubleshooting Tips - Because Even Superheroes Need a Plan B
What if things don't go exactly as planned? Don't worry, we've all been there. Here are a few common issues and how to tackle them like a pro.
Problem: The backup pump doesn't turn on when the power goes out.
Solution: First, double-check that the battery is fully charged and properly connected. Make sure the power switch on the backup pump system is turned on. Consult the manufacturer's instructions for specific troubleshooting steps.
Problem: The backup pump runs, but it doesn't pump water effectively.
Solution: Check the discharge pipe for any obstructions or kinks. Ensure the pump is properly submerged in the water. The pump's impeller might be clogged with debris. Clean it carefully according to the manufacturer's instructions.
Problem: The battery seems to be draining quickly.
Solution: This could indicate a problem with the battery or the charger. Test the battery's voltage with a multimeter. If the voltage is low, the battery may need to be replaced. Make sure the charger is functioning properly and is not damaged.
Problem: The system is making strange noises.
Solution: Investigate the source of the noise. Check for loose connections or vibrating pipes. The pump's motor might be failing. Contact a qualified technician if you suspect a serious problem.
Maintenance Matters - Keeping Your System Running Smoothly
Regular maintenance is essential for prolonging the life of your battery backup sump pump system and ensuring it's always ready to perform. Here's a simple checklist to keep your system in tip-top shape.
Monthly: Visually inspect the entire system, including the pump, battery, charger, and pipes. Look for any signs of damage, corrosion, or leaks.
Quarterly: Test the backup pump by unplugging the primary pump. Observe how quickly and efficiently the backup pump kicks in. Clean the sump pit to remove any sediment or debris.
Annually: Replace the battery according to the manufacturer's recommendations. Even if the battery seems to be working fine, it's best to replace it proactively to avoid unexpected failures. Inspect the check valve to ensure it's functioning properly.
By following these simple maintenance tips, you can keep your battery backup sump pump system running smoothly for years to come, providing reliable protection against basement flooding.
Remember: Always consult the manufacturer's instructions for your specific battery backup sump pump system. If you're not comfortable with any part of the installation or maintenance process, don't hesitate to contact a qualified plumber.