How To Create Invoice For A Job In Netsuite

So, you've done the thing. You wrestled the NetSuite beast and emerged victorious. Congrats! Now, you actually want to get paid. Shocking, I know.
Let's talk invoices, the key to unlocking that sweet, sweet revenue. Because staring blankly at the screen hoping money magically appears? Sadly, not a valid strategy.
The "Let's Get Paid" Journey Begins
First, fire up NetSuite. I know, I know. Deep breaths. We're in this together.
Must Read
Navigate to your customer. Think of them as the golden goose. The one who holds the purse strings.
Turning Opportunities into Invoices
See that beautiful opportunity you carefully crafted? The one you nurtured like a digital bonsai tree? Time to harvest the fruits of your labor.
Find the opportunity record. There should be a magical button lurking somewhere, labeled something like "Bill Sales Order" or "Create Invoice." Click it. Pray to the NetSuite gods.
If you don't see it, don't panic! NetSuite loves hiding things. Look for a "Related Records" tab or a "Convert To" option. It's a treasure hunt, really.
Sales Orders: The Invoice Launchpad
Maybe you’re dealing with a sales order. A little more formal, a little more…orderly. Ha!
Open that sales order. Spot the "Bill" button. It's often conveniently located near the top. Or maybe buried deep in a sub-menu. You know, for fun.
Click that "Bill" button. Behold! A new invoice is born. Almost. You still need to, you know, do things.
From Scratch: The Manual Method
Okay, so no opportunity, no sales order. You're a maverick! You're forging your own path!
Go to "Transactions" -> "Sales" -> "Create Invoice." Brace yourself.

Select your customer. This is pretty crucial. Invoicing the wrong person is a recipe for awkwardness (and delayed payments).
Invoice Tweaking: The Fun Part (Maybe?)
Now for the nitty-gritty. The part where you make sure everything is correct. Because accuracy is important. Apparently.
Double-check the date. The invoice number. The billing address. All that jazz. Don't want to look sloppy.
Adding Items: The Core of the Invoice
This is where you tell them what they're actually paying for. Seems obvious, right? You'd be surprised.
Click on the "Items" subtab. Start adding your products or services. Be specific! "Stuff" isn't a great description.
Enter the quantity and the rate. NetSuite should calculate the amount automatically. If it doesn't, something's gone horribly wrong. Call support. Run.
Taxes: The Inevitable Evil
Ah, taxes. The bane of every freelancer's existence. NetSuite usually handles this automatically, based on your setup. But it's still worth a peek.
Make sure the tax rate is correct. If it's not, adjust it. Don't mess this up. Seriously.
Ignoring taxes is not a valid tax strategy. Just saying.
Discounts: The Art of Negotiation
Giving a discount? You generous soul! (Or maybe you just had to. We've all been there.)
There's usually a field for discounts. Enter the percentage or the amount. Watch the total magically decrease.
Discounts can be a powerful tool. Use them wisely. Don't give away the farm.
Adding Notes: The Personal Touch (Sort Of)
Want to add a personal touch? (Okay, maybe not personal. But at least informative.) Use the "Memo" field. This is for internal use.
There's also a "Message" field, which appears on the invoice itself. Use this to say thank you, provide payment instructions, or subtly remind them about late fees.
Keep it professional. "Pay up, sucker!" is generally frowned upon.
Approval: The Gatekeeper
Depending on your company's setup, invoices might need approval. If so, submit it for approval. Then wait. And wait.
Nag politely. But persistently. Remember, closed mouths don't get fed.
If you are the approver, be responsible! Don't let invoices languish in your inbox. People need to eat!
Sending the Invoice: Release the Kraken!
The moment of truth! The invoice is ready. Time to unleash it upon the world!
Click the "Save & Email" button. Or "Print/Email." Or whatever NetSuite decides to call it today.
Double-check the email address. Make sure it's going to the right person. Sending it to your grandma won't get you paid (unless your grandma is secretly a venture capitalist).
Customize the Email: Make it Pop (A Little)
Take a moment to customize the email. Add a personal message. Remind them of the project.
But keep it brief! No one wants to read a novel when they're just trying to pay a bill.
Professionalism is key. Even if you're tempted to write, "Please pay me! I'm starving!"
The Waiting Game: Patience is a Virtue (Apparently)
You've sent the invoice. Now, the hardest part: waiting. Try not to obsessively check your bank account every five minutes.
Set a reminder to follow up in a week or two. A gentle nudge can be surprisingly effective.
Don't be afraid to pick up the phone. A friendly phone call can work wonders. Just don't be too aggressive.
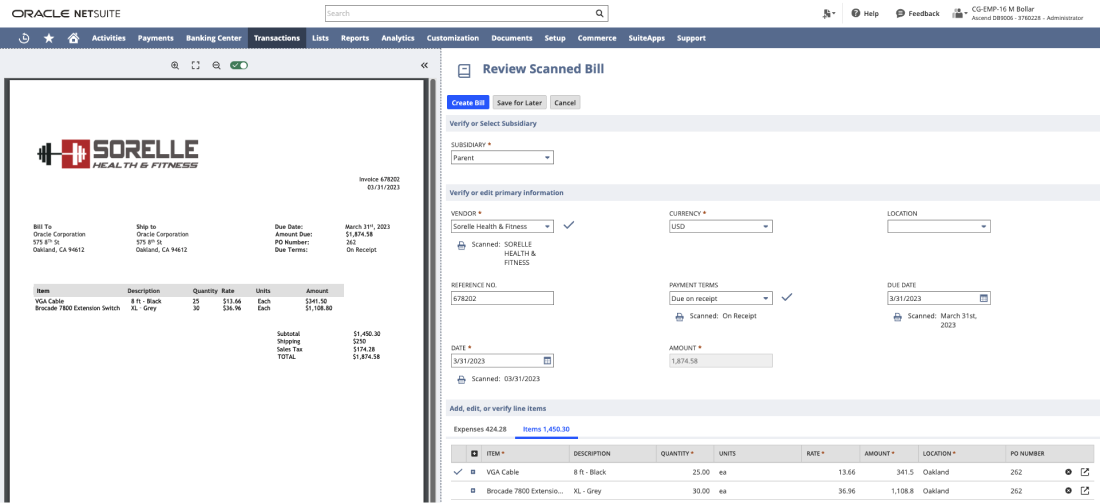
![Manual Invoice Creation in NetSuite: An effective guide [2024]](https://suitepedia.com/wp-content/uploads/2023/11/13-1024x536-1.webp)
Recording Payment: Victory is Yours!
They paid! Hallelujah! Time to record the payment in NetSuite. This is important for keeping your records straight.
Go back to the invoice. Click on the "Receive Payment" button. Enter the amount they paid and the payment method.
If they underpaid, which happens more often than you'd think, you'll have to deal with that. But that's a story for another day.
Unpopular Opinion Time
Here's my unpopular opinion: NetSuite invoices could be simpler. I know, shocking, right? But the process isn't always intuitive.
It's like NetSuite assumes everyone has a PhD in accounting. Which, let's be honest, most of us don't.
But hey, at least you got paid! And now you know (hopefully) how to create another invoice. Go forth and conquer!
Remember, NetSuite is a powerful tool. But it's just a tool. You're the one wielding it. You're the one making the magic happen.
So take a deep breath, embrace the chaos, and get those invoices out! Your bank account will thank you.
Now go make some money. You deserve it!