How To Allocate More Ram To Zomboid
Alright, fellow survivors! Feeling the zombie horde get a little too close for comfort? Is your meticulously crafted base feeling more like a laggy slideshow than a safe haven? Well, chances are your trusty PC is begging for a little extra brainpower, and in Zomboid terms, that brainpower is RAM!
Think of RAM like your character's inventory space. The more they have, the more they can carry without getting encumbered. Same goes for your game! More RAM means your PC can juggle more zombies, bigger maps, and all those sweet, sweet mods without turning into a digital zombie itself. So, how do we give Project Zomboid a bigger backpack?
Why Should I Even Bother?
Good question! Honestly, if you're playing on a tiny map with barely any zombies and no mods, you might not need to. But let's be real, who plays Zomboid like that? We crave the chaos! We want sprawling cities, hordes of thousands, and enough mods to make our game look like a post-apocalyptic fever dream! (Don't judge, we've all been there.)
Must Read
Allocating more RAM can seriously improve your gaming experience. Imagine smoother gameplay, faster loading times, and the ability to finally run that crazy mod that adds drivable tanks! (Yes, that exists. Go look it up!). Trust me, your sanity (and your survivor's life expectancy) will thank you.
The (Relatively) Easy Steps!
Okay, deep breath. This might sound technical, but I promise it's easier than crafting a generator from scratch. (Although, let's be honest, that's not that hard either, right?). We're going to be editing a little text file. Don't panic!

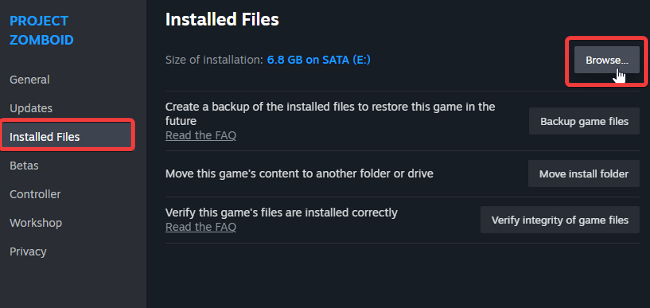
- Find the Magic File: Navigate to your Project Zomboid installation directory. This is usually somewhere like: `C:\Program Files (x86)\Steam\steamapps\common\ProjectZomboid`.
- Search for "ProjectZomboid64.json": You're looking for a file with that exact name. It's like a digital treasure hunt!
- Open with a Text Editor: Right-click the file and choose "Open with" (or "Edit with"). Select a simple text editor like Notepad (Windows) or TextEdit (Mac). Don't use Word! It'll mess things up.
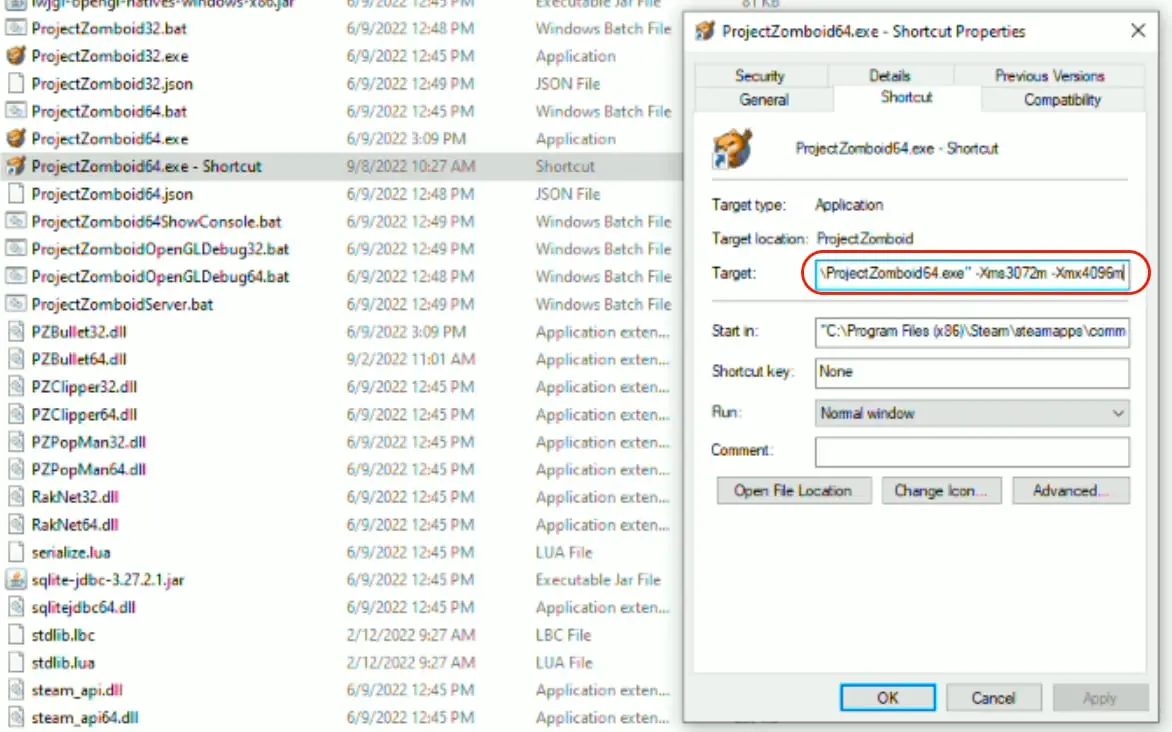
- The Memory Settings: Inside the file, you'll see a line that looks something like this: `"-Xmx2048m"` or `"-Xmx4096m"`. The number after "-Xmx" represents the maximum amount of RAM (in megabytes) that Zomboid can use.
- Changing the Value: This is where the magic happens! Change that number to a higher value, but be careful! Don't allocate more RAM than your PC actually has! Here's a quick guide:
- If you have 8GB of RAM, try setting it to `"-Xmx4096m"`.
- If you have 16GB of RAM, try setting it to `"-Xmx8192m"`.
- If you have 32GB or more (lucky you!), you can experiment with even higher values. `"-Xmx16384m"` might be a good starting point.
Important: Don't go overboard! Leaving some RAM for your operating system and other programs is crucial.
- Save and Launch: Save the changes to the `ProjectZomboid64.json` file, and then launch Project Zomboid. Fingers crossed, you should see a noticeable improvement in performance!
A Few Words of Caution!
While allocating more RAM can be a game-changer, there are a few things to keep in mind:

- Don't Exceed Your Limit: Again, never allocate more RAM to Zomboid than your PC actually has installed. This can lead to crashes and other unpleasantness.
- Monitor Performance: After making changes, keep an eye on your system's performance. Use the Task Manager (Windows) or Activity Monitor (Mac) to see how much RAM is being used.
- Test, Test, Test: Start with a moderate increase and test the game. Gradually increase the allocation until you find the sweet spot where performance is optimal.
Troubleshooting Tips!
If things go wrong (and sometimes they do!), don't panic! Here are a few quick fixes:
- Revert the Changes: If the game crashes after you've changed the RAM allocation, simply open the `ProjectZomboid64.json` file again and revert the value to its original setting.
- Verify Game Files: In Steam, right-click on Project Zomboid, go to "Properties," then "Local Files," and click "Verify Integrity of Game Files." This will check for any corrupted files and replace them.
- Consult the Zomboid Community: The Project Zomboid community is incredibly helpful! If you're stuck, post your problem on the forums or Discord. Someone will likely have the answer.
Remember: If you mess up the ".json" file, you can always delete it and Steam will automatically replace it when you Verify Game Files!
Go Forth and Survive (Smoothly)!
Congratulations! You've successfully (hopefully!) allocated more RAM to Project Zomboid. Now go forth, brave survivor, and conquer the zombie apocalypse with smoother gameplay and fewer lag spikes!
This is just the tip of the iceberg when it comes to optimizing your Zomboid experience. There are countless other tweaks and tricks you can learn to improve performance, customize your gameplay, and generally make your time in Knox Country even more enjoyable. So, don't be afraid to experiment, learn, and share your knowledge with others. The apocalypse is a lot more fun when we're all in it together!
Now, if you'll excuse me, I have a horde to thin out... and a new tank mod to try!