How To Add Second Battery To Car
Ever found yourself staring down a dead car battery, wondering if your life choices somehow led you to this moment? Or maybe you're out camping, trying to run a mini-fridge for your artisanal cheese, and your car's main battery is screaming, "NO MORE!" What if I told you there's a way to unlock a secret level of automotive power, a sort of battery superpower, that lets you run all your gadgets without fear? Welcome, my friend, to the glorious, slightly mad world of adding a second battery to your car!
Think of it. No more panic attacks when your phone charger won't work. No more choosing between a blasting sound system and actually being able to start your car. This isn't just about avoiding a roadside breakdown; it’s about embracing a lifestyle where your car is a mobile power station. A beacon of electricity. A rolling testament to not having to compromise on your caffeine intake during a road trip!
Why Become a Two-Battery Bandit?
So, why would anyone subject themselves to this electrifying endeavor? The short answer: freedom. The longer answer: because your phone isn't the only thing that dies at the worst possible moment. Maybe you're an avid camper who needs to power lights, a portable fridge, or even a tiny espresso machine (don't judge, we've all been there). Perhaps you've got an earth-shattering sound system that draws power like a black hole. Or maybe, just maybe, you're prepping for the zombie apocalypse and need to ensure your ham radio is always juiced up.
Must Read
Your car's main battery, the one under the hood, is built for one thing: giving a huge, short burst of power to start the engine. It's a sprinter, not a marathon runner. What we're talking about here is a deep-cycle battery – a long-distance champion designed to deliver a steady trickle of power over a long time, getting drained and recharged repeatedly without throwing a fit. It's the difference between a pit bull and a golden retriever; both good dogs, but for very different jobs!
Is This Your Destiny? The Self-Assessment
Before you grab your wrenches and dive headfirst into automotive surgery, let's ask the crucial question: Is this really for you? Are you the kind of person who considers "too many gadgets" a personal insult? Do you have an inexplicable urge to connect a disco ball to your car's electrical system? If you answered "yes" to any of those (especially the disco ball), then congratulations, you're a prime candidate! If you just want to charge your phone, a high-quality USB port might suffice, bless your simple heart.
Fair warning: this isn't quite as simple as slapping on a new sticker. There's a bit of wiring, some thinking, and definitely some heavy lifting involved. But fear not, we'll break it down into café-story-level chunks.
The Shopping Spree: Your Arsenal of Awesome
Alright, let's talk gear. This is where you get to pretend you're an electrical engineer for a day. Here’s your shopping list:
1. The Second Battery: As discussed, a deep-cycle battery. Not a regular car starting battery, unless you enjoy replacing batteries more often than socks. Think marine or RV batteries. They come in various sizes, so measure your intended spot first! Don't just eyeball it unless you have superhero vision.
2. The Brains (Battery Isolator/Smart Relay): This is the most critical piece. This magical device ensures that your second battery doesn't drain your main starting battery. It intelligently disconnects the two when the engine is off, meaning you can run your accessories all night long without waking up to a car that's as dead as a disco craze. This is your "set it and forget it" guardian angel.
3. The Veins (Heavy-Gauge Wire): We're talking thick stuff here, like 2- or 4-gauge wire. You're moving serious electricity, so don't skimp. Think python, not spaghetti. You'll need enough to run from your main battery, to the isolator, to your auxiliary battery, and then to your accessories.
4. The Armor (Battery Tray/Box): Your new battery needs a secure home. Batteries are heavy and contain corrosive acid (or are sealed, thankfully, but still heavy!). Secure it tightly so it doesn't try to escape during a sharp turn. Nobody wants a rogue battery rolling around.
5. The Sacrificial Lambs (Fuses!): Crucial! Every major positive wire needs a fuse, especially close to the battery terminals. These are your safety nets, preventing catastrophic short circuits that could turn your car into a very expensive barbecue.
6. The Tools: Wrenches, wire cutters, crimpers, a drill, safety glasses (seriously, wear them!), and maybe a friend who knows what a multimeter is. Or just a friend who can hold the flashlight steady and provide moral support.

The Installation: Let's Get Shockingly Good
Okay, deep breaths. It’s not as scary as it sounds. Here’s the super-simplified, café-chat version:
Step 1: Plan Your Attack (Location, Location, Location!)
Where will your new powerhouse live? Under the hood? In the trunk? In the bed of a truck? Make sure it’s a spot that can handle the weight, is well-ventilated (for some battery types), and isn’t in the way of vital car bits. Measure twice, cut never, just mount!
Step 2: Mount the Battery
Place your second battery in its chosen spot, secured snugly in its tray or box. It should be tighter than a duck in a wetsuit. You don't want it bouncing around like a toddler on a sugar rush.
Step 3: The Isolator's Grand Entrance
Mount your battery isolator somewhere secure and dry. This is where the magic happens. Consult its instructions, because they vary, but generally, one heavy positive wire goes from your main battery to the isolator, and another heavy positive wire goes from the isolator to your new auxiliary battery.

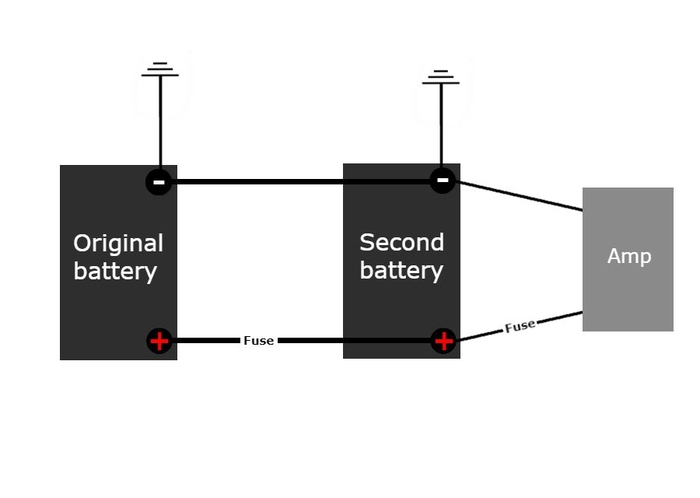
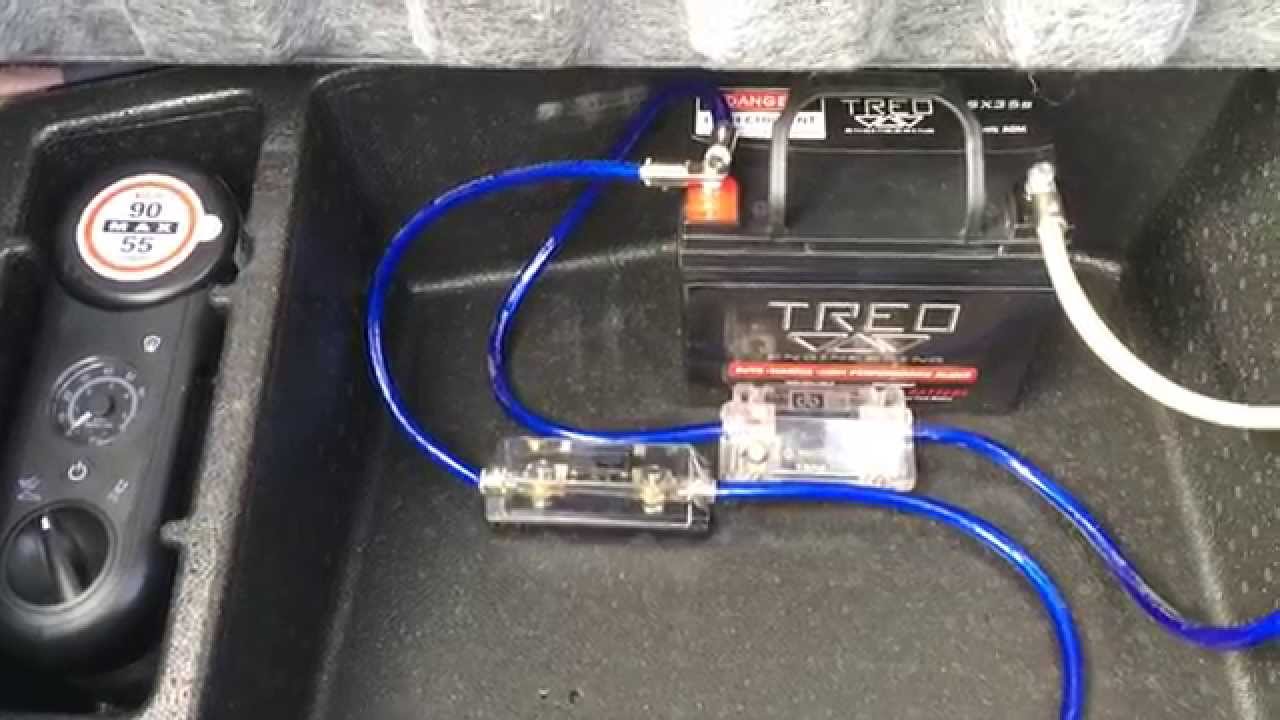
Step 4: The Wiring Web (With Fuses!)
Now, run those thick positive wires. Remember, a fuse must be placed as close to each battery's positive terminal as possible. Connect the main battery's positive to the isolator's input. Connect the isolator's output to the auxiliary battery's positive. Then, connect both battery's negative terminals to a good ground point on the car's chassis. Finally, connect your new accessories (fridge, lights, zombie-zapper) to the auxiliary battery's positive terminal (again, with a fuse!).
Pro-Tip: Always disconnect your main battery's negative terminal before doing any wiring. It's like turning off the water main before fixing a leaky faucet – saves you from a shocking surprise!
Step 5: The Moment of Truth (Testing)
Reconnect your main battery. Start your car. The isolator should connect the batteries, charging your new power pack. Turn the car off. The isolator should disconnect them. Now, power up one of your new accessories. If it works, and your main battery still starts the car, congratulations! You've successfully performed electrical wizardry!
A Few Sparks of Wisdom (aka Warnings)
- Safety First: Wear those safety glasses. Seriously. Battery acid is no joke.
- Don't Be a Hero: If any part of this feels too complicated, too shocking, or just plain wrong, call a professional. A miswired battery system can be dangerous, potentially frying your car's electronics or worse.
- Alternator Awareness: Your car's alternator charges your batteries. If you add a huge battery bank and lots of power-hungry accessories, you might be overworking your alternator. It's a rare issue for a single auxiliary battery, but something to keep in mind for extreme setups.
So there you have it. You're no longer at the mercy of a single battery. You've become a two-battery titan, a dual-power deity, ready to tackle road trips, camping excursions, or just a particularly long wait in the car pickup line with an endless supply of device-charging, music-blasting, and fridge-running glory. Go forth and electrify, my friend! Your car (and your gadgets) will thank you.