How Is A 50 Amp Rv Plug Wired

Ever wondered about the magical portal that brings all the comforts of home into your RV? That mighty 50 amp RV plug is often the unsung hero, powering everything from your AC to your microwave. Understanding how it's wired might sound like a job for an electrical wizard, but trust us, it's a surprisingly accessible and incredibly useful bit of knowledge for any RV enthusiast! Diving into this topic isn't just about wires; it's about unlocking a new level of self-sufficiency, ensuring your adventures are always powered up, and frankly, it's a fantastic feeling to truly understand your rig.
So, who benefits from knowing the ins and outs of a 50 amp RV plug? Well, pretty much everyone on the open road! For beginners, it demystifies a critical part of RV ownership, boosting confidence and making you less reliant on others. You'll understand why your AC runs so smoothly or why that breaker tripped. Families will appreciate the peace of mind that comes from knowing their mobile home is safely and properly powered, keeping all those devices charged and meals cooking. And for the eager DIY hobbyist, it’s a chance to save a few bucks, tackle a practical project, and gain immense satisfaction from doing it yourself, whether it's installing a new home RV outlet or replacing a worn-out plug.
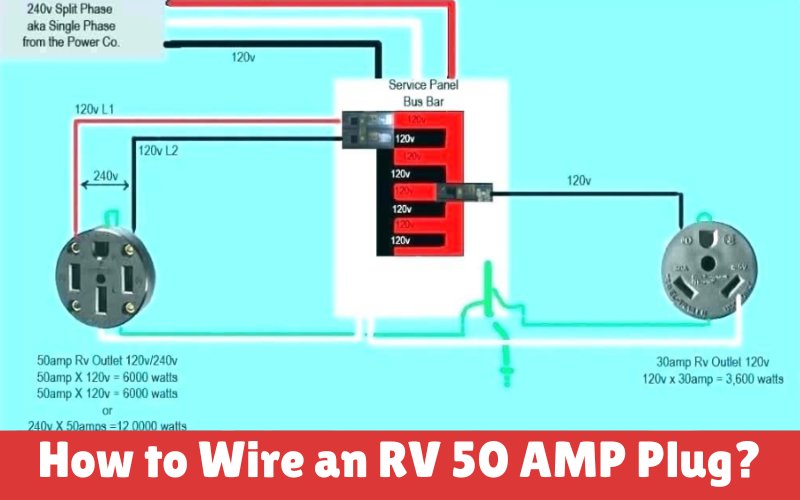
When we talk about a 50 amp RV plug, we're typically referring to a NEMA 14-50, which is distinctive for its four prongs. This is what you'll see on the end of a heavy-duty RV power cord or on a pedestal at a campsite. Unlike its smaller 30 amp cousin (which only has three prongs and offers less power), the 50 amp system delivers a robust 240 volts of power (split into two 120-volt lines), perfect for running multiple appliances simultaneously. You might encounter this setup in a few scenarios: perhaps you're planning to install a dedicated RV outlet at your house for easy pre-trip charging, or maybe you need to replace a damaged plug on your existing RV shore power cord. In each case, the underlying wiring principles remain the same.
Must Read
Ready to get started? Here are some simple, practical tips. First and foremost: safety first! Before touching any wires, always, always, always turn off the power at the breaker. This is non-negotiable. You'll need some basic tools: a screwdriver, wire strippers, and perhaps a multimeter to confirm power is off. Now for the magic of color codes: In a 50 amp setup, you'll typically see four wires. The Black and Red wires are your "hot" wires, each carrying 120 volts. The White wire is your "neutral," completing the circuit, and the Green wire (or bare copper) is your all-important "ground," a safety net against electrical faults. Most plugs and receptacles will have clear labels inside for each wire connection (X, Y, W, G). Just match the colors to the correct terminals, ensuring each connection is tight and secure. If you ever feel uncertain or out of your depth, don't hesitate to call a qualified electrician – your safety is paramount!
In conclusion, understanding how a 50 amp RV plug is wired is more than just a technical detail; it’s an empowering piece of knowledge that enhances your RV experience. It brings confidence, convenience, and a deeper appreciation for the intricate systems that make your adventures possible. So, go ahead, peel back the layers of mystery, and enjoy the satisfaction of being truly plugged into your RV lifestyle!