How Do You Test Tensile Strength

So, you wanna know how we figure out just how strong stuff is, right? Like, not just "oh, that feels strong," but with actual numbers and science-y bits. Specifically, how do you test something's tensile strength? It sounds super fancy, but honestly, it boils down to a pretty straightforward idea: you pull it until it breaks. Yep, that's the gist!
Imagine you're having a tug-of-war with, say, a piece of rubber band. You pull, and pull, and pull... eventually, it snaps, right? Tensile strength testing is basically that, but with a lot more precision, a much bigger machine, and hopefully, less chance of someone losing an eyebrow.
What Are We Even Talking About?
First off, what is tensile strength? Think of it as a material's ultimate refusal to be pulled apart. It's the maximum stress a material can handle before it goes, "Nope, I'm out!" and fractures. Why do we care? Well, if you're building a bridge, a car part, or even just a really good shoelace, you kinda need to know it won't just suddenly give up the ghost when put under strain. Disaster averted, thanks to science!
Must Read
It’s about making sure things are safe and reliable. Nobody wants their roller coaster breaking mid-loop because someone skipped the tensile strength test, right? Shudder.
Enter the Big Bad Machine!
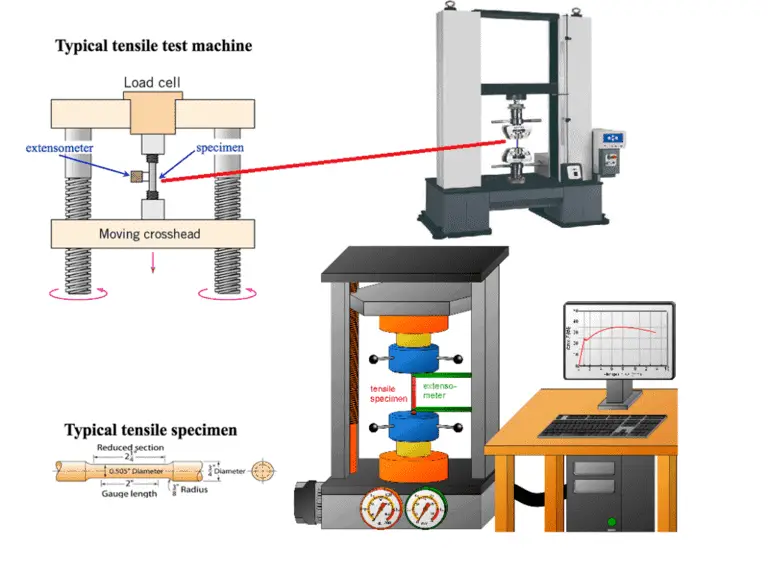
Okay, so you're not just grabbing materials with your bare hands (unless you're testing paper towels, maybe). For serious stuff, we use what's called a Universal Testing Machine, or UTM for short. Sounds impressive, huh? It's basically a giant, super-precise pulling and pushing machine. It looks a bit like a sturdy desk with two big arms that can move up and down, clamping onto things.

These machines are pretty clever. They don't just pull; they also measure exactly how much force they're applying and how much the material is stretching. It's like having a really strong robot friend who's also a meticulous note-taker.
The Ritual of the Test Piece
You can't just grab any old chunk of metal or plastic. Oh no. The sample itself has to be very specific. We're talking meticulously machined specimens, often shaped like a dog bone. Seriously, a dog bone! Why?
This specific shape ensures that when you pull it, the stress concentrates in the middle, thinner section. This way, we know exactly where it's going to break and we get consistent, comparable results every single time. It's all about fairness in testing! You wouldn't test the strength of a chain by pulling one of its thickest links, would you? You'd go for the weakest. Same principle.
Let the Pulling Begin!
Alright, specimen's ready, machine's warmed up (not really, but you get the vibe).
- Clamping Time: First, the "dog bone" specimen is carefully loaded into the UTM. Big, strong grips clamp onto each end of the thicker parts of the sample. These grips are designed to hold on tight, without damaging the test area itself. You don't want it slipping out early, that's just cheating!
- Slow and Steady: The machine then starts to pull the sample apart at a very specific and controlled rate. This isn't a sudden yank; it's a gradual, increasing tension. Think of it like stretching a really tough piece of chewing gum. You're watching it elongate, but also feeling the resistance build.
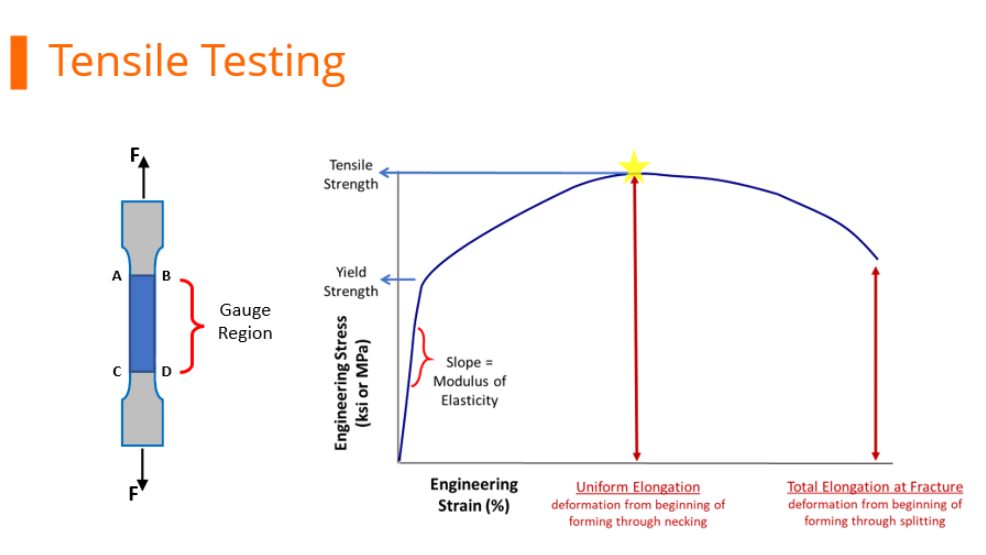
- Measuring Everything: As it pulls, sensors are constantly recording two crucial things: the load (how much force is being applied) and the displacement (how much the sample is stretching). It’s all fed into a computer, usually drawing a super important graph in real-time. This graph, my friend, is where all the magic numbers come from.
- The Big Moment (The Break!): The force builds, the material stretches and stretches... it might even get a little narrower in the middle (that's called necking, super cool to watch!). Eventually, it reaches its absolute limit. There's a peak on that graph, the highest point of resistance it could offer, and then... POP! or sometimes a more dramatic CRACK! The material fractures. The test is over.
What Do We Learn From the Breakup?
It's not just about the final snap! The data from the entire pulling process gives us a treasure trove of information:
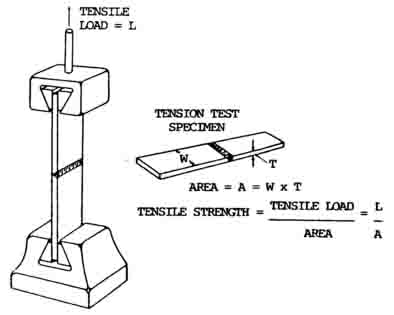
- Ultimate Tensile Strength (UTS): This is the peak force it resisted before breaking. The big kahuna number!
- Yield Strength: Before it breaks, there's a point where the material stops being able to spring back to its original shape. It starts deforming permanently. That's the yield point, and knowing it is crucial for design, especially for things that shouldn't bend too much.
- Elongation: How much did it stretch before it broke? This tells us about its ductility – how much it can deform without fracturing. Some materials stretch a lot (like copper), others, not so much (like ceramics).
- Modulus of Elasticity: How stiff is it? This is another key property for engineers.
Why Bother with All This Pulling and Breaking?
Honestly, it's about safety, reliability, and innovation. Engineers use these numbers to choose the right materials for everything from airplane wings to the tiny components in your phone. They design buildings that won't crumble, cars that can withstand impacts, and even medical implants that won't fail inside you.
So next time you're using something, anything, just remember there's a good chance it's been pulled until it broke, all in the name of making it better and safer for you. Pretty neat, right? And that, my friend, is how you test tensile strength – with a lot of pulling, precise measuring, and a dog-bone-shaped sample!