Carbon Monoxide Detector Installation Near Me
Ever kicked back on the sofa, a warm drink in hand, just soaking in that unbeatable feeling of being home? It’s a sanctuary, isn't it? A place where you can truly relax, unwind, and feel utterly safe. But sometimes, even in our most cherished spaces, there's an unseen, unheard guest that can quietly crash the party: Carbon Monoxide (CO).
Don't worry, this isn't a scare-tactics deep dive. Think of it more as a friendly chat about how to keep your haven, well, heavenly. Installing a CO detector is one of those wonderfully simple, yet profoundly impactful, things you can do for your peace of mind and the safety of everyone under your roof. Let's peel back the mystery and make it feel as easy as it should be.
What's the Deal with CO? The Invisible Intruder
So, what exactly is Carbon Monoxide? Picture this: it’s a gas that’s invisible, odorless, and tasteless. Pretty sneaky, right? It’s often dubbed the "silent killer" because you can't detect it with your senses. CO is produced when fuels — like natural gas, propane, oil, wood, kerosene, or charcoal — don't burn completely.
Must Read
Common culprits in our homes? Think about your furnace, gas stove, water heater, fireplace, or even a barbecue grill used improperly indoors. Even your car's exhaust in an attached garage can be a source. Symptoms of CO poisoning can easily be mistaken for the flu: headaches, dizziness, nausea, and fatigue. Not exactly what you want when you’re just trying to enjoy a cozy evening!
Where to Place Your Peace of Mind: Location, Location, Location!
This is where the magic happens. Getting your CO detector in the right spot is key to its effectiveness. Think of it like setting up a trusty guardian for your home. Here are the golden rules:
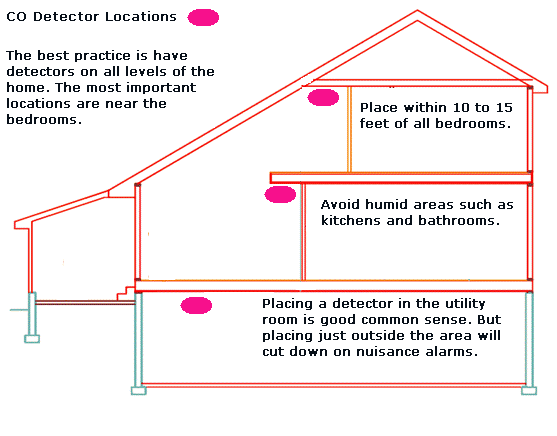
Near Sleeping Areas: This is priority number one. CO levels can rise while you're asleep, making detection crucial when you're most vulnerable. Aim for one inside or just outside each sleeping area.
On Every Level: If you live in a multi-story home, ensure you have a detector on every single level, including the basement. CO mixes evenly with air, so having coverage throughout your home is essential.

Carbon monoxide detector installation notice(pdf file) Near Fuel-Burning Appliances: It’s a smart move to have a detector within about 10-15 feet of your furnace, water heater, or any other major fuel-burning appliance. This gives you an early warning if there's an issue right at the source.
Avoid the "No-Go Zones": Keep detectors away from direct sunlight, vents, windows, and doors, as these can interfere with their operation. Also, avoid placing them in extremely dusty or humid areas like bathrooms or directly above a stove.
Many detectors can be mounted on a wall or simply plugged into an outlet. For wall mounts, a good rule of thumb is at least chest height or higher, but always check your specific detector's instructions – they know best!
Installation? Easier Than You Think!
Honestly, installing a CO detector is often simpler than assembling flat-pack furniture. Most are incredibly DIY-friendly. Here’s the quick rundown:
1. Read the Manual: Yes, really! Each model is a little different, and the manufacturer's instructions are your best friend for optimal placement and setup.
2. Choose Your Type: You'll find battery-powered, plug-in, and hardwired options. Battery-powered ones offer flexibility, plug-ins are super easy, and hardwired detectors provide continuous power (often with battery backup). Many people opt for combination smoke and CO detectors – two birds, one stone!
3. Mount or Plug-In: If it's a plug-in, just find an accessible outlet in a safe location. For wall-mounted units, a few screws are usually all it takes. Most come with templates for easy drilling.
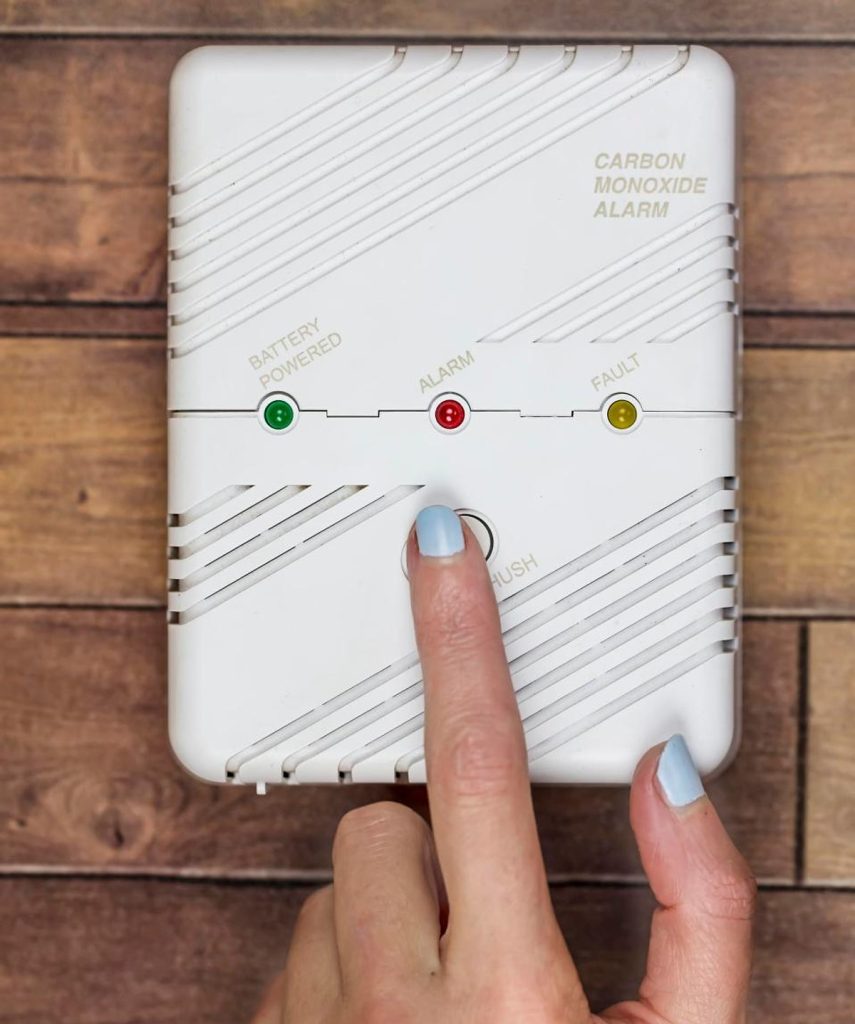
4. Test It Out: Once installed, press the "test" button. You'll hear a loud alarm – this is a good thing! It confirms the unit is working properly. Just be prepared for the sound!

That’s it! Seriously. You’ve just leveled up your home safety game with minimal effort.
Keeping Your Silent Guardian Vigilant: Maintenance Matters
Your CO detector is a loyal protector, but even guardians need a little TLC. Here's how to keep it in tip-top shape:
Test Monthly: Make it a routine. Pick a date each month or tie it to something memorable, like the first Sunday of the month.
Change Batteries Bi-Annually: A great trick is to replace batteries when you change your clocks for Daylight Saving Time. Out with the old, in with the new!
Carbon Monoxide Detector Installation | All-Star Heating And Air Know the Expiration Date: Did you know CO detectors have a lifespan? Typically 5-7 years. After that, their sensors can become less reliable. There's usually a "replace by" date on the back of the unit. Mark it on your calendar!
Keep it Clean: A quick, gentle vacuum over the detector vents can help prevent dust buildup from interfering with its sensors.
A Small Step, A Big Difference
In our busy lives, it's easy to overlook these seemingly small tasks. But installing and maintaining a Carbon Monoxide detector is one of the most proactive, loving things you can do for your household. It's not just a gadget; it's a promise of safety, a silent guardian that allows you to truly relax and enjoy your home.
So go ahead, take a moment this week to check your detectors or pick one up if you don’t have them. Then, go back to sipping your coffee, curling up with a book, or simply enjoying the quiet hum of your happy home, knowing you’ve got one less thing to worry about. Because a safe home is truly the sweetest home.