Can You Install Nest Thermostat Yourself

Ever gazed at those sleek, futuristic Nest thermostats and wondered if installing one yourself was a pipe dream or a doable weekend project? Well, good news, fellow curious homeowner! This isn't some complex brain surgery; it's a surprisingly accessible venture that many everyday folks are tackling with great success. The appeal is huge: a smarter, more energy-efficient home at your fingertips, and the undeniable satisfaction of saying, "Yep, I did that!" It’s a popular topic because smart home tech feels both excitingly advanced and incredibly practical, making DIY installation a fantastic blend of saving money, learning new skills, and upgrading your living space.
So, who benefits most from diving into this DIY adventure? For beginners, it's an ideal first step into home improvement. The instructions are famously clear, and the tools required are minimal. You'll gain a huge confidence boost and a taste for tackling other small projects around the house. For families, the benefits are even more tangible: significant savings on energy bills, a more comfortable living environment (no more adjusting the thermostat manually!), and the sheer convenience of controlling your home's temperature from your phone. Plus, imagine the bragging rights to the kids! Even hobbyists or tech enthusiasts will find a neat little project here, appreciating the elegant engineering and the seamless integration into a broader smart home ecosystem. It's about empowering yourself to manage your home's comfort and efficiency.
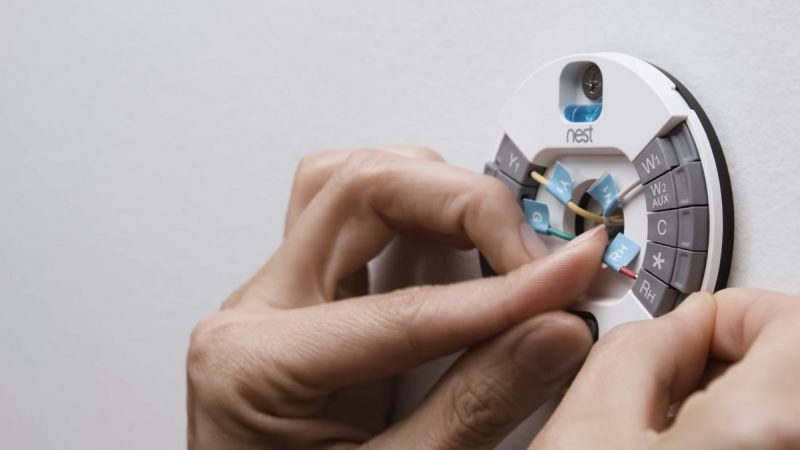
While the core process is straightforward, it's good to know there can be slight variations. Nest offers a couple of popular models, like the Nest Thermostat E and the Nest Learning Thermostat, each with minor differences in features and sometimes, installation nuances. Your existing wiring configuration is the biggest variable; some older homes might have simpler two-wire systems, while newer homes or more complex HVAC setups could involve multiple wires, including a "C-wire" (common wire) for continuous power. Don't fret, though! Nest's superb guidance is designed to walk you through these different scenarios, often with dedicated labels for each wire type. The beauty is that the Nest app itself acts as your personal installation assistant, providing tailored instructions based on your specific situation.
Must Read
Ready to give it a whirl? Here are some simple, practical tips to get you started on the right foot. First and foremost, before you buy anything, use Nest's online compatibility checker to ensure your HVAC system is a match. It’s quick and crucial! Next, gather your tools: usually just a screwdriver (often included), maybe some pliers, and a small level. Then, and this is perhaps the most important safety step, go to your electrical panel and turn off the power to your heating and cooling system. Seriously, don't skip this. Before disconnecting any wires from your old thermostat, take a clear picture of how everything is wired. This photo will be your best friend if you get confused. Finally, take your time, follow Nest's step-by-step instructions (they're really good!), and don't be afraid to consult their support resources if you hit a snag.
Installing a Nest thermostat yourself isn't just about saving a few bucks on installation fees; it's about the satisfaction of a job well done, the newfound understanding of your home's systems, and the daily convenience and energy savings that follow. You'll love coming home to a perfectly comfortable house, knowing you made it happen. It's a genuinely rewarding experience that adds both practical value and a little dash of tech-savvy enjoyment to your everyday life. Go on, you totally can do it!
:max_bytes(150000):strip_icc()/Nest_Install04-203ef7416adc4721804649bbe080389d.jpg)