Alright, settle in, grab another sip of your (presumably iced) coffee, because today we’re talking about a project that sounds daunting but is actually, dare I say, almost fun: installing an attic fan. You know, that magical device that promises to turn your attic from a literal hellish inferno into something merely... well, still hot, but at least not actively trying to melt your brain.
Picture this: it’s the peak of summer. Your air conditioner is working harder than a one-legged man in a butt-kicking contest, and yet your upstairs still feels like a sauna designed by Satan himself. The culprit? Your attic. That neglected space above your head acts like a giant, heat-trapping blanket, radiating warmth down into your living areas. An attic fan? It’s basically a giant exhaust fan for your roof, sucking out that superheated air and pulling in cooler air from outside. The result? A house that feels significantly less like the surface of the sun. Plus, it can actually lower your energy bills – a nice little bonus, right?
First Things First: Safety (and not becoming a meme)
Before we dive into cutting holes in your roof (don’t worry, it’s less terrifying than it sounds), let’s talk safety. This isn’t rocket science, but it does involve heights, sharp objects, and electricity. So, please, please, for the love of all that is cool and comfortable, make sure you:
- Turn off the power! Seriously. Find the circuit breaker for your attic or, even better, the main breaker for your entire house. A little shock might be a funny story later, but a big shock is... less funny.
- Wear appropriate gear. Gloves, safety glasses, long sleeves, and a hat. Attics are dusty, full of insulation (which is itchy!), and often home to delightful creatures like spiders and dust bunnies the size of small dogs.
- Watch your step. Attics are notorious for hidden perils. Stick to the joists! One wrong step and you'll be giving your ceiling a surprise new skylight (and probably an expensive repair bill).
Gathering Your Arsenal: The Tools of the Trade
Think of yourself as a weekend warrior preparing for battle against oppressive heat. You'll need some trusty companions:
- The Fan Kit: Obviously! Make sure it’s rated for your attic size.
- Power Drill: Your best friend for fastening.
- Jigsaw or Reciprocating Saw: For the main event: cutting the hole.
- Utility Knife: Handy for insulation and whatnot.
- Tape Measure & Pencil: Precision is key (or at least, close enough).
- Caulking Gun & Exterior-Grade Caulk: To seal things up nice and tight.
- Roofing Cement & Roofing Nails: For securing flashing.
- Wire Strippers & Electrical Pliers: For the zappy bits.
- Ladder: For attic access and rooftop shenanigans.
- Dust Mask: Because breathing insulation dust is not on anyone's fun list.
- A Buddy (Optional but Recommended): For holding things, moral support, and calling 911 if you get stuck upside down.
The Great Attic Expedition: Finding Your Spot
First, you need to actually get into your attic. This can be an adventure in itself, often involving pull-down ladders, tight squeezes, and a deep breath before plunging into the unknown. Once inside, you'll need to choose the fan’s location. You want it relatively central, or towards the highest point of your attic space. Look for an area that’s clear of rafters, wiring, and plumbing. Imagine placing it so it has a straight shot to exhaust air out through your roof. Avoid placing it directly over your head where you like to sleep; these things aren't silent!
Now, for the thrilling part: marking the cut. Use the fan's template (or the fan itself if it comes with one) to trace the exact circle on your attic floor, between two joists. This is where your measuring skills really shine. Measure twice, cut once, and then stare at it nervously for a few minutes before cutting.
The Moment of Truth: Cutting the Hole
Okay, deep breaths. This is where things get exciting. Or terrifying. Depending on your DIY confidence level. Start by drilling a pilot hole inside your marked circle. Then, from the attic, you'll use your jigsaw or reciprocating saw to carefully cut along the traced line. Expect a shower of dust, insulation bits, and maybe a few choice words if the saw snags. You're creating a window to the outside world, so make it neat, but don't obsess. Once the hole is cut, you'll likely need to clean up any dangling insulation around the edges.
Wiring Wizardry: Don't Become Part of the Circuit
This is arguably the trickiest part for some. Your fan needs power! You'll need to run an electrical cable from a power source (like an existing light fixture or a dedicated circuit) to the fan. This usually involves fishing wires through joists and connecting them according to the fan's instructions. Most attic fans come with a thermostat, which is brilliant – it turns the fan on automatically when the attic hits a certain temperature (e.g., 90-100 degrees Fahrenheit) and off when it cools down. Make sure all connections are secure and covered with wire nuts. If electricity makes your brain feel like scrambled eggs, or you're unsure at all, please, please, hire a qualified electrician. There's no shame in calling in a pro to keep your house from becoming a giant toast oven.
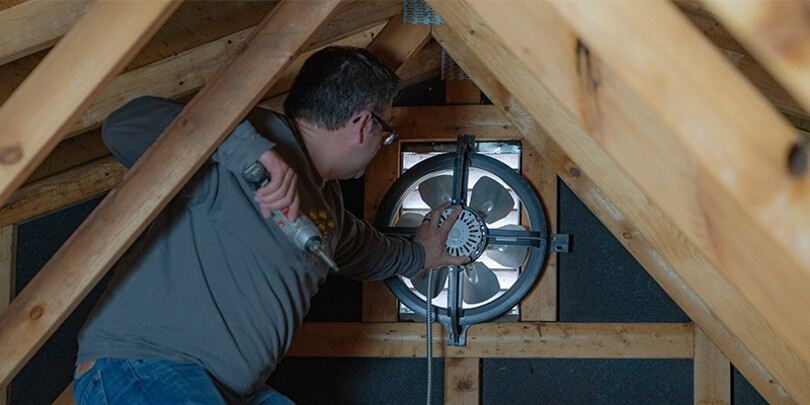
Mounting the Beast: Securing Your Investment
Now that your hole is cut and your wires are ready, it's time to install the fan unit itself. Depending on your fan, you'll either mount it directly into the hole or secure a flashing plate to your roof, through which the fan will sit. Use the provided screws and hardware to secure the fan firmly to your roof decking or rafters. Make sure it's snug – you don't want it rattling like a phantom poltergeist every time it turns on. Apply generous amounts of roofing cement and caulk around the flashing to ensure a watertight seal. We're installing a fan, not a new leak point, right?
The Grand Finale: Power On and Chill Out!
With everything securely mounted and wired, it's time for the big reveal! Head back to your circuit breaker, flip the power back on, and wait. If your attic is hot enough, the fan should kick in with a satisfying hum. Go outside and look at your roof – you should see the fan spinning and feel warm air being pushed out. Congratulations! You just wrestled an attic into submission and made your home a much more pleasant place to be.
So, there you have it. Installing an attic fan: a project that might involve a little sweat (ironically), a little dust, and maybe a few moments of "what have I done?!" panic, but ultimately leads to a cooler home and the undeniable pride of a DIY victory. Now, go enjoy that newfound comfort. You've earned it!


