Hey there, friend! Grab a coffee, let's chat about something probably a little less glamorous than your usual weekend plans: cleaning those pesky ducts in your house. Yeah, I know, not exactly "Netflix and Chill," right? But trust me, once you peek into those dusty caverns, you'll understand why this chat is totally worth it.
You know that feeling when you've just dusted every surface, and an hour later, there's a *new* layer? Or maybe your allergies are doing the cha-cha slide all year long? Or, heaven forbid, you get a whiff of something a bit… stale when your AC kicks on? Yup, your air ducts are probably giving you the side-eye. They're like the unsung heroes (or villains, depending on how you look at it) of your home's air quality. And guess what? They get filthy.
Why Bother Cleaning Ducts? Is It Even a Big Deal?
Oh, honey, it's a *huge* deal! Imagine a highway system in your house, but instead of cars, it's transporting air – the very air you breathe! Now imagine that highway is covered in grime, pet hair, dust mites, pollen, mold spores (eek!), and who knows what else. Every time your HVAC system kicks in, all that lovely stuff gets blasted right into your living space. Sounds delightful, right? Not!
Cleaning your ducts can lead to better air quality (hello, less sneezing!), a potentially more efficient HVAC system (which means happier energy bills – who doesn't want that?), and a generally fresher-smelling home. Plus, there’s just something satisfying about knowing you've tackled a genuinely grimy job, isn't there?
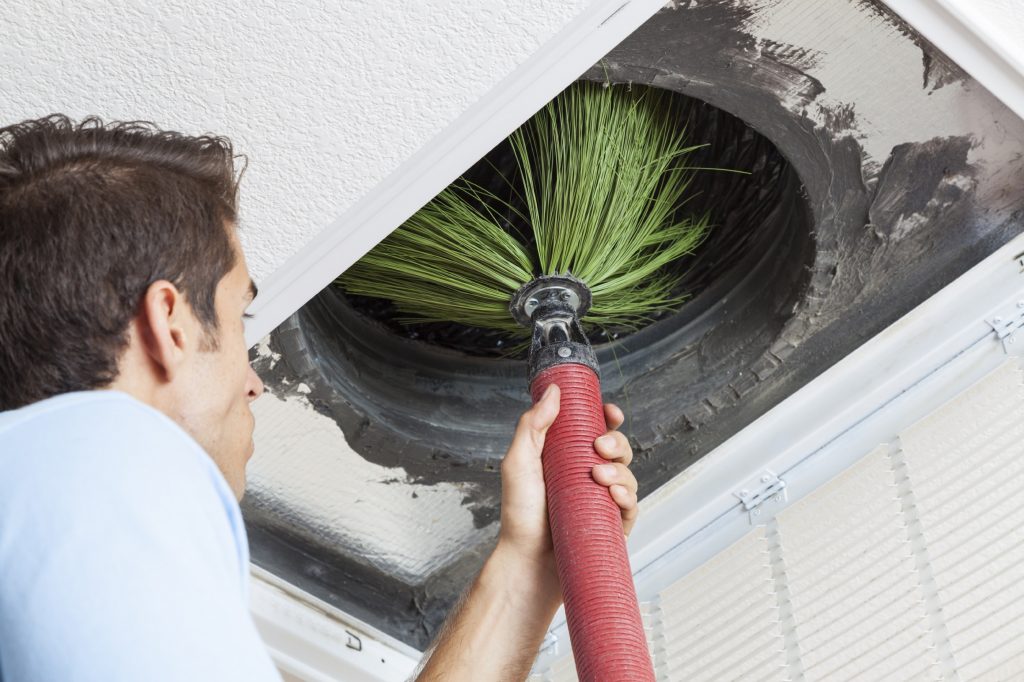
DIY or Call the Pros? The Age-Old Question!
Okay, real talk: A *deep, whole-system* duct cleaning is usually best left to the professionals. They have these fancy, super-powerful vacuums and brushes that go all the way through your system. But for a good, satisfying "I'm making a difference!" clean, you can absolutely do some DIY. Think of it as a really thorough spring cleaning for your air channels. It won't get *everything*, but it'll definitely make a dent.
Ready to roll up your sleeves? Let's dive in!
Your DIY Duct Cleaning Arsenal (A.K.A. What You'll Need)
Before you go spelunking into your ventilation system, gather your gear. You'll want:
- A shop vac with a long hose attachment (this is your MVP!).
- A sturdy brush – a long-handled bottle brush or a dryer vent brush works wonders.
- A screwdriver (to remove vent covers).
- Gloves (trust me, you'll thank me).
- A good quality dust mask or respirator (you don't want to breathe all that stirred-up gunk).
- A flashlight (it's dark in there!).
- Some damp cloths for wiping down vent covers.
- And maybe some upbeat music? It helps, honestly!
Step 1: Safety First, Always!
This is probably the most important step: Turn off your HVAC system! Go to your thermostat and set it to "off." You absolutely do not want the fan kicking on while you're elbow-deep in a vent. Imagine the dust storm! Or worse, a surprise blast of air. Not fun.
Step 2: Tackle Those Registers & Vents
Start with the registers and vents you can easily reach. These are the grilles you see on your walls, floors, or ceilings. Using your screwdriver, carefully remove the screws holding them in place. Once removed, take them outside (if possible) and give them a good scrub with warm soapy water, or at least wipe them down thoroughly with a damp cloth. You’ll be surprised at how much crud accumulates on these!
Now, with the vent cover off, grab your flashlight and peek inside. See all that dust? Yuck! Use your shop vac's hose to reach as far as you can into the duct. Suck up all the loose debris. Then, take your long brush and dislodge anything stuck to the sides. Follow up again with the shop vac. Work your way around the house, hitting every single register. Don't forget the return air vents – those are often the dirtiest, as they pull air *into* the system.
Step 3: What About the Main Ducts?
This is where DIY gets a bit trickier. If you can access your main ducts (sometimes in a basement or attic), you can try to vacuum as far as your shop vac hose allows. Be gentle! The goal here is just to remove superficial dust. For anything deeper or harder to reach, that's definitely pro territory. Remember, you're doing a "good enough" job, not a commercial-grade overhaul.
Step 4: The Crucial Grand Finale: Change Your Filter!
You’ve just stirred up a whole lot of dust, even if you vacuumed diligently. Your HVAC filter is about to work overtime. So, once you're done with all your duct-cleaning efforts, immediately replace your old filter with a brand-new one. This will catch any remaining airborne particles and ensure your freshly "cleaned" system starts with the freshest possible air intake.
When to Definitely Call in the Big Guns (Professionals)
As I mentioned, DIY is great for maintenance, but some situations demand a pro. If you:
- See visible mold growth (that's a job for experts!).
- Notice evidence of rodent or insect infestation (hello, nightmare fuel!).
- Have exceptionally severe allergies and need the *deepest* clean possible.
- Simply look at your ducts and think, "Nope, too much," and that's totally okay too!
Breathe Easy, My Friend!
So there you have it! A little weekend warrior action can go a long way in making your home feel cleaner and your air feel fresher. It’s not the most glamorous chore, but taking care of your ducts is a huge step toward a healthier home environment. Now, go grab that dust mask and get to it! You've got this, and a cleaner, fresher home awaits. Cheers to that!