Welding Amps And Volts Chart
Ever stared at your welding machine, seen those dials for amps and volts, and felt a tiny shiver of panic? Like you're about to launch a rocket, but you're not even sure which button makes the coffee? Well, my friend, you're not alone! It might seem like a dark art, but getting your welding amps and volts sorted is actually way less scary than trying to assemble IKEA furniture with missing instructions.
Think of it as finding the sweet spot for your metal-melting symphony. It’s all about balance, and once you get the hang of it, you’ll be laying down beads that look like perfect stacks of shiny, metallic dimes. Or at least, not like chewed-up bubblegum. We're aiming for progress, not immediate perfection, right?
What's the Big Deal with Amps and Volts?
Okay, let's break it down without needing a physics degree. Imagine your welding machine is a super-powered garden hose. (Stick with me here, it's a fun analogy!)
Must Read
Amps (Amperage) are like the water pressure. They control how much "oomph" you're pushing into your weld. More amps mean more heat, more penetration into your base metal. Too little, and you're just tickling the metal; too much, and you're blowing holes faster than a squirrel with a nut addiction.
Volts (Voltage) are like the nozzle setting on that hose. They dictate the length and width of your arc, basically how "spread out" or "focused" your weld puddle is. Too high, and your arc gets wild and erratic, like a dog chasing its tail. Too low, and it’s sputter city, no good for anyone.

Amps: The Heat Boss!
When you hear "amps," think heat and penetration. This is your primary control for melting power. Working with thicker metal? You'll need to crank up those amps to get good fusion. Thin sheet metal? Go easy, or you'll be creating more holes than actual welds. It’s a delicate dance, like trying to toast a marshmallow perfectly – not burnt, not raw, just golden and gooey.
Most welding processes, especially MIG and TIG, are pretty sensitive to amperage. Too few amps and your weld won't penetrate; too many, and you risk burn-through, especially on thinner materials. It's like adjusting the volume on your favorite song – you want it just right, not too quiet, not blowing out your speakers!
Volts: The Arc's Personality!
Now for the volts. These guys are responsible for the arc length and bead profile. Think of voltage as setting the "mood" for your arc. A higher voltage gives you a longer, wider, flatter arc, which can lead to a flatter, wider bead. A lower voltage means a shorter, more concentrated arc, perfect for a narrower, often "ropier" bead profile.
If your voltage is off, your weld can look pretty sad. Too high? Your arc will wander and sputter, creating a messy, inconsistent bead. Too low? Your wire might stub into the plate constantly, sounding like a disgruntled chicken pecking at a tin roof. You want that smooth, consistent "sizzle," not a random crackle-pop concerto.
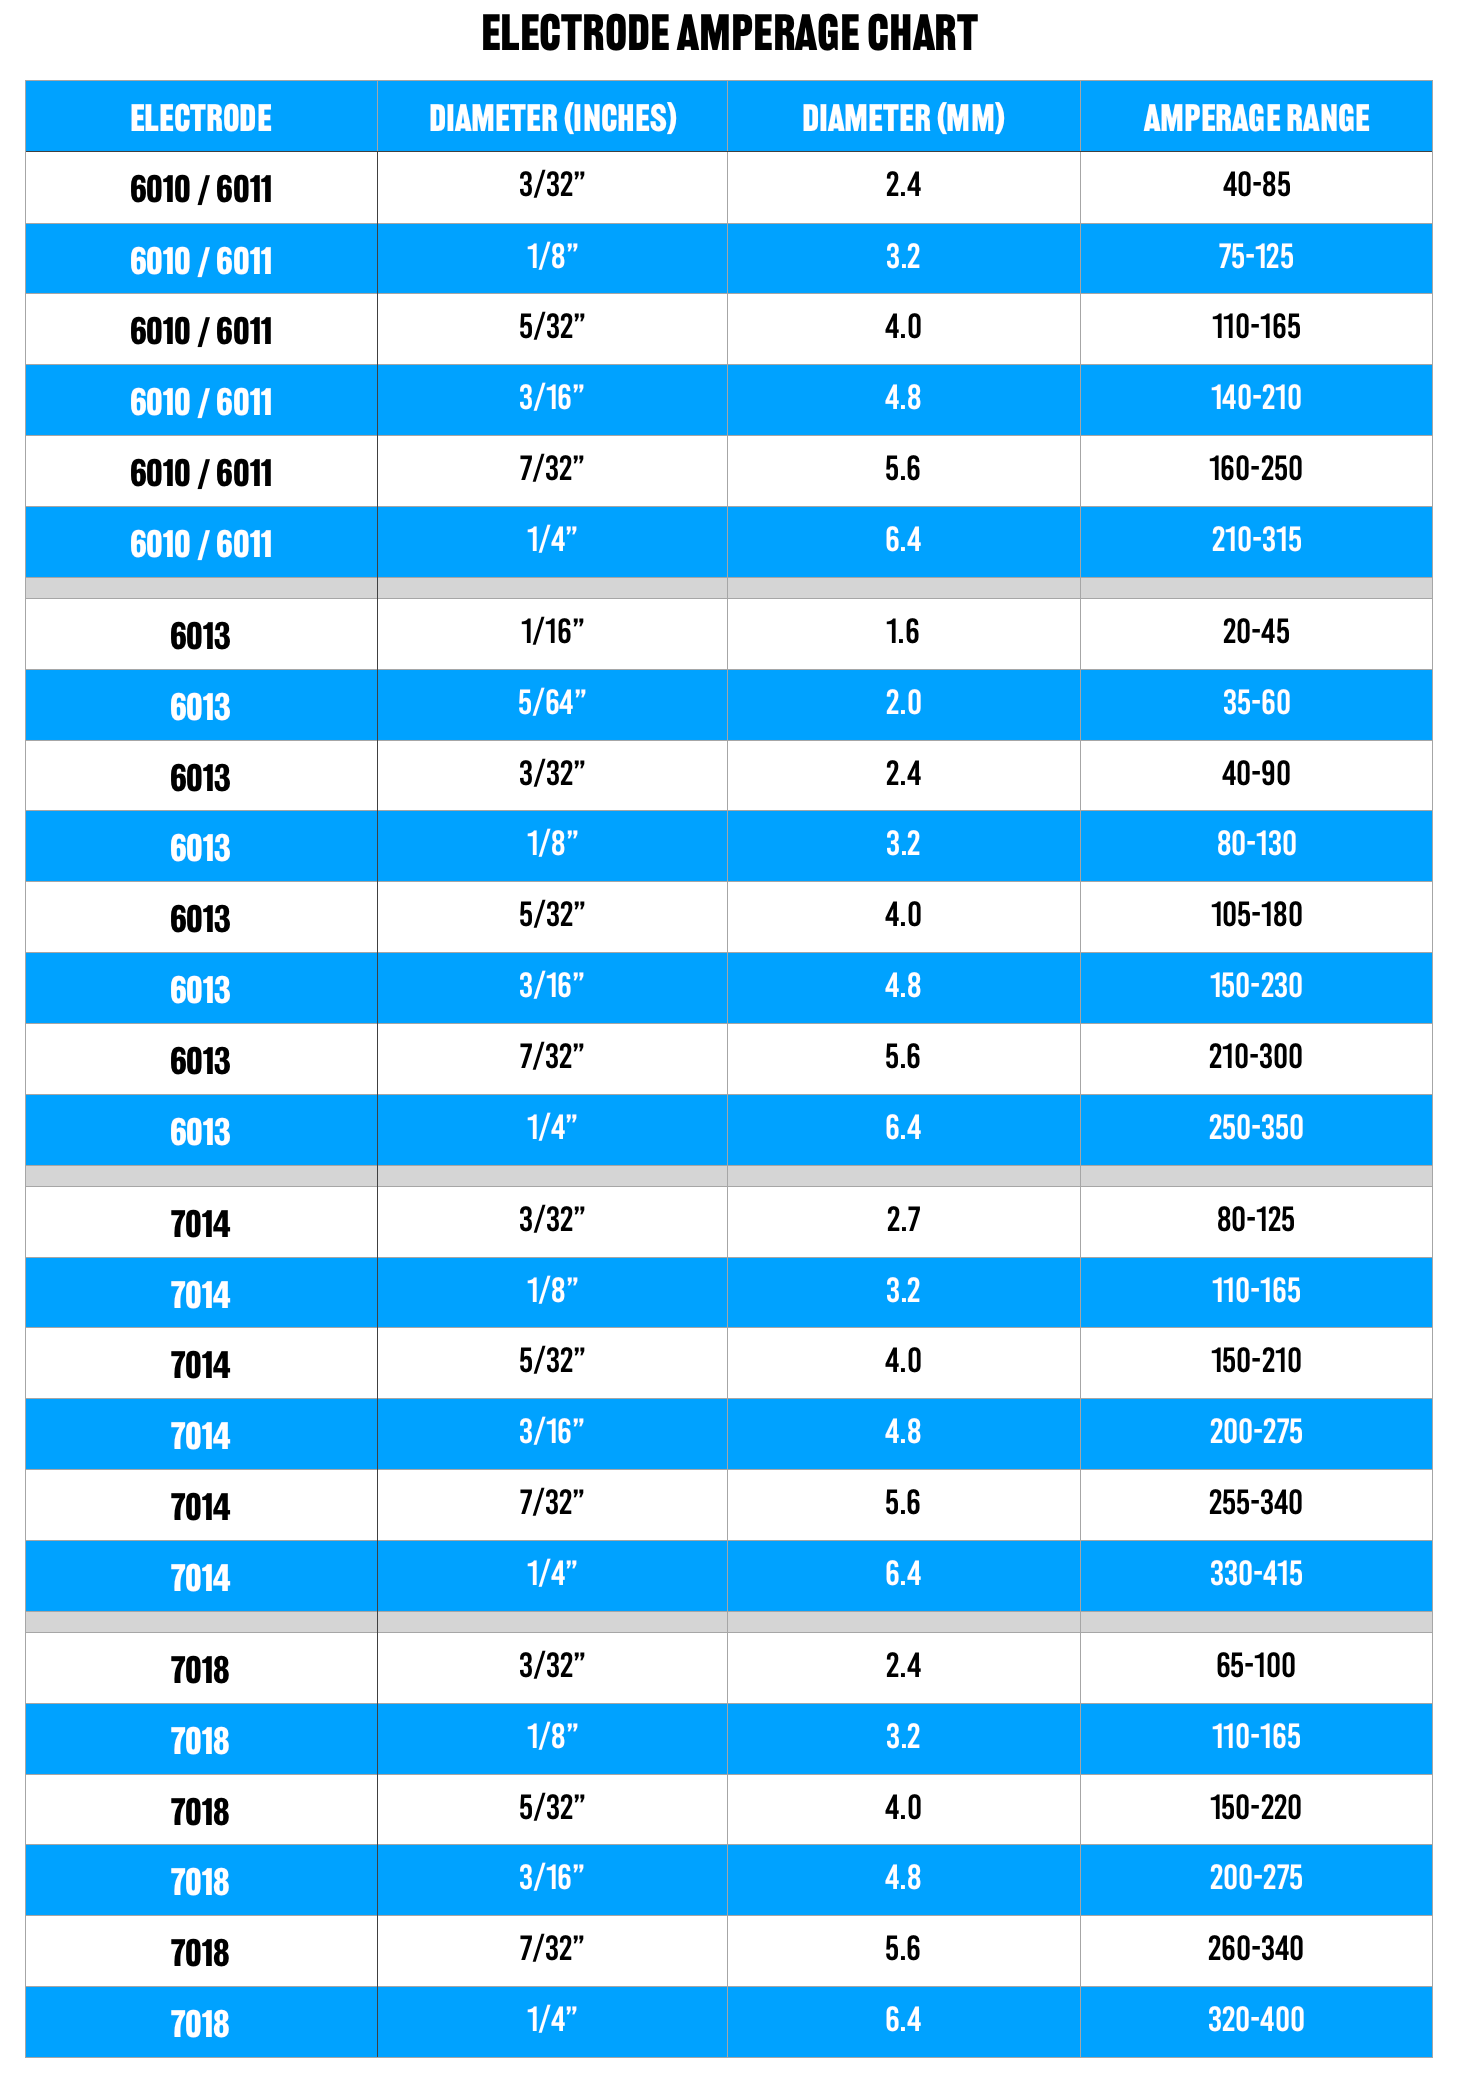
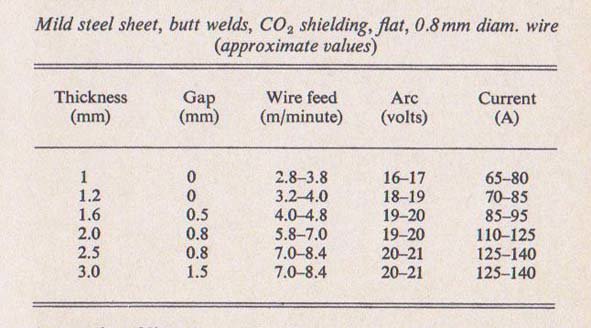
Why You Need a "Chart" (Sort Of)
So, where does the "chart" come in? Well, it's less about a literal chart you have to memorize like the periodic table, and more about a starting point guide. Most welding machines, wire spools, or electrode boxes will have recommended amperage and voltage settings for specific material thicknesses and wire/rod sizes.

These are your best friends! They give you a fantastic baseline. It's like a recipe – you start with the recommended amounts, and then you tweak to taste. Or, in our case, to get that beautiful, strong weld.
Factors that influence your settings:
- Material Type: Steel, aluminum, stainless all behave differently.
- Material Thickness: Thicker means more heat (amps!).
- Wire/Electrode Diameter: Larger diameter usually means more amps.
- Welding Position: Flat, horizontal, vertical, overhead – each has its quirks.
- Shielding Gas: Affects arc stability and heat transfer.
Don't Panic, Start Somewhere!
The best way to get good at this? Practice, practice, practice! Start with the manufacturer's recommendations for your specific material and setup. Lay a test bead on some scrap metal of the same thickness. See how it looks, how it sounds, and how it feels.

Is your weld too cold (not penetrating, lumpy)? Increase your amps! Is it too hot (burning through, excessive splatter)? Decrease your amps!
Is your arc unstable and loud (like popcorn)? Adjust your voltage! A little bit up or down can make a huge difference. Think of it as tuning a guitar – small adjustments lead to perfect harmony.
You've Got This!
Don't be intimidated by those dials. Welding is a skill that comes with experience and a bit of playful experimentation. Every wobbly, ugly bead is a lesson learned. Soon, you'll develop an intuitive feel for what settings your project needs, like a chef instinctively knowing how much salt to add. So go forth, make some sparks, and remember: every master welder started with their very first, probably-not-so-perfect, weld. You're building skills, confidence, and maybe even something awesome. Happy welding!