Too Much Spatter Mig Welding

Ever found yourself admiring a freshly laid MIG weld, only to have your moment of zen interrupted by a gritty constellation of tiny metal BBs sticking stubbornly to your workpiece? You’re not alone. Welcome to the world of too much spatter, a common — and frankly, rather annoying — companion for many a hobbyist and professional welder alike. It’s like throwing a fabulous dinner party, only to find glitter exploded all over your spotless kitchen afterwards. Uninvited, sparkly, and a pain to clean up.
But fear not, fellow metal sculptors! Taming the spatter beast isn't some mythical quest reserved for seasoned masters. It’s a journey of understanding, tweaking, and a little bit of zen. Let’s dive into making your welds smoother, cleaner, and your post-weld cleanup a breeze. Because life's too short for excessive spatter, right?
The Little Metal Rebels: What Exactly Is Spatter?
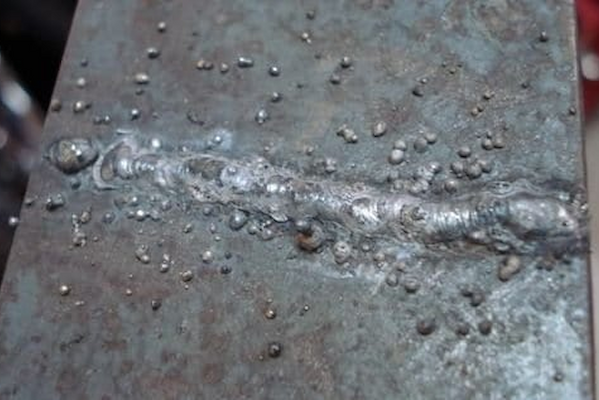
Imagine tiny droplets of molten metal, ejected from your weld puddle during the MIG process, cooling rapidly and adhering to surrounding surfaces. That’s spatter in a nutshell. While a tiny bit is almost inevitable, a heavy build-up not only looks unsightly, but it also means wasted filler material, extra grinding, and a less-than-professional finish. It’s the metal equivalent of breadcrumbs everywhere after making toast – a minor inconvenience, but one that adds up if you don’t manage it.
Must Read
Decoding the "Why": The Usual Suspects Behind Spatter
So, why do these little metal rebels stage their molten coup? Often, it boils down to a few key variables. Think of it like a delicate recipe; if one ingredient is off, the whole dish can go sideways.
- Voltage & Wire Speed: The Goldilocks Zone. This is perhaps the most common culprit. If your voltage is too high, or your wire speed is too low, you’ll get an unstable arc that sprays metal like a tiny, angry sprinkler. Conversely, too low voltage or too high wire speed can also cause issues. We’re aiming for just right.
- Stick-Out: Finding the Sweet Spot. This refers to the length of welding wire extending from your contact tip. Too long, and you lose shielding gas protection and get excessive resistance heating, leading to instability and spatter. Too short can also cause problems, but too long is a prime spatter generator.
- Gas Flow: The Invisible Shield. Your shielding gas (typically Argon/CO2 mix for MIG) protects the molten puddle from atmospheric contaminants. If your gas flow is too low, the puddle is exposed and spits. If it’s too high, it can create turbulence, sucking in air and again, leading to spatter. Plus, an empty gas bottle is a guaranteed spatter-fest!
- Material Cleanliness: The Unsung Hero. Welding over rust, paint, oil, or even moisture is like trying to paint on a greasy canvas. These contaminants vaporize violently during welding, causing the puddle to erupt and, you guessed it, spatter. A clean surface is a happy surface.
- Nozzle & Contact Tip: Wear and Tear. A worn contact tip can hinder current transfer, leading to an erratic arc. A clogged or spatter-laden nozzle can disrupt your gas flow, leaving your weld puddle vulnerable. Think of it as a crucial component of your welding "engine" needing a tune-up.
- Technique: Your Artistic Touch. A steady hand and consistent travel speed are key. Jerky movements or incorrect torch angles can also contribute to an uneven arc and, yes, more spatter. Generally, a pushing technique (pushing the puddle) is preferred for thinner materials and can result in less spatter than pulling.
Your Spatter-Busting Arsenal: Practical Tips for a Cleaner Weld
Ready to turn the tide against those pesky metal droplets? Here’s your battle plan:

1. Cleanliness is Next to Weldliness: Always, always, always start with clean material. Wire brush away rust, grind off paint, degrease oily surfaces. This simple step can drastically reduce spatter.
2. Check Your Gas: Ensure your gas bottle isn’t empty, and your regulator is set correctly. For mild steel, a good starting point is often around 15-20 CFH (Cubic Feet per Hour) for a standard nozzle. Listen for a steady, gentle hiss, not a violent whoosh.
3. Dial In Your Settings: Consult your welder's door chart for recommended voltage and wire speed settings for your material thickness. Then, listen to the arc! You want a smooth, consistent sizzle, like bacon frying or a well-oiled machine humming. Avoid a harsh crackle or a dull rumble. Don't be afraid to make small adjustments.

4. Mind Your Stick-Out: Aim for about 3/8 to 1/2 inch (roughly 10-13mm) stick-out. Practice keeping it consistent.
5. Maintain Your Gear: Regularly clean spatter from your nozzle, and replace worn contact tips. Anti-spatter spray is your best friend here – a quick spritz on the nozzle and surrounding workpiece before you start will make cleanup a breeze.
6. Practice Makes Perfect: Consistent travel speed, correct torch angle (a slight push angle, usually 10-15 degrees), and maintaining your arc length will all contribute to a smoother, spatter-free experience. Like any craft, it’s all in the repetition.
Beyond the Bench: The Joy of the Clean Finish
There’s a real satisfaction that comes with laying down a beautiful, clean weld, free from a blizzard of spatter. It’s not just about aesthetics; it’s about efficiency, strength, and pride in your work. Think of it as the difference between a meticulously crafted meal and one that looks like a food fight erupted. Both might taste okay, but one certainly elevates the experience!
This pursuit of minimal spatter isn’t just about welding; it's a metaphor for life. Sometimes, the "spatter" in our daily routines – those little frustrations, unexpected messes, or inefficient habits – can pile up. But by taking a moment to understand the causes, adjusting our "settings," and applying a little preventative maintenance (or perhaps some anti-spatter spray for our mental state!), we can achieve a smoother, cleaner, and ultimately more enjoyable experience. So, next time you're wielding that torch, remember: a little attention to detail goes a long, long way.
