The Symbol That Denotes The Type Of Weld Desired
Ever looked at a blueprint for a metal project and felt like you were reading hieroglyphics? You’re not alone! Decoding welding symbols can seem daunting, but trust me, it’s like learning a secret language that unlocks a world of DIY possibilities. It’s fun because it empowers you to understand and execute projects accurately. It’s useful because it prevents costly mistakes and ensures the integrity of your work. And it’s increasingly popular as more people dive into welding as a hobby or even a profession.
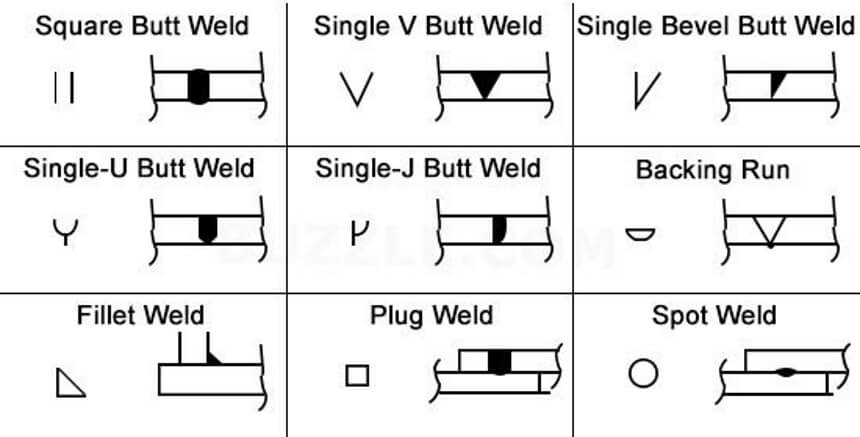
So, what's the deal with these mysterious symbols? The most fundamental part is the weld symbol itself, the little pictograph that tells you what type of weld is needed. For beginners, understanding these symbols is the first step to translating a design into reality. It helps you select the right welding process and prepare the materials accordingly. For families embarking on a backyard project, like building a sturdy swing set, understanding weld symbols ensures the joints are strong and safe. And for hobbyists restoring classic cars or crafting metal art, knowing these symbols allows for greater precision and creativity.
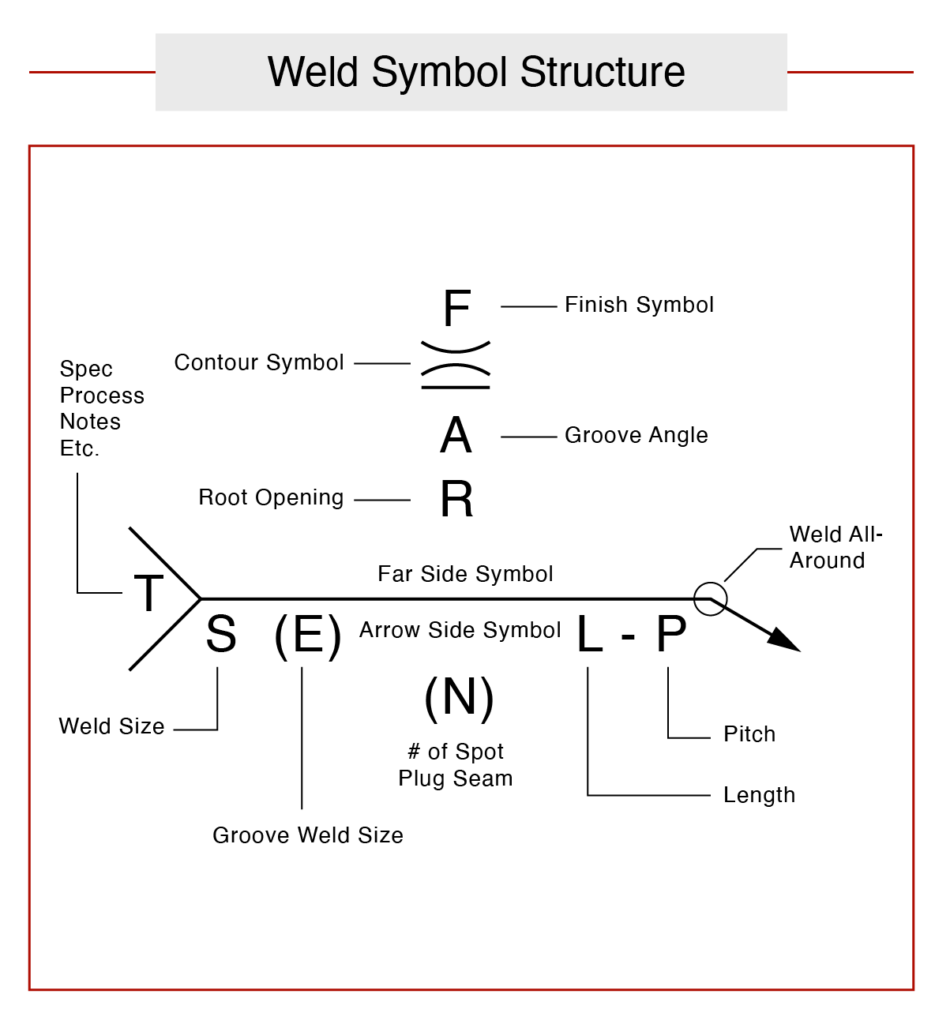
Let's look at some common examples. The fillet weld is probably the most frequently used. It’s represented by a triangle. Its position (above or below the reference line) indicates which side of the joint it goes on. A square groove weld, often used for butt joints, is depicted as a rectangle. A V-groove weld, creating a stronger joint, is shown as a "V" shape. And a plug weld, used to join overlapping pieces, looks like a small rectangle standing on its end. Each of these symbols might also have accompanying numbers indicating the weld size or length, adding another layer of detail.
Must Read
Variations exist too. The "arrow side" and "other side" designations are crucial. Think of it like this: imagine an invisible arrow pointing to the joint. Anything above the reference line in the symbol applies to the side the arrow is pointing to. Anything below the line applies to the opposite side. Also, combination welds are common, using different symbols together to specify a complex weld configuration.

Want to get started? Here are a few simple tips. First, grab a welding symbol chart. These are readily available online or in welding supply stores. Keep it handy and refer to it often. Second, start with simple projects. Don't try to tackle a complicated blueprint right away. Practice identifying the basic symbols on simpler diagrams. Third, seek guidance. Join a local welding club or online forum and ask questions. Experienced welders are usually happy to share their knowledge. Finally, practice drawing the symbols. This will help you internalize their meanings and improve your ability to read blueprints quickly.
Decoding welding symbols might seem intimidating at first, but with a little practice and patience, you’ll be speaking the language of welding in no time. The ability to understand and interpret these symbols unlocks a world of creative and practical possibilities, making your welding journey even more enjoyable and valuable.