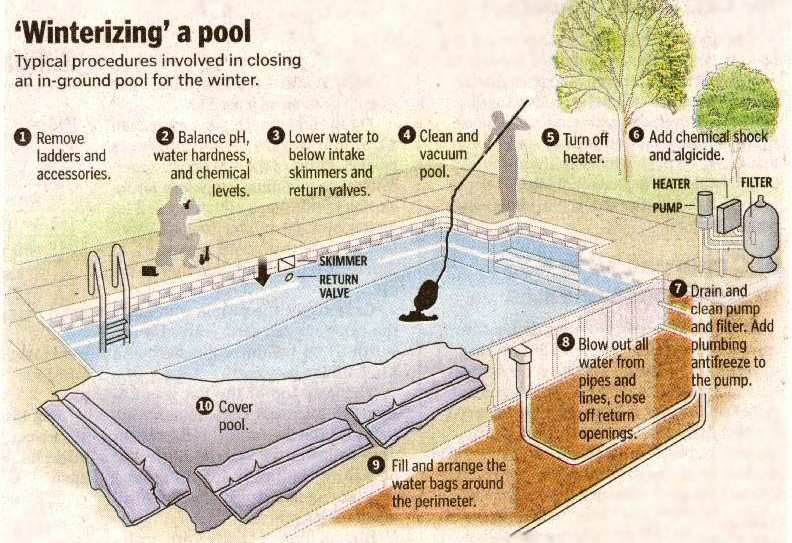
Steps To Winterize An Inground Swimming Pool
Hey there, pool pal! So, summer's officially waved goodbye (tear!), and the leaves are turning colors faster than my toddler changes his mind about wanting a cookie. That means it's time to face the music… winterizing your inground swimming pool. Don't worry, it's not as scary as finding a spider the size of your hand in the skimmer basket (shudder!). Think of it as tucking your pool in for a long, cozy nap. Let's get this pool party prepped for hibernation!
Step 1: Clean Like You Mean It (One Last Time!)
Okay, picture this: you wouldn’t want to sleep in a messy bed, right? Neither does your pool! This is super important. Grab your skimmer, your trusty vacuum, and maybe even put on some upbeat tunes. You're going for a sparkling clean finish.
Make sure you get rid of all the leaves, twigs, and that rogue inflatable unicorn that’s been clinging on for dear life. Seriously, give it a good once-over. Leftover debris can stain your pool surface or, even worse, become a breeding ground for… well, let’s not even go there. Nobody wants swamp creatures in their pool come springtime!
Must Read
Step 2: Chemical Balancing Act (The Pool's Last Supper!)
Time to get your mad scientist on! You need to test and balance your pool water one last time before closing it up. Grab your test kit (the one you haven't accidentally launched into the bushes yet) and check your pH, alkalinity, and calcium hardness levels. Make sure they're all within the recommended ranges.
Shocking the pool is crucial here. This helps kill any lingering bacteria or algae that might be lurking in the depths, plotting their return. Think of it as giving them a "not invited" card to the winter slumber party. Use a good quality pool shock and follow the instructions on the label. And remember, safety first! Wear gloves and eye protection. We don't want you looking like you just lost a fight with a chemistry set.

Step 3: Lower the Water Level (Time for a Little Drain Drama!)
Okay, this step is all about protecting your pipes from the dreaded freeze-thaw cycle. Water expands when it freezes, and that expansion can crack your plumbing faster than you can say "polar vortex." So, you need to lower the water level to below the skimmer and return jets.
How much to lower it depends on your specific pool and climate. If you live in a super-cold area, you might need to drain it further. Consult your pool professional if you're unsure! Better safe than sorry (and a burst pipe in January!). Use your pool pump (or a submersible pump) to drain the water. Don't drain it completely unless absolutely necessary, as this can damage the pool liner.
Step 4: Blow Out the Lines (Expelling Those Pesky Pipes!)
This is where things get a little more… whoosh! You need to get all the water out of your plumbing lines. The best way to do this is with an air compressor. Connect it to your skimmer line and blow air through the system until all the water is expelled from the return jets. Cap off the lines with winterizing plugs after they're empty.
Don't forget the main drain! You might need to use a specialized gizmo (yes, that's a technical term) to blow air through that line. Again, if you're not comfortable with this, call a professional! We're aiming for a relaxing winter, not a plumbing emergency.

Step 5: Cover Up (The Pool's Pajamas!)
Last but definitely not least, slap on that winter pool cover! A good quality cover will protect your pool from debris, leaves, and unwanted sunlight (which can fuel algae growth). Make sure the cover is securely fastened and that it fits snugly.
If you have a mesh cover, you might want to consider using an air pillow to support the center of the cover and prevent it from sagging. Think of it as giving your pool cover a comfy place to rest its head. Voila! Your pool is officially tucked in for the winter.
And there you have it! You've successfully winterized your inground swimming pool. Pat yourself on the back, grab a hot cocoa (with marshmallows, naturally), and bask in the satisfaction of a job well done. Now you can relax and dream of sunny days and cannonballs, knowing that your pool will be ready to welcome you back with open arms (or… water, I guess) when spring rolls around. See you at the poolside!
