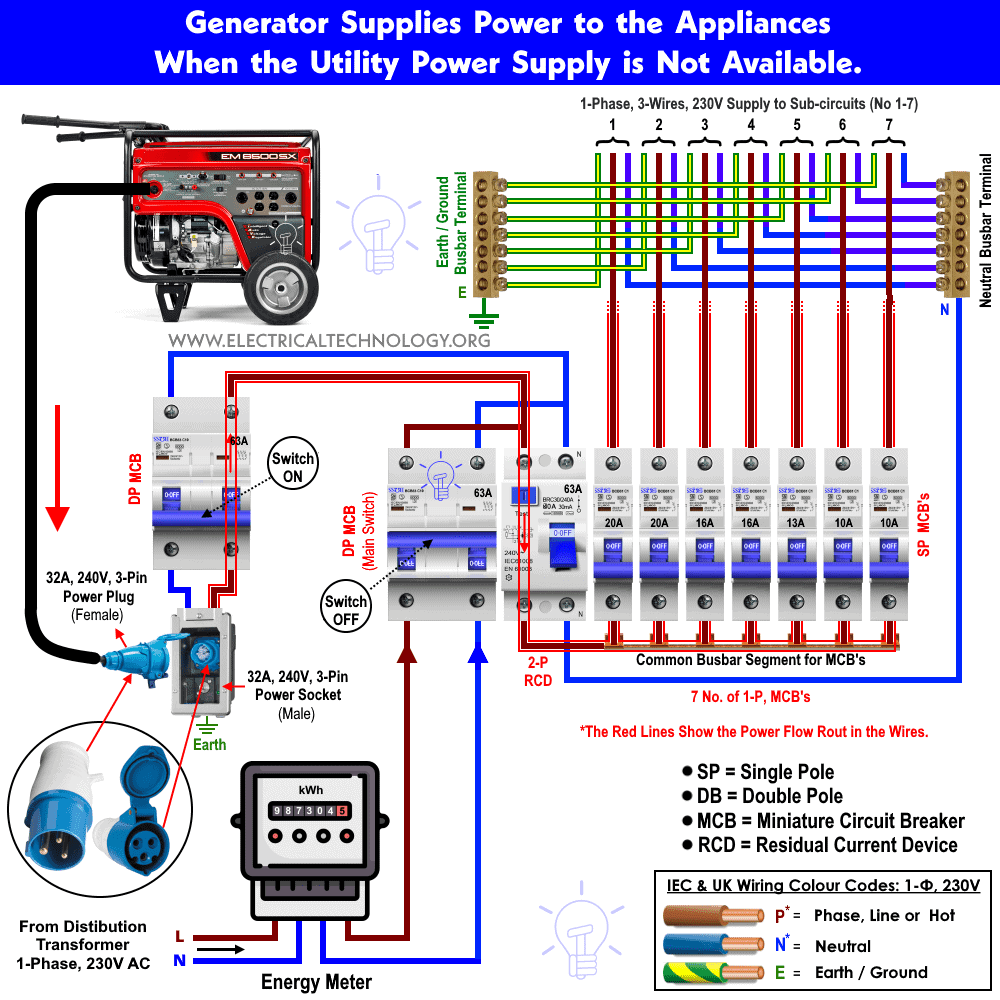
How To Wire A Generator To An Electrical Panel

Okay, let's talk power. Not the Machiavellian kind, but the kind that keeps your fridge humming and your Netflix binging uninterrupted. Power outages, those uninvited guests, are a modern-day inconvenience. But fear not, intrepid homeowner! We’re diving into how to wire a generator to your electrical panel, transforming you from a victim of the grid to a master of your own electrical destiny. Think of it as your own personal "Back to the Future" moment – harnessing energy for the greater good (or at least, for keeping your ice cream frozen).
Safety First: Your Yoda-Level Training
Before we even think about wires and volts, let’s channel our inner Obi-Wan Kenobi. Safety is paramount. We’re dealing with electricity, which is cool and useful, but also potentially dangerous. If you feel even slightly unsure about anything we're about to discuss, hire a qualified electrician. seriously. It's not worth saving a few bucks to become a human lightning rod. This isn't a DIY project for the faint of heart.
Essential safety gear:
Must Read
- Insulated gloves.
- Safety glasses.
- A non-contact voltage tester (to ensure circuits are dead).
Important Reminder: Always, and I mean always, turn off the main breaker before working on your electrical panel. Think of it as hitting the 'pause' button on your entire house's electrical system. We want tranquility, not sparks flying.
Gather Your Arsenal: The Gear You'll Need
Wiring a generator isn’t just about slapping some cables together. You'll need the right equipment. It's like trying to bake a cake without flour – you might end up with something, but it probably won't be very good.

Here's your shopping list:
- A generator. (Duh!). Size matters – calculate your power needs beforehand. Don’t just guess!
- A transfer switch. This is the crucial piece that isolates your generator power from the utility grid. It prevents backfeeding, which is dangerous for both you and utility workers. Imagine accidentally powering the entire neighborhood – not a good look.
- Wiring. Correct gauge wiring is essential. Consult the transfer switch instructions and your local electrical codes. Thicker wires can handle more current.
- Conduit and connectors. To protect the wiring.
- Basic tools: Screwdrivers, wire strippers, pliers, etc. Your standard DIY arsenal.
The Hookup: A Step-by-Step Breakdown
Alright, here's where the rubber meets the road (or, more accurately, where the wire meets the terminal). This is a general overview. Always refer to the specific instructions for your transfer switch and generator.

- Install the Transfer Switch: Choose a location near your electrical panel. Mount it securely.
- Connect to the Panel: This involves wiring specific circuits from your main panel to the transfer switch. These are the circuits you want to power during an outage (lights, fridge, maybe that espresso machine).
- Wire the Generator Inlet Box: Mount an inlet box on the exterior of your house. This is where you'll plug in the generator. Run wiring from the inlet box to the transfer switch.
- Connect the Generator: When the power goes out, plug the generator into the inlet box. Flip the transfer switch to generator power. Bam! You're back in business.
Pro Tip: Label everything! Use a label maker or even just some masking tape and a pen. Trust me, future you will thank you when you're troubleshooting at 2 AM during a thunderstorm.
Avoiding Disaster: Common Mistakes to Dodge
Even the most seasoned DIYers can stumble. Here are some common pitfalls to avoid:

- Backfeeding: As mentioned before, this is a major no-no. It can electrocute utility workers and damage equipment. A transfer switch is non-negotiable.
- Overloading the Generator: Don’t try to power your entire house on a small generator. Calculate your power needs and manage your load.
- Using Extension Cords: Avoid using long extension cords to connect the generator to the house. This can create a fire hazard. The inlet box is the way to go.
Beyond the Basics: A Few Extra Sparks of Wisdom
Here are a few thoughts to ensure a smooth generator setup:
- Regular Maintenance: Generators need regular maintenance. Change the oil, check the filters, and run it periodically to keep it in good working order.
- Carbon Monoxide Safety: Generators produce carbon monoxide, a deadly gas. Never run a generator indoors or in an enclosed space.
- Local Codes: Check your local building codes and regulations before starting any electrical work.
Fun Fact: The first electric generator was invented by Michael Faraday in 1831. He used a copper disc rotating between the poles of a magnet.
Bringing it Home: Power and Preparedness
Wiring a generator to your electrical panel isn't just about having power during an outage. It's about preparedness, self-reliance, and having a little control in a world that often feels chaotic. It's about ensuring your family is safe and comfortable, even when the lights go out. Like having a well-stocked pantry, knowing your power won't disappear with the next big storm offers a peace of mind we all need in our connected world. So grab those gloves, read your manuals carefully, and get ready to take control of your power destiny.