How To Weld With Stick Welder

Ever looked at a rusty old garden gate or a wobbly chair and thought, "If only I could just... fix that?" Or maybe you've dreamt of creating some quirky metal art for your backyard, but the idea of joining metal together felt like something only mythical blacksmiths could do. Well, friend, let me introduce you to the wonderful world of stick welding – your new superpower for fixing, building, and creating!
Why Even Bother With a Stick Welder?
Picture this: your trusty wheelbarrow gets a crack, and you're about to toss it. But wait! With a stick welder, you could patch that up in no time, saving you money and keeping perfectly good stuff out of the landfill. Or perhaps you want to build a custom grill stand, a sturdy workbench, or even some abstract metal sculptures that'll make your neighbors stop and stare. Stick welding is like the Swiss Army knife of metal joining – it's incredibly versatile, surprisingly accessible, and gives you that awesome feeling of "I made/fixed this myself!"
It’s the OG of welding, often seen as the most forgiving for beginners, especially when you're working outdoors or with less-than-sparkling-clean metal. Think of it as the sturdy, reliable pickup truck of the welding world – it might not be the fanciest, but it gets the job done, and it’s tough as nails.
Must Read
So, What Exactly IS Stick Welding?
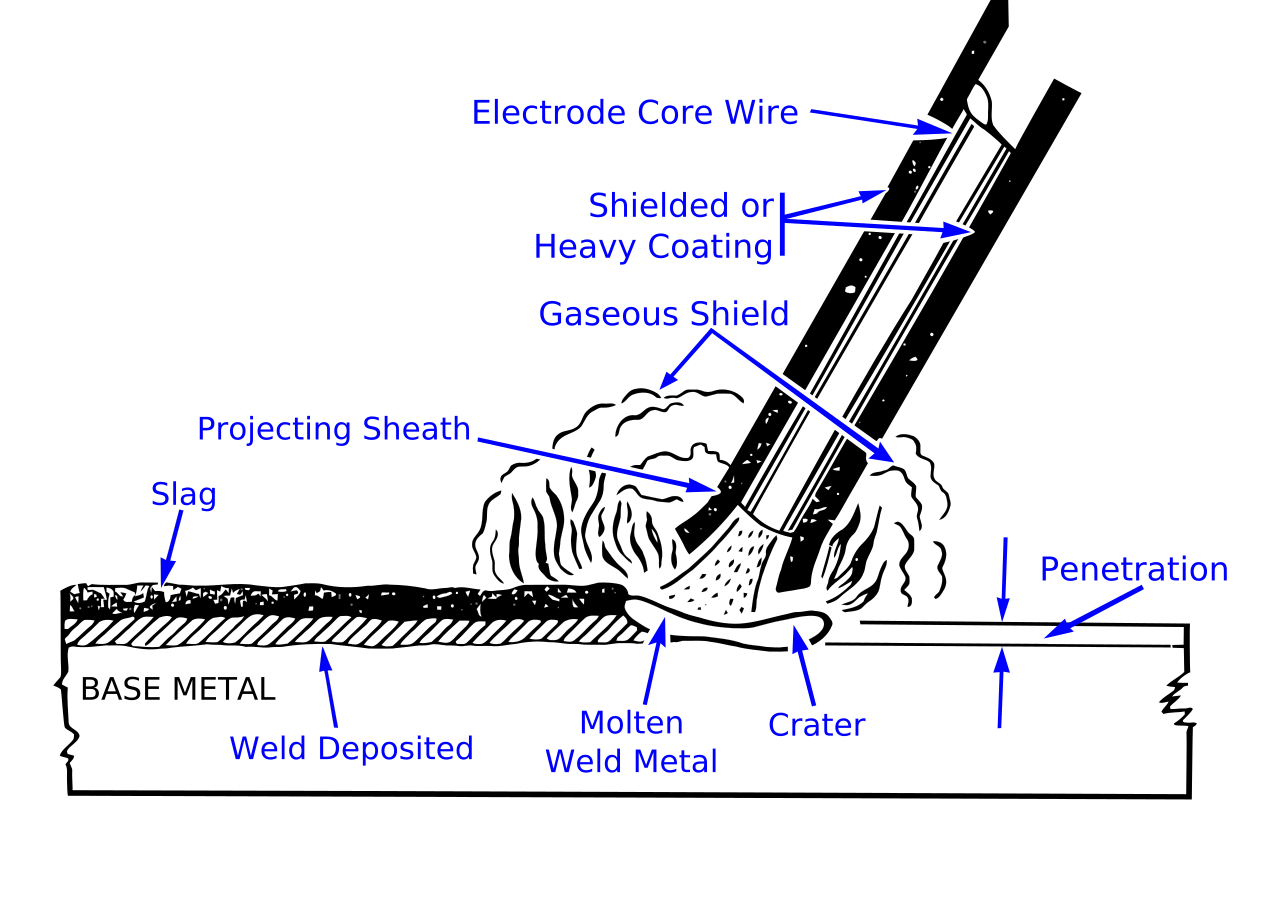
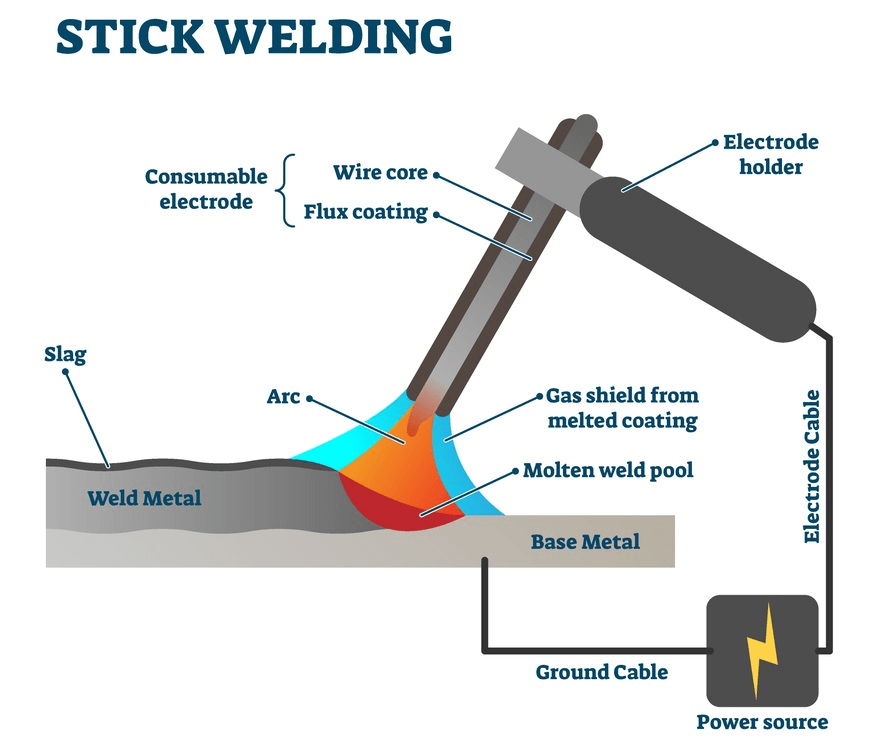
At its core, stick welding (also known as Shielded Metal Arc Welding, or SMAW, if you want to sound fancy) is pretty straightforward. You've got a metal rod, called an electrode, coated in a special flux. When you strike this rod against a piece of metal, it creates a super-hot electrical arc. This arc melts both the rod and the base metal, creating a molten "puddle" that, once cooled, fuses everything together into a strong, permanent bond.
Think of it like a super-powered hot glue gun for metal. The flux coating on the rod burns away, creating a protective gas shield around your molten puddle, keeping nasty oxygen out. Once it cools, this burnt flux forms a crusty layer called "slag," which you chip off to reveal your shiny new weld. Satisfying, right?
Gather Your Super-Welder Gear!
Before you unleash your inner metal-melting maestro, safety is paramount. We're talking about electricity and molten metal, so let's be smart!
- Welding Machine: You can find simple, portable stick welders that plug into a standard household outlet. They're robust and don't need gas tanks, which makes them great for home use.
- Electrodes (Rods): These are your consumables, like paintbrushes for different jobs. For general home use, 6013 or 7018 rods are often recommended for beginners.
-
Safety First! This is non-negotiable.
- Welding Helmet: A good auto-darkening helmet is worth its weight in gold. Your eyes are precious, like a good cup of coffee on a Monday morning – protect them!
- Welding Gloves: Thick, heat-resistant, and covering your forearms.
- Welding Jacket/Flame-Resistant Clothing: No polyester shirts, please! Sparks fly, and polyester melts. Ouch.
- Closed-Toe Shoes: Leather boots are ideal.
- Chipping Hammer & Wire Brush: For cleaning off that slag and spatter.
Let's Make Some Sparks! (The How-To)
1. Set Up Your Scene
Find a clear, non-flammable workspace. Plug in your welder, connect the electrode holder, and attach the ground clamp to your workpiece. The ground clamp is crucial – it completes the electrical circuit. Think of it as the silent partner making sure the electricity flows where it needs to go.
Insert your chosen electrode into the holder. Check your welder's settings – there's usually a guide for different rod types and metal thicknesses. Start a bit lower than recommended and adjust up if needed.

2. Strike an Arc!
This is often the trickiest part for beginners, but once you get it, you'll feel like a wizard! There are two main ways:
- The Scratch Start: Like lighting a big match. Touch the tip of the rod to the metal and scratch it quickly across the surface, then pull it back slightly (about 1/8 to 1/4 inch) to create the arc.
- The Tap Start: Tap the rod straight down onto the metal, then quickly lift it up a tiny bit to establish the arc.
The goal is to get that bright, buzzing arc going and maintain that small gap. If it sticks, just wiggle it a bit, or pull it free. Don't worry if your first few attempts look more like you're trying to draw with a hot crayon – practice makes perfect!
3. Run Your Bead (The Magic Puddle)
Once you've got your arc, look for the molten puddle – that shiny, liquid pool of metal. This is your magic! You want to maintain a consistent arc length (that 1/8-1/4 inch gap) and move the rod along your joint at a steady pace.
Imagine you're painting a line, but instead of paint, it's molten metal. You're trying to keep the puddle a consistent size.
- Too fast? You'll get a thin, weak weld.
- Too slow? You might get a lumpy mess or burn through the metal.
- Too far away? The arc sputters, and the weld looks ugly.
- Too close? The rod sticks.
4. Clean Up Your Masterpiece
After your weld cools (give it a minute!), grab your chipping hammer and tap away that slag. Then, hit it with a wire brush to clean up any spatter. Voila! You've made a weld!
Don't Fret the First Flops!
Your first welds probably won't win any beauty contests, and that's totally normal! Mine looked like a pigeon tried to weld for quite a while. The key is practice, practice, practice. Grab some scrap metal, watch some videos, and just keep at it. Pay attention to the sound of the arc – a good weld has a consistent, sizzling sound, like bacon frying.
Why You Should Really Care (Beyond the Sparks)
Learning to stick weld isn't just about melting metal; it's about gaining a valuable skill, boosting your confidence, and unlocking a whole new level of DIY potential. Imagine fixing that rusty old garden swing for the grandkids, instead of buying a new one. Or building that custom metal frame for your workbench that fits perfectly in your garage.
It’s empowering, practical, and honestly, a lot of fun. So, if you've ever felt the itch to create or fix things with your own hands, consider giving stick welding a try. With a little patience and the right safety gear, you'll be making sparks and strong bonds in no time!