How To Use Fillet Weld Gauge

Ever watched a master welder lay down a perfect bead, turning separate pieces of metal into one strong, seamless whole? It's like magic! But behind every great weld, there's a secret ingredient: precision. While the sparks and torches get all the glory, some of the coolest tools are the ones that ensure that weld is not just pretty, but also strong and safe. Today, we're diving into one such unsung hero: the fillet weld gauge. Trust us, once you see how easy and essential this gadget is, you'll want one for your own toolbox!
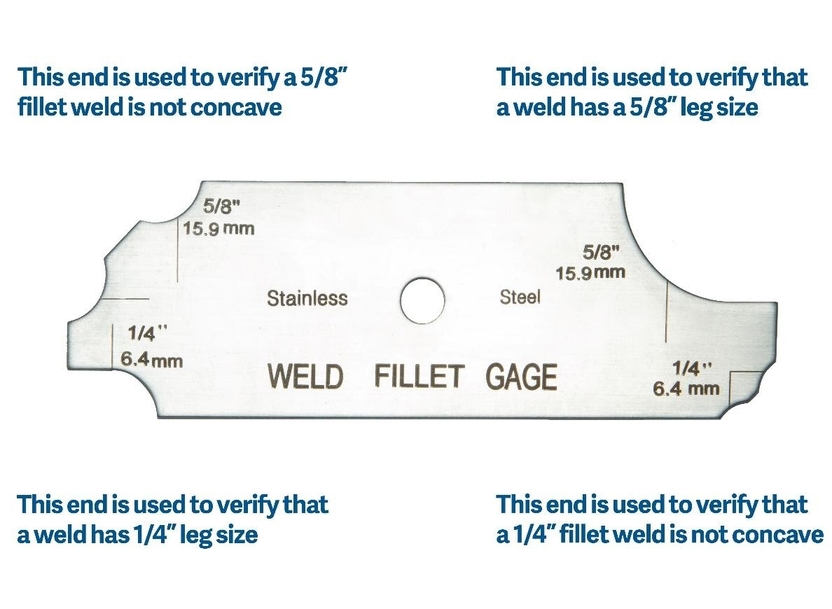
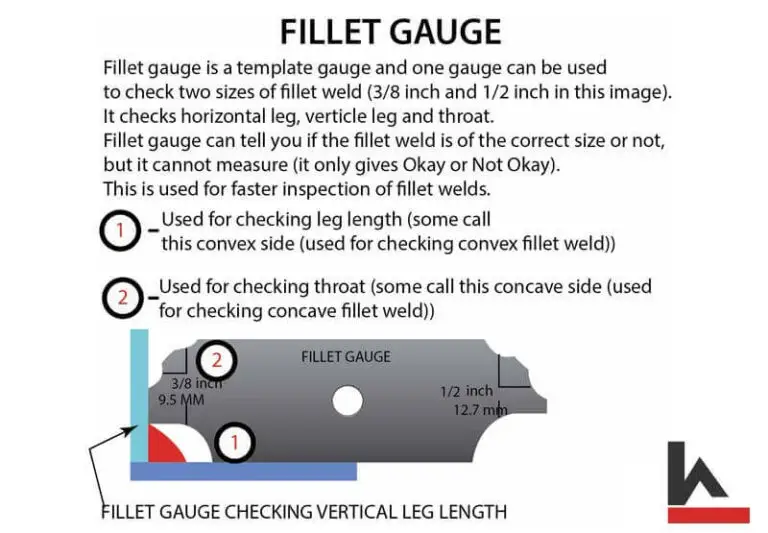
So, what exactly is a fillet weld gauge, and why should you care? Imagine you're building something critical – maybe a frame for a heavy machine, or even a sculpture that needs to defy gravity. The welds holding it all together are paramount. A fillet weld is the most common type, typically triangular in cross-section, joining two surfaces at roughly right angles. The strength of this weld depends critically on its size and shape. Too small, and it could fail; too large, and you're wasting material and time. That's where our handy gauge comes in!
The purpose of a fillet weld gauge is simple yet profound: to accurately measure the dimensions of a fillet weld, ensuring it meets specified engineering requirements. It helps you check two primary aspects: the leg length and the throat thickness. The leg length is basically the size of the "legs" of your triangular weld, while the throat thickness is the shortest distance from the root to the face of the weld – this is often considered the most important measure for a weld's strength. The benefits are enormous: enhanced safety (no catastrophic failures!), consistent quality across all your work, compliance with building codes and standards, and ultimately, peace of mind. It saves you from costly reworks and guarantees your welds are up to par.
Must Read
Ready to wield this little wonder? Using a fillet weld gauge is surprisingly intuitive. Most gauges come as a set of blades, each precisely machined to represent a specific weld size. Here’s the simple rundown:
- First, know your target! Your project's blueprint or specification will tell you the desired weld size.
- Select the appropriate blade from your gauge set that matches the required weld size.
- Gently place the selected blade onto your finished fillet weld. You want it to fit snugly against both the base metal and the weld face.
- The key is the fit:
- For leg length: Check if the blade's "leg" sits flush along the base metal and the "toe" of the weld. There should be no gaps and no rocking. If the weld is smaller than the blade, it won't touch; if it's larger, the blade won't sit flush.
- For throat thickness: Some gauges have steps or dedicated blades to check the effective throat. This ensures the weld has enough material in its critical strength zone.
- Don't just check one spot! Welds can vary, so measure at multiple points along the length of your fillet weld to ensure uniformity.
It's like having a little quality control inspector in your pocket! With a fillet weld gauge, you're not just guessing; you're confirming your hard work meets the mark. So, next time you see a beautifully strong weld, remember the quiet precision tool that helped make it happen. Happy welding, and may your beads always be perfect!