How To Setup A Cutting Torch

Alright, so you’ve got that itch, that primal urge to cut through metal like it’s butter on a hot day. Maybe you’re fixing a rusty old fence, or perhaps you’re finally tackling that ambitious sculpture project that involves a lot of sparks and an even larger degree of satisfying destruction. Whatever your reason, setting up a cutting torch can seem a bit like preparing for a rocket launch: lots of tanks, hoses, and a vague sense of, “Am I doing this right?”
Fear not, my friend! It’s actually less like NASA and more like assembling a really, really powerful, fiery Lego set. We’re going to get you set up, safely, and with a few chuckles along the way.
First Things First: Safety (The Un-Fun But Necessary Bit)
Before we even think about turning anything on, let’s talk about not becoming a human marshmallow. You’ll need some serious PPE: welding gloves, a face shield or cutting goggles (dark shade, please!), and clothes made of natural fibers, not that fancy synthetic stuff that melts to your skin. Also, make sure your work area is clear of anything flammable. Think of it like hosting a wild house party – you want to move all the expensive breakables out of the way before things get lit.
Must Read
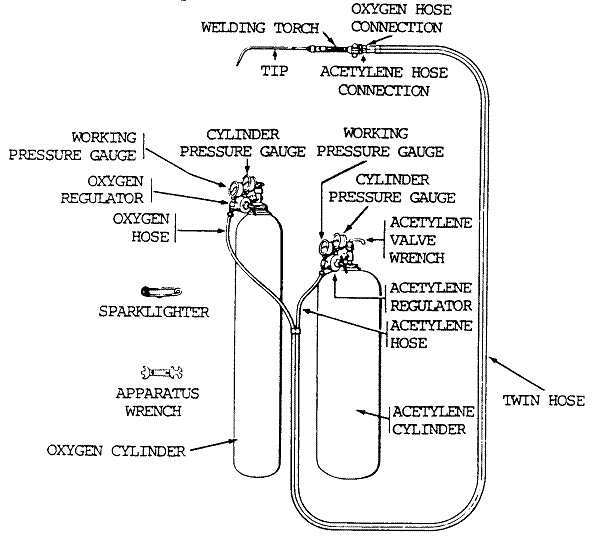
Meet The Dynamic Duo: Oxygen & Acetylene
These are the Bonnie and Clyde of your cutting setup, but instead of robbing banks, they’re helping you slice through steel. You’ll have two tanks: a tall, green one for Oxygen (the steady, reliable workhorse) and a shorter, often maroon or black one for Acetylene (the fiery, temperamental rockstar). Acetylene is the gas that actually burns, and oxygen just helps it burn much, much hotter. Without oxygen, acetylene is just a grumpy fart; with it, it’s a roaring dragon!
The Brains of the Operation: Regulators
These shiny, often brass contraptions are like the thermostats for your gas. You screw one onto each tank. They have two gauges: one shows how much gas is left in the tank (like your fuel gauge), and the other shows the working pressure – how much gas is actually flowing to your torch. Oxygen regulators usually have right-hand threads, while acetylene often has left-hand threads (marked by a groove around the nut) because, well, acetylene just likes to be different.

Twist them on, hand-tight first, then a gentle snug with a wrench. Don’t go full Hulk on them; these aren't lug nuts on a monster truck.
The Lifelines: Hoses
Now for the umbilical cords that carry the good stuff. You’ll have two hoses, typically color-coded: Green for Oxygen (think grass, fresh air, all that good wholesome stuff) and Red for Acetylene (think fire trucks, danger, that spicy salsa that makes your eyes water). Connect the green hose to the oxygen regulator and the red hose to the acetylene regulator. Again, remember the left-hand thread for acetylene. It’s a little trickster, that one.
Make sure they’re routed safely, not kinked, and nowhere near where you'll be dropping hot metal or sparks. We're aiming for precision cutting, not hose-roasting.
The Business End: The Torch Handle and Tip
This is where the magic happens! The torch handle is what you hold, and it has two inlet connections for your hoses. Green to green, red to red. Easy enough, right? Then, you'll choose your cutting tip. These are the little brass nozzles that dictate the size and shape of your flame, much like choosing a different spray pattern on a garden hose. A smaller number usually means a smaller hole, good for thinner metal, and vice-versa.

Screw the tip onto the head of the torch handle. Again, snug, not gorilla-grip tight.
The Grand Connection: Everything Together!
You’ve got your tanks, regulators, hoses, and torch. It's like a gas-powered jigsaw puzzle. Connect the other ends of your hoses to the appropriate inlets on your torch handle. The oxygen inlet is usually marked "OXY" or "OX," and acetylene is "ACET" or "FUEL." Double-check those connections. This isn't the time for guesswork.

The Famous Leak Test: Bubble, Bubble, No Trouble!
Before you even think about lighting this fiery beast, you must check for leaks. Open your tank valves (slowly!) then open the regulator adjusting screws until you see pressure on the gauges. Now, here’s the fun part: grab a spray bottle with soapy water (dish soap mixed with water works perfectly). Spray down every single connection point – where the regulators meet the tanks, where the hoses meet the regulators, and where the hoses meet the torch.
Look for bubbles. Lots of bubbles. If you see any, you've got a leak. Tighten the connection (gently!) and re-test. This is not the time to channel your inner "meh, good enough." Think of it as giving your setup a spa treatment, just looking for any suspicious foamy sneezes.
Almost Ready to Ignite!
Once you’re bubble-free, you’re practically there! You've successfully assembled your metal-munching monster. Now, you’re ready to learn about setting your pressures and actually lighting the torch, but that’s a fiery tale for another day. For now, bask in the glory of a well-assembled cutting torch, ready to turn some scrap metal into art… or just smaller pieces of scrap metal. Either way, mission accomplished!