How To Set Up A Cutting Torch

There’s a certain thrill in preparing for something powerful, a quiet anticipation that builds even before the first turn of a wrench. It’s like gathering ingredients for a spectacular meal, but instead of spices, you’re wrangling metal and gas. The air itself seems to hold a promise, a whisper of transformation.
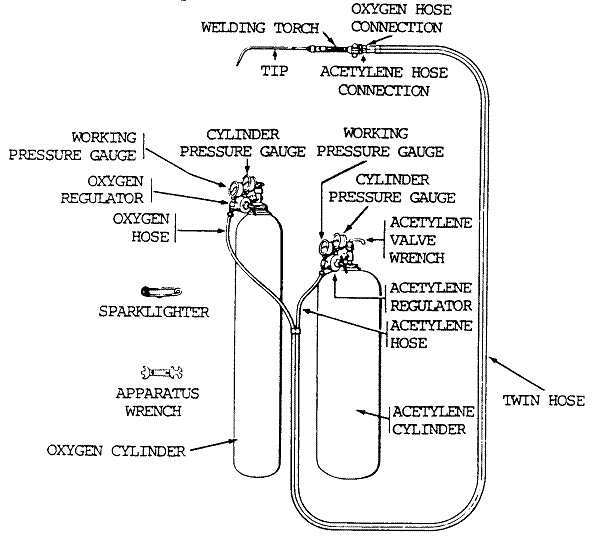
First, you’ll meet the two gentle giants: the oxygen cylinder, tall and green, and the squat, crimson acetylene cylinder, looking a bit like a sturdy, dependable friend. They stand guard, full of potential, waiting for their moment. Make sure they’re properly chained, like loyal watchdogs, so they don’t decide to go on an unexpected adventure.
Next come the brainy types, the regulators. One for each cylinder, they're like wise old professors with their many gauges and knobs. The oxygen regulator often sports a green color, matching its tank, while the acetylene one is usually red. They screw onto the tank valves, a precise twist until they feel snugly in place.
Must Read
It’s a satisfying feeling, that moment when metal meets metal with a confident click, like pieces of a grand puzzle falling into exactly the right spot. You’re building something, one deliberate step at a time.
Then unfurl the vibrant hoses, often a striking green and red, winding like friendly garden snakes. The green hose, naturally, finds its home on the green oxygen regulator, and the red one connects to the red acetylene regulator. It's a colorful ballet of connections, each one a small, deliberate act of bringing power closer.

These hoses then converge at the torch handle itself, the heart of the operation. The green hose attaches to the oxygen inlet, and the red to the acetylene. Each connection is secured with a special wrench, a gentle but firm tightening, ensuring no mischievous gas decides to sneak out.
Now, for the business end: the cutting attachment. This piece slides into the torch handle, often with a satisfying click or a quick tighten of a small nut. It’s like adding the perfect head to a magnificent beast, giving it direction and purpose. This is where the magic truly begins to take shape.
The tiniest star of the show is the cutting tip. These little brass jewels come in various sizes, each one designed for a specific task, like choosing the right brush for a masterpiece. It slots neatly into the cutting attachment, a quick tighten of the retaining nut, and suddenly, the torch has its voice.

Each component, no matter how small, plays a crucial role. It’s a testament to how even the smallest piece can hold immense importance in a larger system.
With all connections made, it’s time for a little bit of detective work: the leak check. A spray bottle filled with soapy water becomes your trusty sidekick. A gentle spritz over every connection point, from regulator to handle, awaits tell-tale bubbles. Finding no bubbles is a quiet victory, a confirmation that everything is perfectly sealed.
Then comes the moment to wake the giants. Slowly, ever so slowly, the cylinder valves are opened. First the oxygen, then the acetylene. You might hear a faint hiss, a whisper of contained power, as the gases flow into their respective regulators. It's like turning the key in a powerful engine, hearing it hum to life.
Next, the hoses need purging. This means opening the torch valves momentarily, letting any air or mixed gases escape. A brief hiss from the oxygen, then another from the acetylene. It’s a cleansing breath, ensuring pure gas is ready for action. You're clearing the throat for a powerful song.
With the cylinders awake and the hoses clear, you consult the regulator gauges, those wise old eyes. They tell you the story of the pressure within. Adjusting the regulator screws, you set the working pressures, first for the oxygen, then the acetylene. It’s a delicate dance, a slow turn and watchful eye, aiming for just the right numbers.

There's a quiet thrill in adjusting those dials, finding the perfect balance, like tuning a delicate instrument before a grand performance.
Finally, the torch is ready to sing. A quick flick of a striker, and the gases ignite with a soft pop, then a steady flame. Adjusting the valves on the torch handle, you fine-tune the flame, sculpting it until it forms a crisp, bright blue cone. It's mesmerizing, a tiny sun held in your hand.
You’ve taken disparate pieces of metal and gas and brought them together, coaxing them into a single, focused entity. The journey from separate parts to a cohesive whole is a satisfying one, a small act of creation that feels surprisingly profound. And suddenly, the world is ready to be reshaped.