How To Install Antares Autotune In Fl Studio 20
Alright, future hitmakers! So, you're ready to unleash the vocal wizardry of Antares Autotune in FL Studio 20? Fantastic! Let's get this show on the road. No need to feel overwhelmed, it's easier than making toast (and way more rewarding).
First Things First: The Downloading Dance
Okay, you've probably already done this, but let's double-check. Head over to the Antares website and download the version of Autotune that sings to your operating system (Windows or Mac). Make sure it's compatible with FL Studio 20.
Downloaded? Awesome! Now, find that installer – it’s usually lurking in your Downloads folder, patiently waiting for its moment to shine. Double-click it like you're opening a treasure chest filled with vocal gold.
Must Read
The Installation Fiesta
The installer will pop up, ready to guide you through the mystical land of software installation. Read the license agreement (or scroll through it really fast like everyone else does, we won't judge!). Then, click "Agree" or "I Accept" or whatever button signifies your consent to the software's terms.
Next, the installer might ask you where you want to install Autotune. Usually, the default location is perfectly fine. Just let it do its thing and install the plugin where it wants to – it knows best.
Pay close attention during the installation process! The installer might ask you to select the VST plugin folder. This is the crucial step that tells FL Studio where to find Autotune.
Take note of the folder path or write it down somewhere. You'll need it in a minute when we tell FL Studio where to look for its new best friend. Think of it like giving FL Studio the address to Autotune's house.
FL Studio: The Plugin Awakening
Alright, let's fire up FL Studio 20! It's time to introduce it to its new sibling. Open a project or create a new one – whatever floats your boat.
Now, navigate to the "Options" menu. It's usually at the top of the screen, hiding in plain sight. Click on "Options" and then find "Manage plugins." It's like opening the door to FL Studio's plugin kingdom.
The Plugin Search Party
A new window will appear, the "FL Studio Plugin Manager." This is where the magic happens. See that "Plugin search paths" section? This is where we tell FL Studio to look for Autotune.
Click the little folder icon (usually labeled "+") to add a new search path. Remember that VST plugin folder you noted down during the installation? Paste or type that path into the new search path field. You're giving FL Studio a treasure map!
Once you've added the path, make sure the "Verify plugins" box is checked. This tells FL Studio to double-check all the plugins it finds to make sure they're legit and ready to rock. It's like a plugin security check.
Now, hit the "Start scan" button! FL Studio will go on a plugin-finding mission, scouring the folders you specified for new plugins. This might take a few seconds, so be patient. Maybe do a little dance while you wait.
After the scan is complete, Autotune should appear in the list of plugins. Make sure the box next to it is checked. This activates the plugin and makes it available for use in your projects. It’s like giving Autotune a VIP pass to your song!
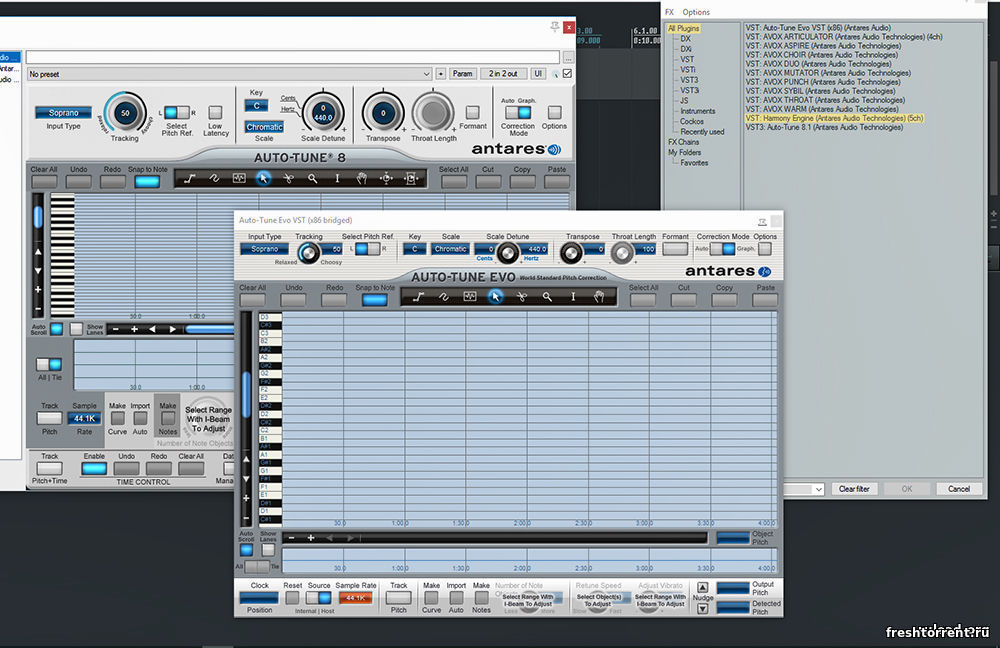
Autotune: Entering the Vocal Booth
Now that Autotune is installed and activated, it's time to use it! Open your mixer by pressing F9 (or clicking the mixer icon). Choose the track you want to apply Autotune to – usually, this is your vocal track.
In the mixer track, find an empty insert slot. These are the little slots where you can add effects like EQ, compression, and, of course, Autotune. Click on the slot and a menu will pop up.
Navigate through the menu to find Autotune. It might be under "VST," "Antares," or something similar. Just keep digging until you find it. It's like searching for your favorite candy in a giant candy store.
Select Autotune, and the Autotune interface will pop up! Congratulations, you've successfully installed and loaded Autotune in FL Studio 20. Give yourself a pat on the back – you deserve it!
Tweaking and Tuning: Unleash Your Inner Robot (or Not)
Now comes the fun part: experimenting with Autotune! Every version of Autotune has different settings, so play around with them until you get the sound you're looking for.
Adjust the "Retune Speed" to control how quickly Autotune corrects the pitch. A faster retune speed will create a more robotic effect, while a slower speed will sound more natural. It’s all about finding the sweet spot!
Select the key and scale of your song. This helps Autotune understand which notes are "correct" and which ones need to be nudged into place. Think of it as giving Autotune a musical map to follow.
Experiment with the "Humanize" control. This adds subtle variations to the pitch correction, making the vocals sound less robotic and more organic. It's like adding a little bit of soul back into the machine.
Don't be afraid to experiment! Autotune can be used in subtle ways to enhance your vocals, or it can be used to create wild and crazy effects. There are no rules, so have fun and see what you can come up with.
Troubleshooting: When Things Go Wrong
Sometimes, things don't go as planned. If FL Studio isn't recognizing Autotune, don't panic! We've all been there.
Double-check that you've installed Autotune correctly and that you've added the correct VST plugin folder to FL Studio's plugin search paths. A simple typo can cause a lot of trouble.

Try rescanning your plugins in the Plugin Manager. Sometimes, FL Studio just needs a little nudge to find new plugins. It’s like reminding it that something new is in the house.
Make sure you're using a compatible version of Autotune with FL Studio 20 and your operating system. Older versions of Autotune might not work with newer versions of FL Studio, and vice versa.
If you're still having trouble, consult the Antares website or the FL Studio documentation. They have tons of helpful resources and troubleshooting tips. You're not alone in this!
The Final Flourish: Vocal Perfection Achieved!
Congratulations! You've successfully installed Antares Autotune in FL Studio 20 and are now ready to create vocal magic. Go forth and create some amazing music! The world is waiting to hear your autotuned masterpiece.
Remember, Autotune is just a tool. It's up to you to use it creatively and artistically. Don't be afraid to experiment and push the boundaries of what's possible. Who knows, you might just create the next big vocal trend.
Now, crank up those vocals, add a touch of Autotune, and let your voice be heard! The stage is yours!