How To Dump Black Water From Rv

Ah, the open road! The wind in your hair, the endless horizon, the freedom to explore America's majestic landscapes from the comfort of your very own rolling palace. RVing is truly a lifestyle unlike any other, offering unparalleled independence and the joy of bringing your home-away-from-home wherever adventure calls. But even the most glamorous road trip has its practicalities, and chief among them is managing your onboard facilities. Yes, we're talking about the venerable, the essential, the often-whispered-about ritual of dumping your RV's black water tank.
Now, before you wrinkle your nose, let's be clear: this isn't just a chore; it's a liberation. The benefit? A clean, functional, and odor-free RV that allows you to continue your journey unburdened. It's the unsung hero that keeps your mobile sanctuary hygienic and comfortable. Without proper dumping, your tanks would fill, odors would proliferate, and your fantastic voyage would grind to a rather unpleasant halt. This activity, while perhaps not as picturesque as a sunset over the Grand Canyon, is absolutely fundamental to the everyday enjoyment and longevity of your RV experience. It ensures you can confidently boondock for days, relax at full-service campgrounds, and keep everything running smoothly, so you can focus on the fun stuff.
You’ll encounter opportunities to perform this crucial task in many places: most RV parks offer convenient full hookups right at your site, making it a breeze. Dedicated dump stations are also common at state parks, truck stops, and even some rest areas – typically well-marked and easy to find. For the homebodies, a macerator pump can even allow you to empty your tanks into your residential sewer cleanout. It’s a universal part of the RV owner's skillset, a shared experience that connects us all, whether you're a weekend warrior or a full-time nomad.
Must Read
So, how do we make this necessary ritual not just tolerable, but almost... satisfying? Here are some practical tips to master the art of the black tank dump, ensuring you do it effectively and without a hitch:
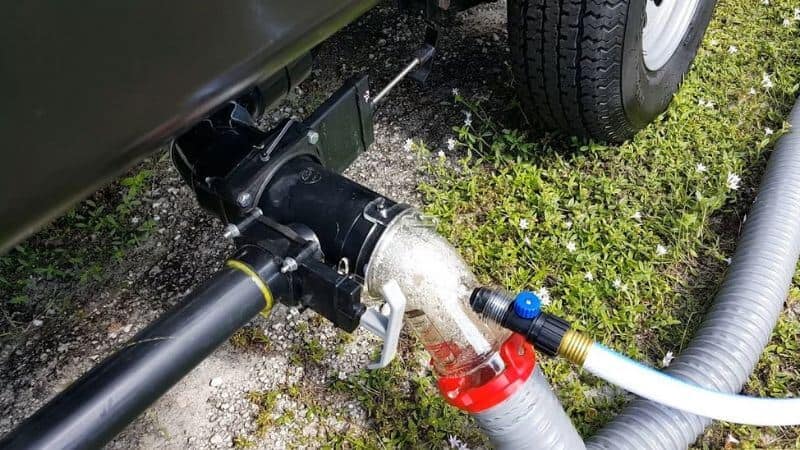
- Gear Up: First, always, always, always wear gloves. Disposable nitrile gloves are your best friend here. Also, ensure you have a dedicated, sturdy RV sewer hose – ideally one with a clear elbow fitting so you can visually confirm when things are truly clean.
- The Golden Rule: Black First, Then Gray: This is crucial. Connect your sewer hose to the RV’s black water outlet and the dump station. Pull the black tank valve first. Let it drain completely. Once clear, immediately close the black tank valve.
- The Rinse Cycle: Now, this is where the magic happens. After the black tank, open your gray tank valve. The soapy water from your shower and sinks will surge through the sewer hose, helping to rinse out any residual nasties left behind from the black tank. This is your natural, eco-friendly hose cleaner! Many RVs also have a built-in tank flush system; if yours does, connect a potable water hose (not your drinking water hose!) to it and let it run for several minutes to really scour the inside of your black tank. Watch through your clear elbow until the water runs truly clean.
- Close Up Shop: Once both tanks are empty and the hose is rinsed, close both valves. Disconnect from the dump station first, then from your RV. Store your hose properly – many RVers keep it in a dedicated bumper storage or a sealed bin.
- Post-Dump Refresh: After every dump, add a good quality black tank treatment with enzyme digesters. This helps break down solids and control odors until your next dump. A little water in the tank with the chemicals also helps activate them.
Embrace the process, and you’ll find that a well-executed black water dump is a small price to pay for the immense freedom and joy that RVing brings. It's about maintaining your sanctuary, ensuring comfort, and knowing that you're ready for your next grand adventure, fresh and clean.