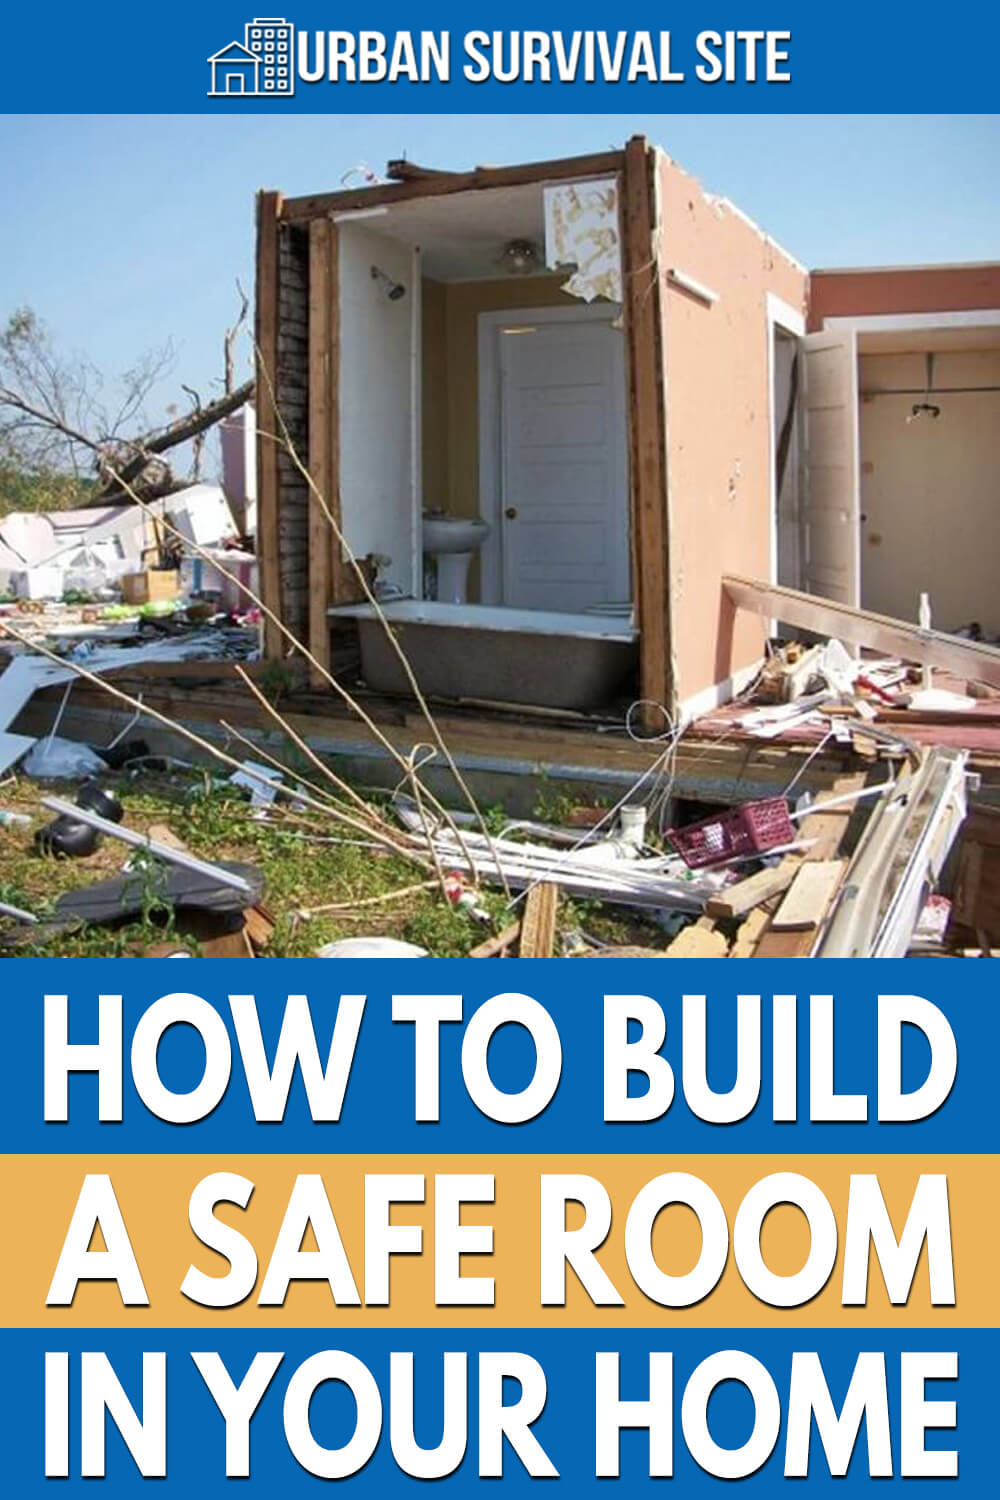
How To Build A Safe Room In An Existing Home

Alright, gather 'round, folks! Let's talk about something slightly more exciting than choosing the right avocado: building your own safe room! Forget panic rooms from movies – we're not talking about hiding from diamond thieves (unless, you know, that's your Tuesday). This is about creating a secure space for actual emergencies, like extreme weather, unexpected visitors (the ones who don't bring wine), or, you know, the occasional zombie apocalypse (always be prepared!).
Now, I know what you're thinking: "Building a safe room? Sounds expensive, complicated, and possibly involving concrete boots!" Well, it can be, but it doesn't have to be. Think of it as a DIY project, only instead of a birdhouse, you're building a slightly more robust birdhouse...for humans. A human-house, if you will.
Step 1: Location, Location, Safety!
First things first, gotta pick a spot! Ideally, you want an interior room, away from exterior walls and windows. Basements are popular, but not everyone has one. A central bathroom or a large walk-in closet can also work. Think about it: you probably already spend a decent amount of time in your closet trying to find matching socks – why not make it multi-purpose?
Must Read
Now, here's a fun fact: did you know that the most important thing about a safe room isn't the steel plating (though that is cool)? It's the foundation! You need a solid concrete foundation under your chosen room. If you're on a slab foundation, you're golden! If you're on a pier and beam, you might need to reinforce the area. Think of it like this: you wouldn't build a Lego Death Star on a wobbly table, would you? (Okay, maybe you would, but it wouldn't be very safe from, say, a rogue cat.)
Step 2: Fort Knox-ifying Your Walls
Time to get serious about those walls. Standard drywall ain't gonna cut it when a tornado is knocking at your door (or a particularly aggressive salesperson). You've got a few options here:
- Reinforce existing walls: This involves adding extra studs and filling the cavities with concrete or a high-strength grout. It's like giving your walls a protein shake, making them bulkier and more resilient. Think of it as turning your humble drywall into Dwayne "The Rock" Johnson-wall!
- Install steel plating: Okay, this is where the James Bond fantasies come in. Steel plating is expensive, but it's also incredibly effective. It's basically turning your room into a bank vault. Just be prepared for your neighbors to think you're either incredibly paranoid or planning a heist.
- Use bullet-resistant panels: Yes, they exist! And no, you probably don't need them. But hey, it's your safe room! Maybe you do have a zombie apocalypse plan. I'm not judging.
Important Note: Make sure you're properly anchoring everything to that solid foundation we talked about earlier. Otherwise, you're just building a fancy box that can be swept away like a cardboard castle in a hurricane. And trust me, you don't want to be inside that cardboard castle when the metaphorical (or literal) hurricane hits.
Step 3: The Doorway to Safety (and No Solicitors!)
The door is the weakest point in any safe room. A flimsy hollow-core door is basically an invitation for disaster. You need a solid-core door, preferably made of steel. Think of it as the bouncer at your exclusive "emergency only" club.
And don't forget the frame! Reinforce the door frame with steel plates and heavy-duty screws. You want that door to be able to withstand a serious battering. Imagine a toddler trying to get to a cookie jar – except the cookie jar is you, and the toddler is a force of nature.
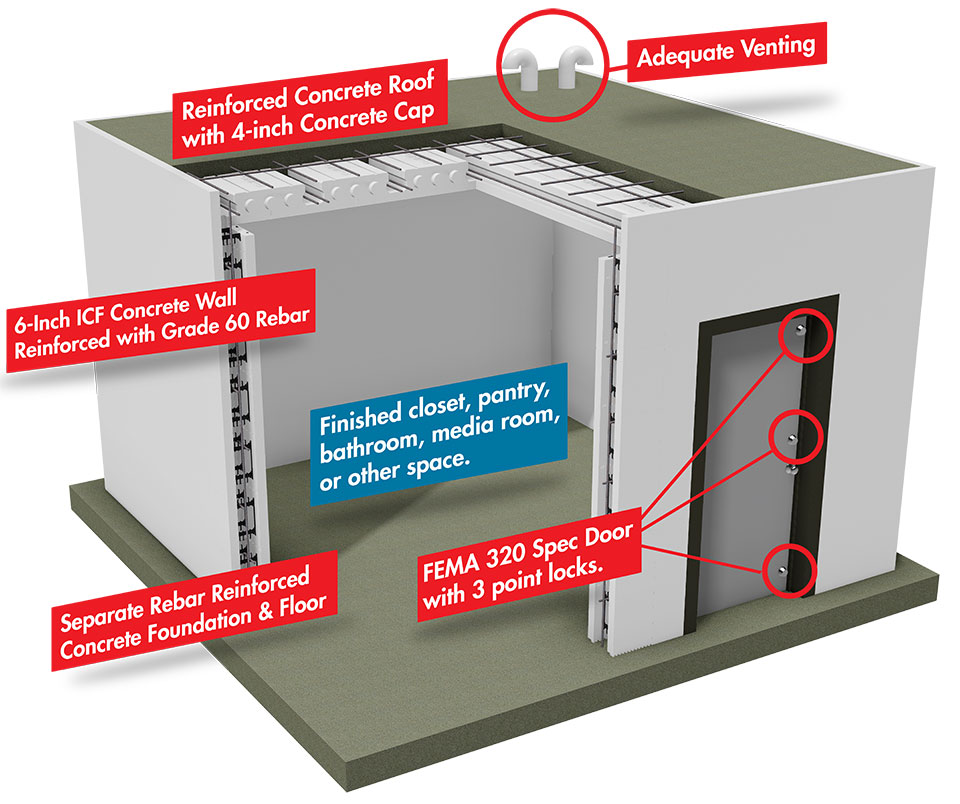
And finally, invest in a good, multi-point locking system. This isn't the time to skimp on security. You want locks that would make a professional locksmith sweat. Think of it as the combination to your super-secret stash of emergency chocolate. You want to keep that safe!
Step 4: Creature Comforts (and Emergency Supplies)
Okay, you've got the fortress. Now, let's make it livable. Because let's be honest, nobody wants to be stuck in a cold, concrete box for hours on end (unless you're into that sort of thing – no judgement!).

Here's your checklist:
- Ventilation: Don't suffocate! Install a small, filtered vent to provide fresh air. Unless you're planning to hold your breath for extended periods of time, a vent is crucial.
- Emergency supplies: Water, non-perishable food, a first-aid kit, a flashlight, a radio, and maybe a good book (or ten). Think of it as your survival kit for a Netflix-free weekend.
- Communication: A NOAA weather radio is essential for staying informed. A charged cell phone and a portable charger are also a good idea. Just remember to put it on silent – you don't want your ringtone to announce your location to the zombie horde.
- Seating: A comfortable chair or a small cot can make a huge difference. Especially if you're stuck in there for a while. Imagine trying to binge-watch your favorite show on a concrete floor. Ouch!
And finally, the most important thing: Practice! Run drills with your family so everyone knows what to do in an emergency. Think of it as a fire drill, but with less smoke and more pretending to be chased by imaginary monsters.
Building a safe room might seem daunting, but it's an investment in your peace of mind. And who knows, maybe it'll even increase your home's resale value. Just imagine the listing: "Charming 3-bedroom, 2-bath home with… bonus safe room! Zombie-proof and tornado-tested!" Now that's curb appeal!
:max_bytes(150000):strip_icc()/safe-room-Gaffco-2108027-crop-58b0d8a75f9b5860461ddd8c.jpg)