How To Add An Outlet From An Existing Outlet

Alright, gather 'round, folks! Let's talk about electricity. No, don't faint! I know, the word itself sounds like something only a wizard should mess with. But trust me, adding an outlet from an existing one is totally doable, even if your DIY skills mostly extend to assembling IKEA furniture (and even then, there's usually a rogue screw left over, am I right?).
Seriously though, before we dive in, a major, like Mount Everest major, word of caution: messing with electricity can be dangerous. I'm talking potential for shocking experiences, literally. If you're even remotely uncomfortable, or your hand starts trembling just thinking about it, call a qualified electrician. They went to school for this stuff, and their resume probably doesn't include a line about "almost electrocuted myself trying to hang a picture." Just sayin'.
But, if you're feeling brave (and responsible!), and you're just adding an outlet on the same wall as an existing one, then buckle up, buttercup. We're going on an electrical adventure!
Must Read
The Essentials: What You'll Need
Okay, so first, the supplies. Think of this as your electrical survival kit. You'll need:
- A non-contact voltage tester. This is your best friend. It's like a little electrical lie detector that tells you if a wire is live without you having to touch it. Think of it as the electric equivalent of a breath mint – essential before you get too close.
- A new electrical outlet. Don't be cheap here. Get a decent one. And while you're at it, maybe upgrade to one with USB ports? Future-proof, baby!
- Some electrical wire (typically 12- or 14-gauge, depending on your existing wiring - verify this!). Buy a little extra, because you will mess up at least one wire stripping attempt. It's practically a rite of passage.
- Wire connectors (wire nuts). These little guys keep your wires connected safely. Think of them as tiny electrical chaperones.
- A screwdriver (or two). A Phillips head and a flathead are usually necessary. If you only own one screwdriver, now's the time to invest.
- Wire strippers. These are a must. Trying to strip wires with a knife is a bad idea. Like, "hospital visit" bad.
- A utility knife or drywall saw. For cutting into the wall, obviously. Try not to cut any major pipes or support beams. You'll have a bad day.
- A level. Because nobody wants a crooked outlet. Unless you're going for that "intentionally quirky" look.
- A drill (optional, but helpful). For making pilot holes. Also useful for intimidating your neighbors with power tool noises.
- And finally, a healthy dose of common sense. This is arguably the most important tool on the list. Use it liberally.
Step-by-Step: The Shockingly Simple Process (Okay, Maybe Not Shockingly Simple)
Alright, deep breath. Here we go. Important: TURN OFF THE POWER! I can't stress this enough. Find the breaker that controls the existing outlet you're tapping into and flip it off. Double-check with your non-contact voltage tester. If it lights up, you've got the wrong breaker. Keep searching. This isn't a game of hide-and-seek; it's your safety on the line.
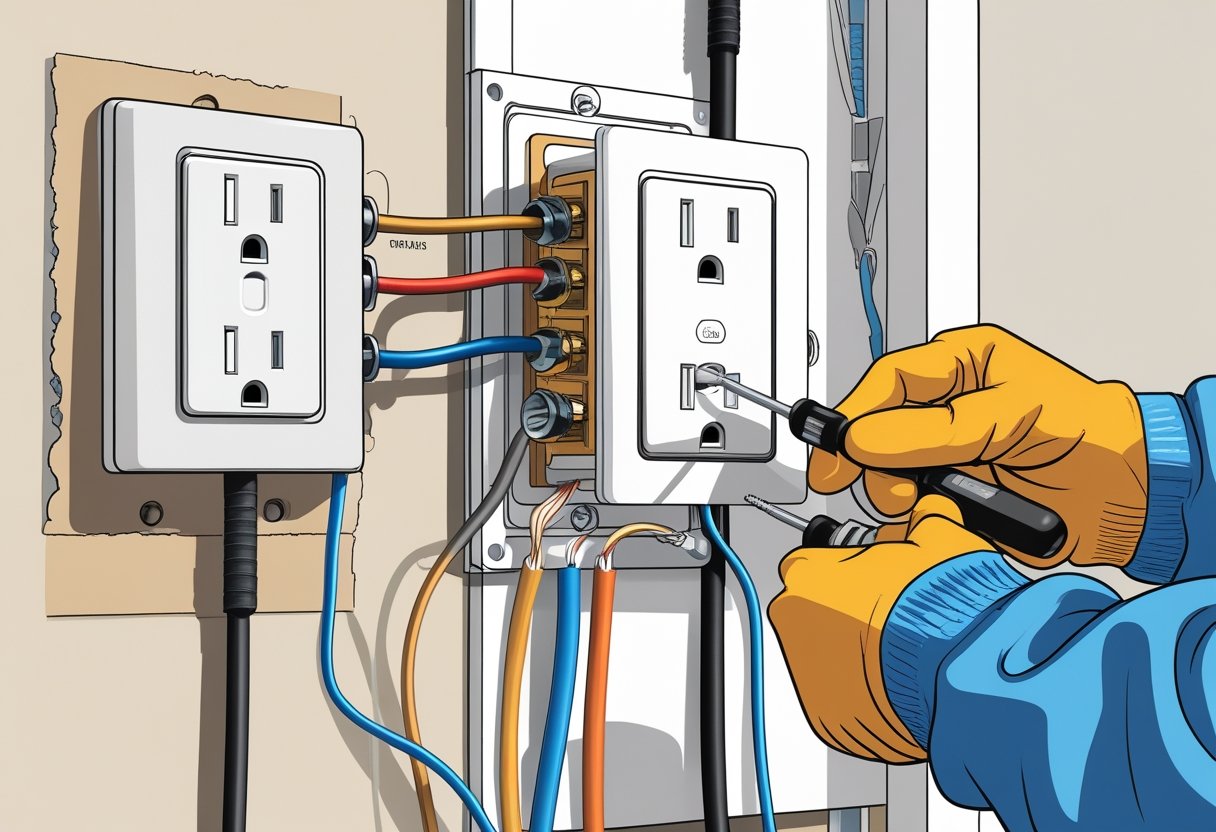
Now, carefully remove the cover plate from the existing outlet. Unscrew the outlet from the box. Gently pull it out. Behold! The glorious mess of wires within!
Using your non-contact voltage tester again, make sure no wires are live. Seriously, just check. It takes two seconds and could save your life.
Determine where you want to install the new outlet. Use your utility knife or drywall saw to cut a hole for the new electrical box. Pro tip: Trace the outline of the electrical box onto the wall before you start cutting. Makes things much easier.
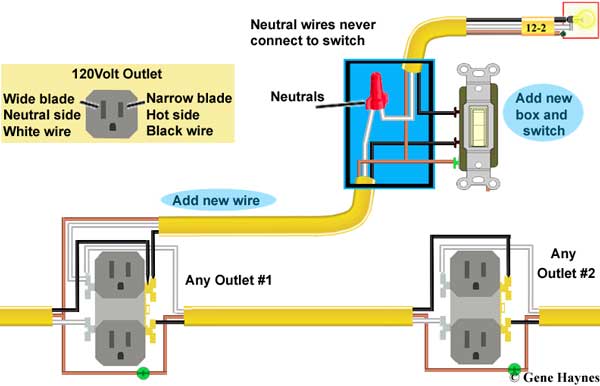
Run the new electrical wire from the existing outlet box to the new outlet box. This might involve some creative maneuvering. Try not to kink the wire. Imagine you're a wire whisperer, guiding it gently through the wall.
Now comes the fun part: wiring! You'll typically have three wires: black (hot), white (neutral), and green or bare copper (ground). Connect the corresponding wires from the existing outlet to the new wire using wire connectors. Then, connect the other end of the new wire to the new outlet. Important: Make sure the connections are tight! Loose connections are a fire hazard.
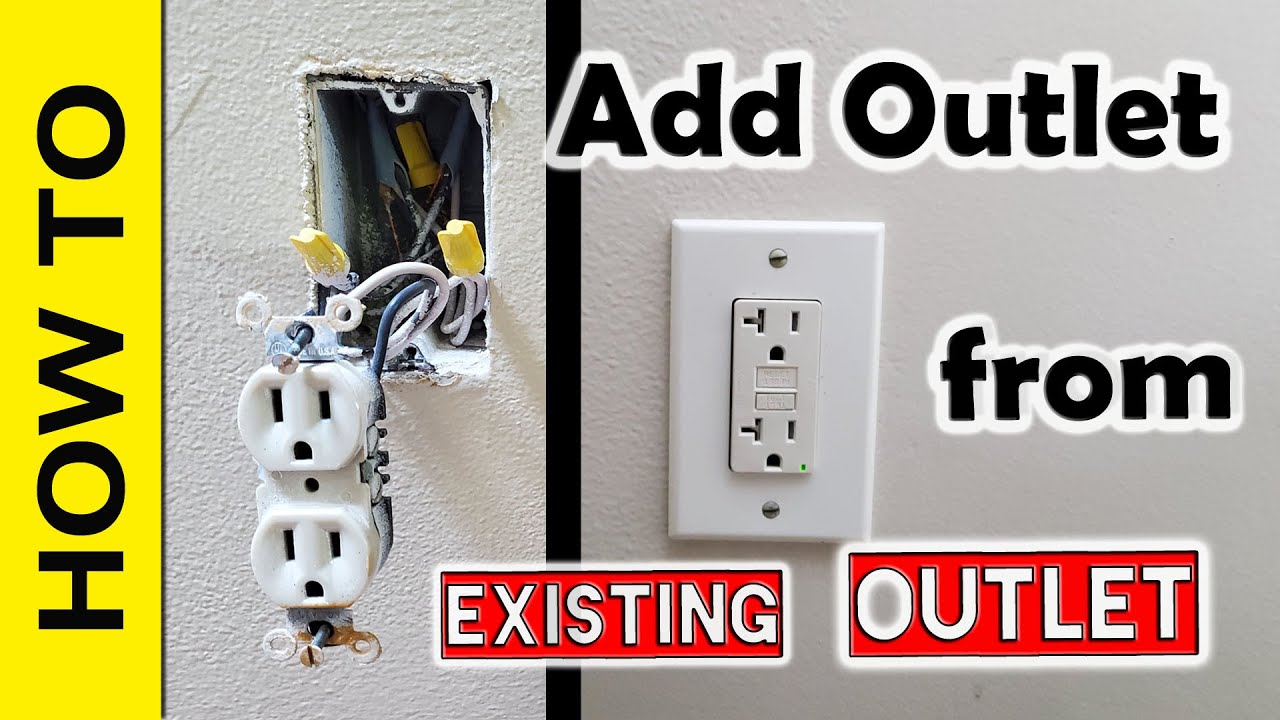
Carefully push the wires back into the electrical boxes and screw the outlets into place. Attach the cover plates. Make sure everything is level and secure.
Cross your fingers, say a little prayer to the electrical gods, and flip the breaker back on. Test the new outlet with a lamp or phone charger. If it works, congratulations! You've successfully added an outlet without electrocuting yourself (hopefully!). If it doesn't work, double-check your wiring and connections. And if you're still stumped, call an electrician. Seriously.
And there you have it! You've conquered the electrical beast. Now go forth and plug in all the things! Just maybe not all at once. You don't want to blow a fuse and have to start all over again.
