How Do You Wire A Plug Outlet
Ever stared at those two slits and that little round hole in your wall, wondering what magical, electrically charged elves live behind them? We all do! It’s one of those everyday mysteries, like why socks disappear in the dryer or how pigeons always know where the best dropped fries are. But unlike those conundrums, figuring out how to wire a plug outlet is actually something you can totally do. And it’s not nearly as shocking (pun absolutely intended!) as you might think. Grab your imaginary coffee, because we're about to demystify the humble wall socket, cafe-story style!
First things first, before we even think about touching wires, let's talk about the absolute, non-negotiable, most important step: safety! Think of it like this: electricity is your friend, but it’s the kind of friend who gives really enthusiastic, full-body hugs if you’re not careful. So, we need to turn off the power at the breaker box. Seriously. Go find that panel, flip the corresponding switch for the room you're working in, and maybe even put a little sticky note that says, "Do NOT touch, unless you want to feel like a human lightning rod!" Or, you know, just don't let anyone flip it back on. This isn't just a suggestion; it’s a commandment. Trust me, a dark room is far less dramatic than a trip to the emergency room.
The Cast of Characters: Wires!
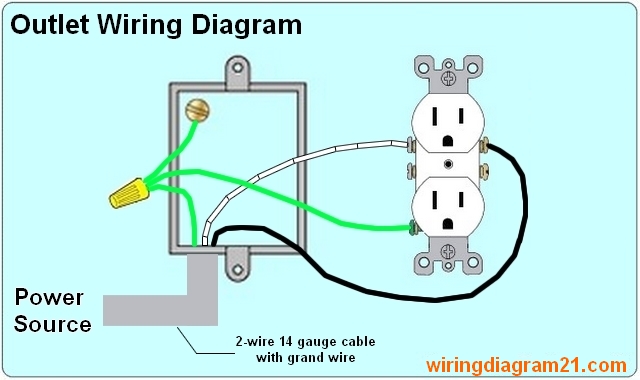
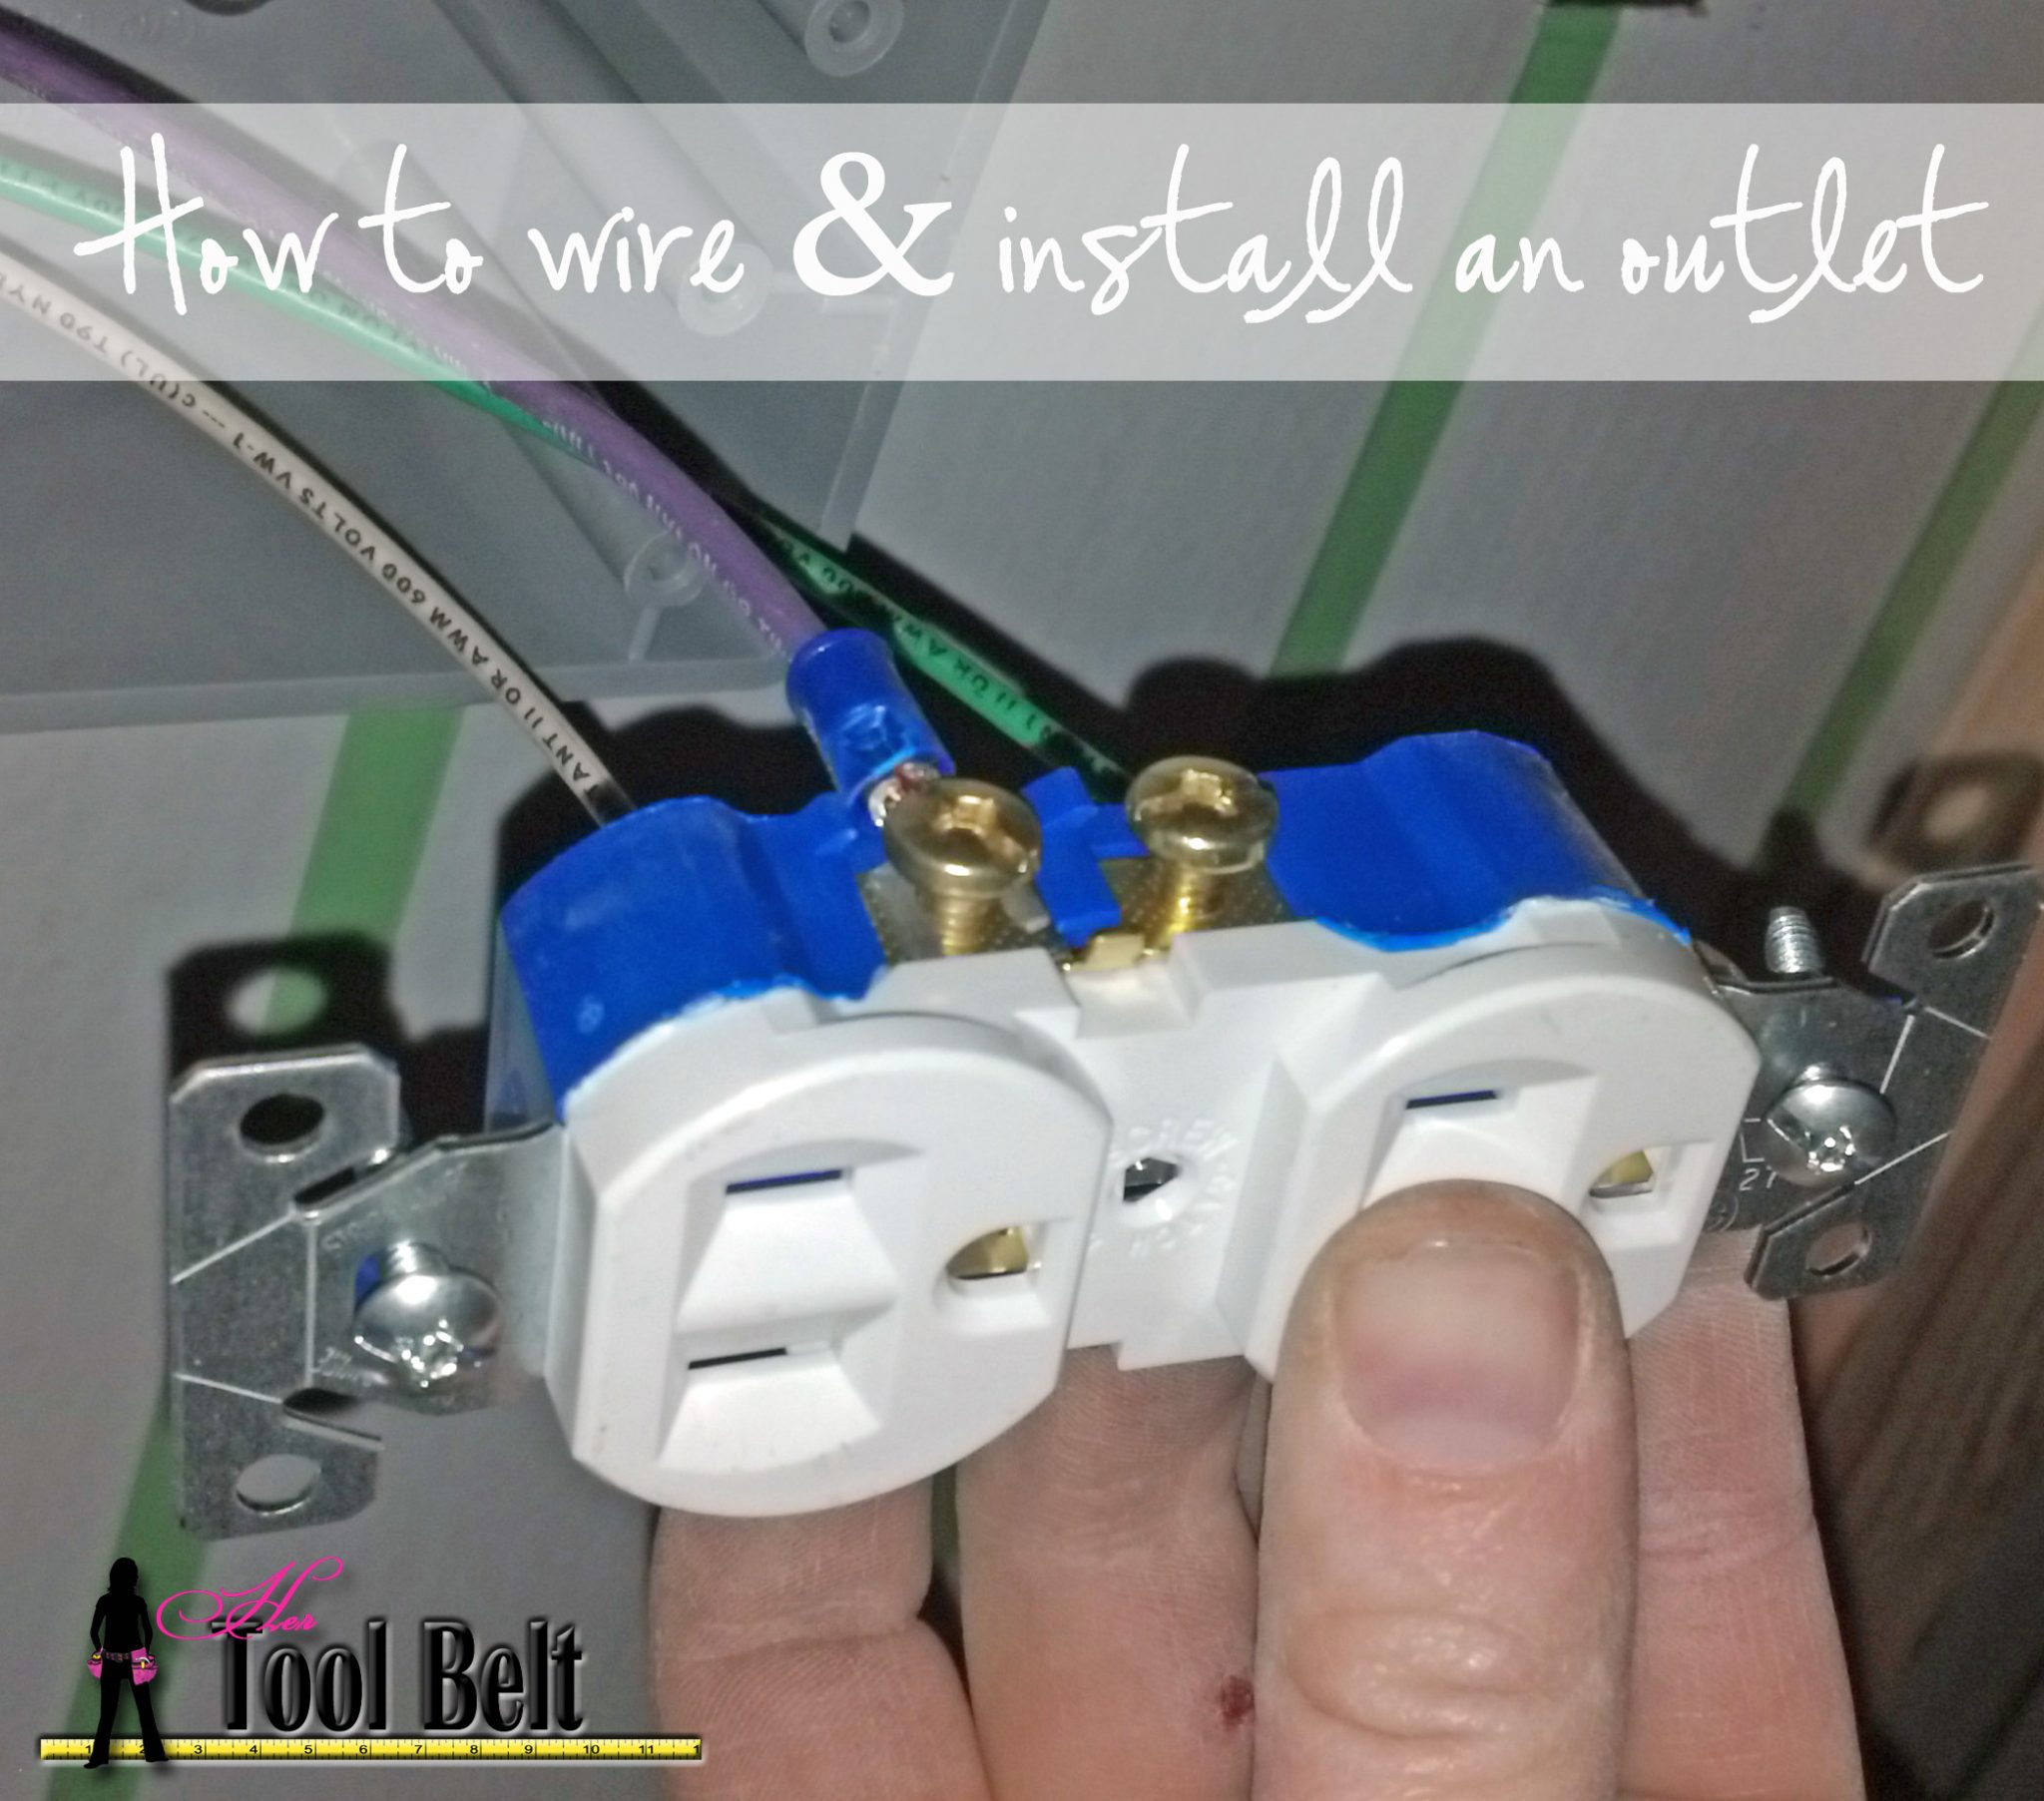
Once you’ve safely cut the juice, it's time to meet our electrical stars. When you peek into the outlet box (after unscrewing the old cover plate and outlet), you'll typically see three wires, each with its own vital role:
Must Read
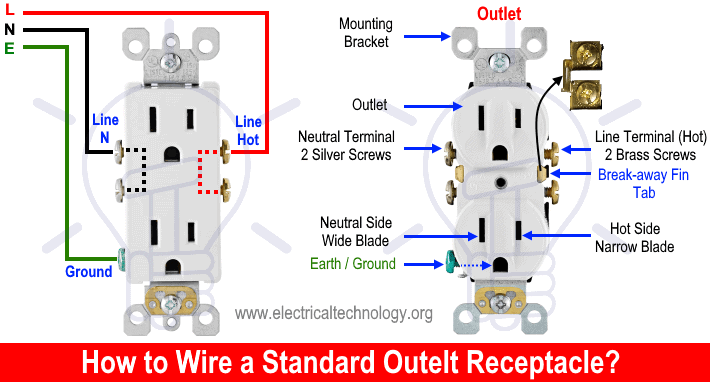
The Black Wire: This is our hot wire. Think of it as the super-charged, always-on character, the one bringing all the energy from the breaker box. It's got attitude, and it's carrying the live current. This one is almost always black (or sometimes red, but usually black in outlets).
The White Wire: This is our neutral wire. This guy is chill. It's the return path for the electricity, taking it back to the source after it's done its job. Like a good Uber driver, it just wants to get the current home safely. Always white, like freshly laundered sheets.
The Bare Copper (or Green) Wire: Ah, our superhero! This is the ground wire. In case anything goes horribly wrong – a stray spark, a short circuit – this wire is the emergency exit. It diverts excess electricity safely into the earth, preventing you (or your appliances) from becoming part of an impromptu light show. This is your unsung hero, the one who deserves a tiny cape! It's usually bare copper, or sometimes green-insulated.
How To Run Multiple Electrical Outlets
Your Toolkit for Taming Electrons
You don't need a crazy array of gadgets, just a few trusty sidekicks:
A screwdriver (Phillips and flathead, because you never know what kind of screws you’ll encounter).
Wire strippers: These are like tiny, precise barber shears for wires, helping you get just the right amount of insulation off without nicking the copper.
how to wire a plug outlet diagram - Wiring Diagram A voltage tester: This is your magic wand. It's a non-contact device that tells you if there's still electricity present, even when you think you've turned it off. Always test, test, test!
Needle-nose pliers (handy for bending wire loops).
The Grand Connection Ceremony: Wiring It Up!
Alright, power's off, tools are ready, wires have been identified. Let's wire this baby! The back of your new outlet will have three distinct screws:
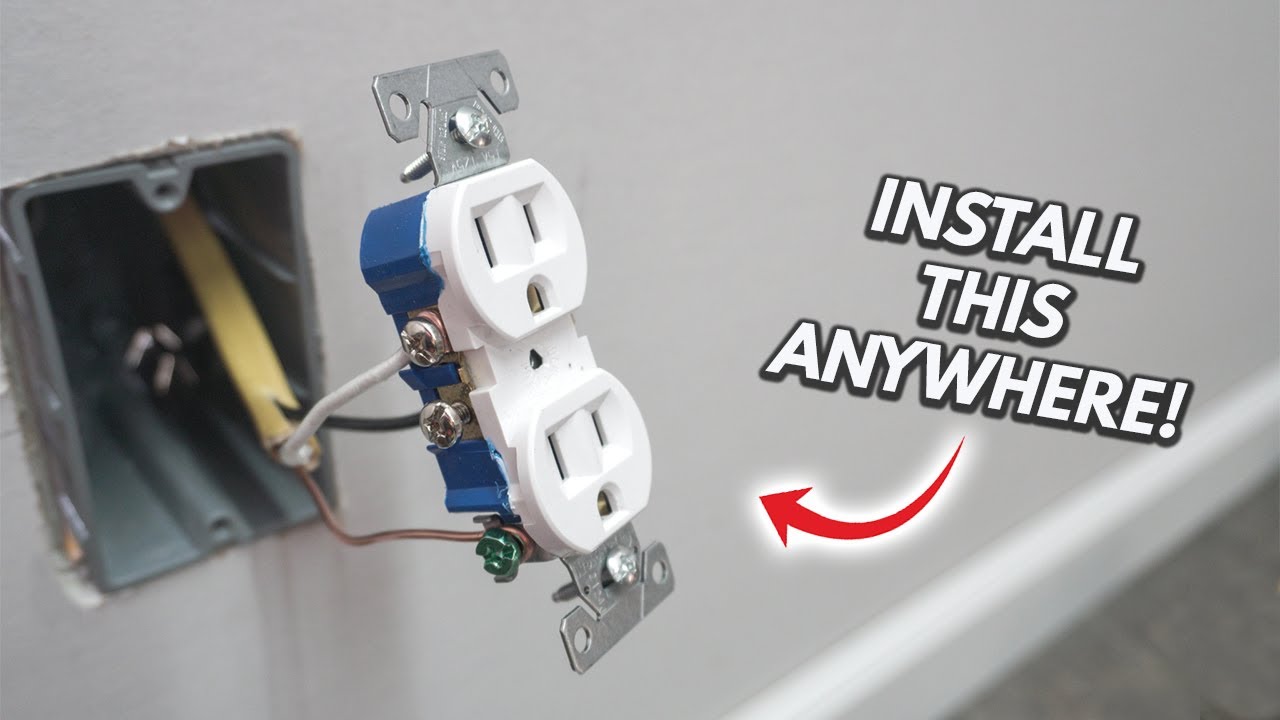
1. The Brass Screw (or darker colored): This is for the hot wire. * Take your black wire. Using your strippers, expose about ¾ inch of copper. * Bend the exposed copper into a small hook with your pliers. * Hook it around the brass screw, making sure the hook goes in a clockwise direction. This is important! When you tighten the screw, you want it to pull the wire tighter, not push it away. * Tighten that screw down until it's snug, but don't overtighten and strip it. We’re aiming for a firm handshake, not a death grip.
2. The Silver Screw (or lighter colored): This is for the neutral wire. * Grab your white wire. Strip about ¾ inch, bend it into a clockwise hook. * Attach it to the silver screw, and tighten it down firmly. See? Already a pro!
3. The Green Screw: This is for the ground wire. * This is the easiest one! Take your bare copper (or green) wire. Strip, hook clockwise. * Attach it to the green screw. Again, tighten it securely. This little guy is literally saving lives, so give it a good, tight connection.

Pro Tip: Some newer outlets have "stab-in" connections where you just push the wire into a hole. While quicker, screw terminals generally provide a more reliable and secure connection. If you're going for maximum peace of mind, stick to the screws!
The Grand Finale: Tuck, Test, and Triumph!
Once all three wires are securely fastened – black to brass, white to silver, green/copper to green – gently fold the wires back into the electrical box. Be careful not to crimp them or put too much stress on the connections. Push the outlet into the box, screw it into place, and then attach the decorative cover plate. Admire your handiwork!
Now for the moment of truth! Head back to your breaker box, and with a flourish (or just a simple flip), turn the power back on. Plug in a lamp or a phone charger (something simple, not your expensive new TV, just in case). If the light comes on, or your phone starts charging, congratulations! You’ve successfully tamed the electrons and wired your own outlet! You are officially an electrical wizard (a minor one, but still!).
If, for some reason, it doesn't work, or you hear any strange buzzing, or if you ever feel like you're out of your depth, always call a qualified electrician. There's no shame in seeking professional help, especially when it comes to the zappy bits of your home. But for many, wiring an outlet is a surprisingly satisfying, confidence-boosting DIY project. So go forth, conquer those outlets, and may your electrons flow ever so smoothly!