How Do You Weld Cast Aluminum
Okay, so picture this: My buddy Frank, a man who loves old machinery more than he probably loves some relatives, had a catastrophic moment. His vintage 1970s motorcycle, a true beauty, decided to vent its feelings via a rather dramatic crack in its cast aluminum engine casing. Frank looked at me, eyes wide with a mixture of despair and desperate hope. "Dude," he practically whispered, "can we... weld this?"
And that, my friends, is the million-dollar question when it comes to cast aluminum. It's the kind of query that sends shivers down the spine of many a seasoned welder, conjuring images of molten metal spitting, pores popping, and a whole lot of head-scratching. Welding regular aluminum? Yeah, that's one thing. But cast aluminum? Oh boy, that's a whole different beast. But fear not, intrepid metal whisperer, because it can be done. It just requires a healthy dose of patience, the right tools, and maybe a little less cursing than usual.
Why is it such a royal pain in the… well, you know?
If you've ever tried to weld something made of cast aluminum and ended up with a mess that looks more like modern art than a functional repair, you're not alone. The reasons are pretty solid, pun intended:
Must Read
- Contamination, glorious contamination! Cast aluminum is often made from recycled materials. This means it can be chock-full of impurities like silicon, magnesium, zinc, and sometimes even lead. Plus, given its use in engine blocks or transmission casings, it’s probably soaked up years of oil, grease, and dirt. All these contaminants are like kryptonite to a clean weld. They bubble, they spit, they create porosity like it's going out of style.
- Porosity's party trick: Because of all those impurities and gases trapped within the metal, your weld can end up looking like Swiss cheese. Not ideal for structural integrity, right?
- The Oxide Layer: Aluminum naturally forms a super-tough, high-melting-point oxide layer on its surface. This pesky layer has to be dealt with, or your weld won't penetrate the actual aluminum underneath.
- Thermal Conductivity & Cracking: Aluminum dissipates heat incredibly fast, which can lead to cracking if not handled correctly. Different alloys also expand and contract at different rates, adding to the fun.
So, can it be done? (Spoiler: Yes, but with caveats!)
Absolutely, it can be done! But let's be real: it’s not for the faint of heart or the casually curious. This isn't a "grab your stick welder and go for it" kind of job, unless you enjoy abstract sculpture. For successful cast aluminum welding, you're almost certainly going to need an AC TIG (GTAW) welder. Why TIG? Because it gives you precision control over heat and allows for the necessary cleaning action (more on that in a sec).
The Secret Sauce (aka The Method)
Alright, lean in, because this is where the magic (and a lot of elbow grease) happens:

1. Cleaning, Cleaning, CLEANING!
Seriously, folks, I cannot stress this enough. This step is 80% of your battle. Imagine trying to paint over a greasy, muddy wall – it’s just not going to stick, is it? It's the same here.
- Mechanical Cleaning: Grab a dedicated stainless steel wire brush (and I mean dedicated – don't use the one you use for steel, or you'll contaminate everything). Grind out any cracks, bevel the edges, and remove as much surface gunk as possible. A carbide burr on a die grinder works wonders here.
- Chemical Cleaning: Once you've scraped away the big stuff, douse it in acetone, brake cleaner (non-chlorinated, please!), or a good degreaser. Wipe, wipe, wipe until your rag comes away clean. You might have to repeat this a few times, especially if it's an old engine part that’s been marinated in oil for decades. Some welders even bake the part in an oven to sweat out hidden oils!
2. Preheating: Get it Cozy
Once it's squeaky clean, you'll want to preheat the cast aluminum. This isn't just to make it feel nice; it serves a few crucial purposes:

- It helps burn off any residual contaminants lurking below the surface.
- It reduces the thermal shock when you start welding, minimizing the risk of cracking.
- It helps with penetration and makes the metal flow better.
Aim for around 300-400°F (150-200°C). You can use a temperature crayon or an infrared thermometer to check. Be careful not to overheat it, or you'll risk collapsing the casting.
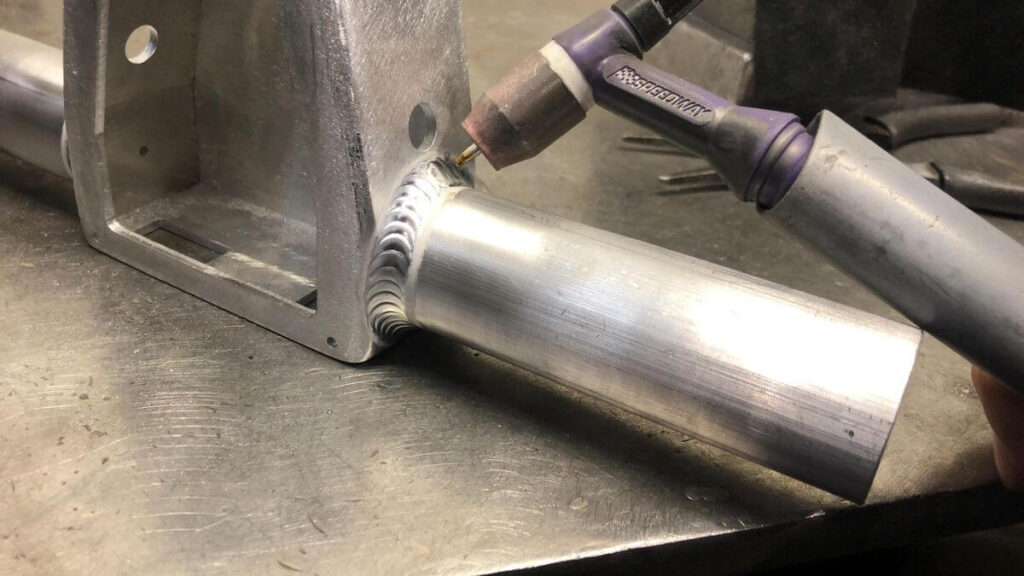
3. AC TIG is Your Best Friend
As mentioned, AC (Alternating Current) TIG welding is paramount for aluminum. The alternating current effectively blasts away that stubborn oxide layer, allowing your filler metal to fuse with the clean aluminum underneath. Play with your balance and frequency settings to find what works best for your machine and the particular casting.

4. Filler Rod: Choose Wisely (or Wildly Guess)
Selecting the right filler rod can be a bit of a guess if you don't know the specific alloy of your cast aluminum. However, a common and often successful choice for general-purpose cast aluminum repair is 4043 aluminum filler rod. It has good flow characteristics and helps reduce cracking. Some folks use 5356 for slightly stronger welds, but it doesn't flow quite as easily.
5. The Actual Weld: Fast and Furious (but controlled)
Once you start welding, you need to be fairly quick and confident. Cast aluminum requires a hotter, faster approach than wrought aluminum. Get a good puddle going, add your filler, and move. Don't dally, or you'll just create more heat and potentially more problems. Watch for porosity – if you see too many bubbles, stop, clean again, and reconsider your preheat or amperage.

6. Post-Weld: Chill Out
After your weld is done, let the part cool slowly and naturally. Don't dunk it in water or hit it with compressed air to speed things up, as rapid cooling can introduce new stresses and lead to cracking. Think of it like a nice, relaxing cooldown after a workout.
Is it worth it?
For Frank's vintage motorcycle engine casing, a new one would have been astronomically expensive, if not impossible to find. So for him, the time, effort, and occasional profanity were absolutely worth it. It’s challenging, for sure, but the satisfaction of successfully repairing a seemingly irreparable cast aluminum part? That, my friends, is priceless.
So, next time you stare down a cracked cast aluminum component, don't immediately throw in the towel. With the right preparation, tools, and a healthy dose of determination, you just might bring that broken part back to life. Go forth and conquer that cast aluminum!