How Do You Use A Mig Welder

Ever dreamed of being a modern-day alchemist, turning sparks into solid, unbreakable bonds? Well, my friend, grab your imaginary cape because we're about to dive headfirst into the gloriously messy, utterly satisfying world of using a MIG welder! Think of it less as complicated machinery and more as a super-powered glue gun for grown-ups who like to make things ridiculously strong and occasionally shiny. We're going to make metal pieces fall madly in love and stay stuck forever. Prepare for adventure!
First Things First: Suit Up, Superhero!
Before you even think about touching that trigger, let's get you looking like a cool, but protected, welding warrior. This isn't just about fashion, it's about keeping your precious self intact. You'll need a good pair of heavy-duty welding gloves – because molten metal is not a friendly hand-lotion. Next up, a long-sleeved shirt (preferably cotton or denim, skip the synthetics unless you fancy a melted arm party) and some sturdy jeans. And for the grand finale, your majestic welding helmet! This isn't just a mask; it's your personal eclipse viewer for the miniature sun you're about to create. Don’t even glance at an arc without it; your eyeballs are priceless, trust me, they don't sell replacements at the corner store.
Safety mantra: Protect the eyes, protect the skin, protect the sanity!
Meet Your Metal-Melting Machine
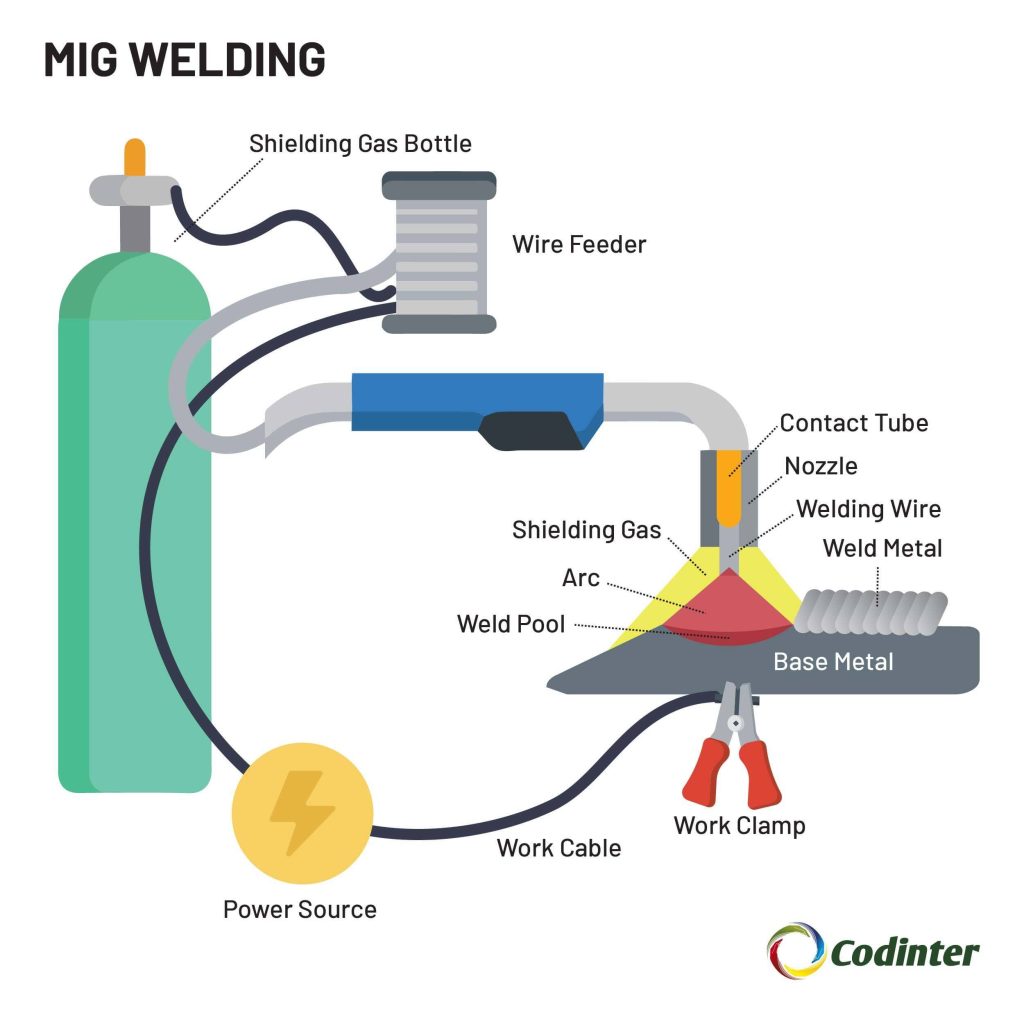
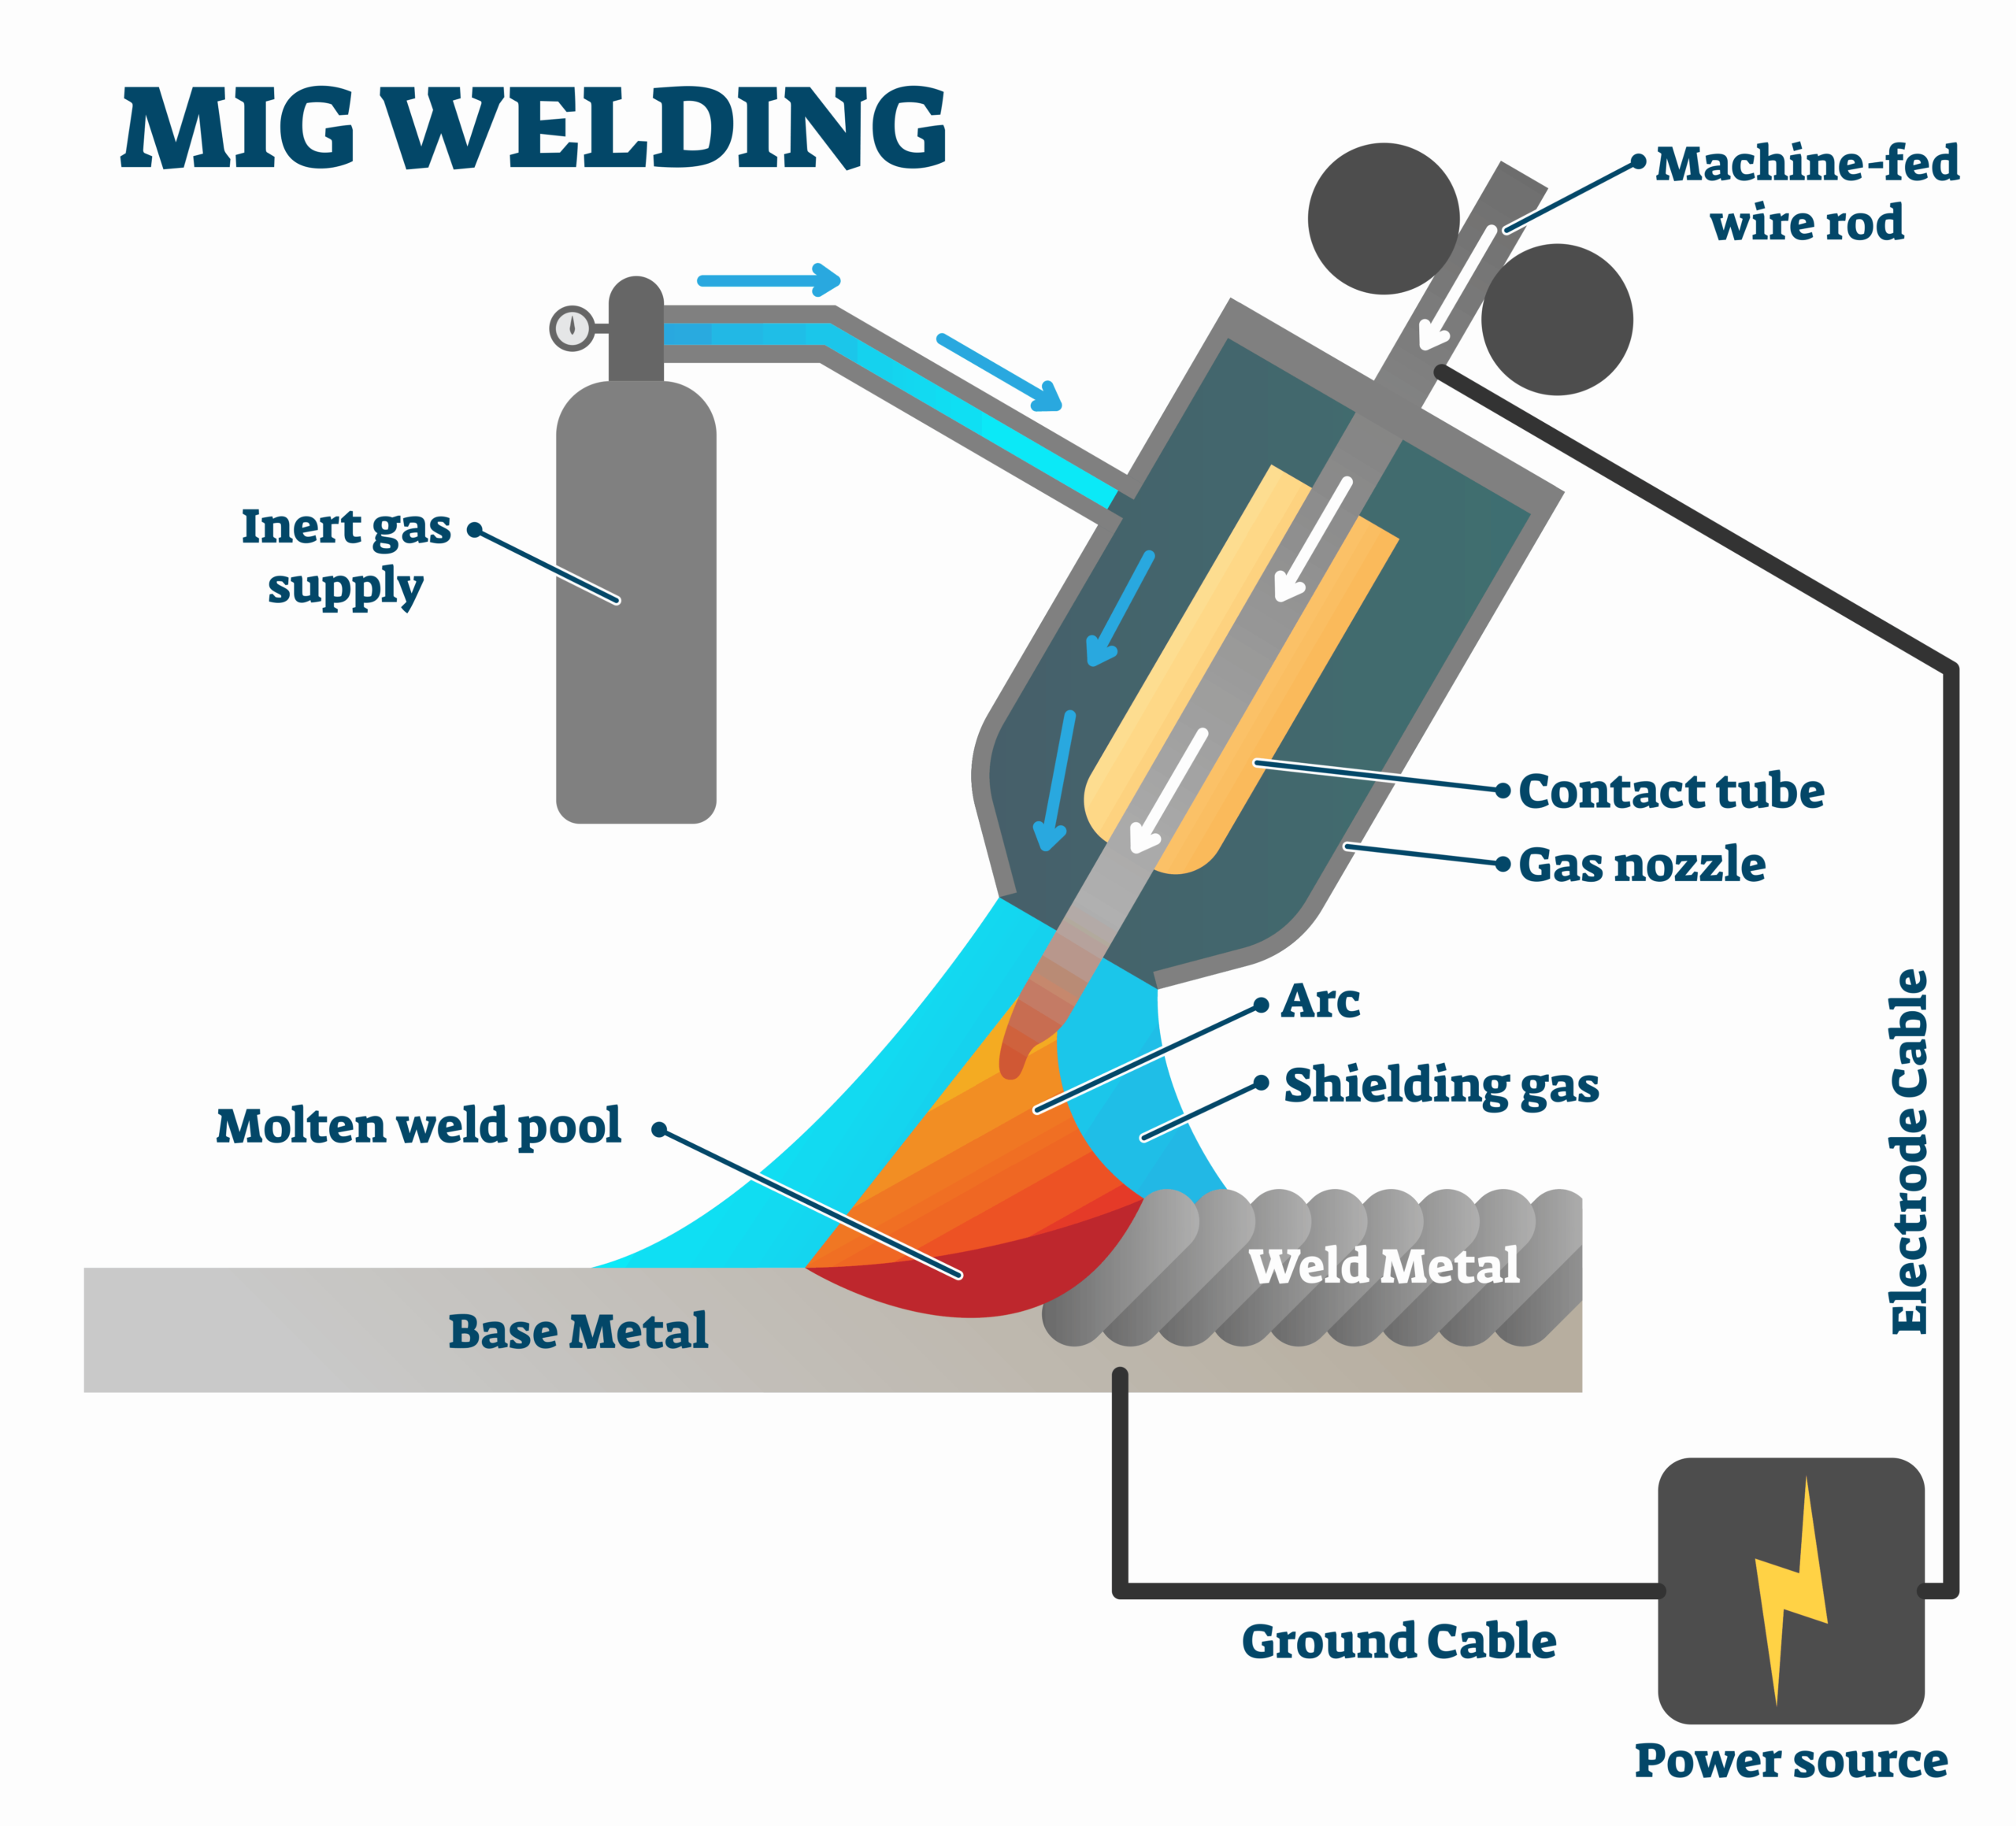
Okay, now for the star of the show: your MIG welder! It might look a little like a futuristic bread maker with a very long, bendy nose, but it’s actually your ticket to metal magic. That long nose is the welding gun, and it’s where all the sparky action happens. Inside the machine, there’s a spool of metal wire, patiently waiting to be zapped into existence, and usually, a big ol' gas tank hooked up to the back. This tank holds an inert gas (like argon or a mix) which acts like a magical invisible shield, protecting your weld from angry air molecules.
The Grand Setup: Your Pre-Welding Ritual
Alright, let’s get this party started! First, make sure your gas tank is open and the flow rate is set. Think of it like giving your welder a very important deep breath of fresh air... only it's inert gas, not fresh air, and it's from a tank, not a lung. Details, details! Next, feed that glorious metal wire through the gun. It’s like threading a needle, but instead of fabric, it’s for metal, and instead of a needle, it’s a high-tech gun. Once it’s coming out the tip, snip it off so you have about a half-inch sticking out – just like a little metallic tongue ready to taste some sparks.

Now for the power settings! This is where you become the maestro of the metal symphony. Most MIG welders have two main dials: one for voltage (how hot your spark is, like the oven temperature) and one for wire speed (how fast that metal spaghetti shoots out, like how quickly you're spreading frosting). Start with the settings recommended for your metal thickness (there’s usually a handy chart inside your welder's door or in the manual) and get ready to fine-tune. This is where the artistry comes in, a little more heat, a little less wire, until it sounds like bacon sizzling on a very happy grill.
The Moment of Truth: Laying Down That Bead!
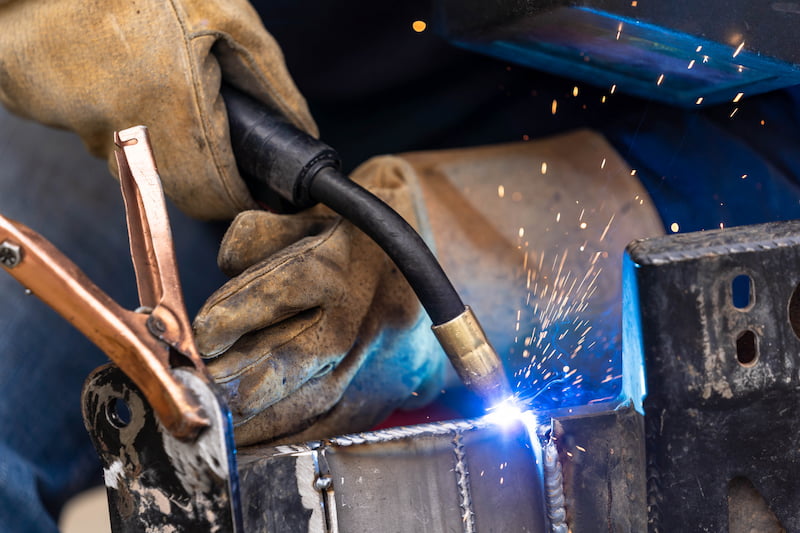
You’re suited up, the machine is humming, the metal is prepped (and hopefully clean, because dirt is the enemy of a good weld, almost as much as actual enemies). Clip your ground clamp firmly to the piece of metal you want to weld. This completes the circuit, making sure all that electrical magic has somewhere to go. Now, hold your welding gun with a firm but relaxed grip, angled slightly – think of it like holding a pencil, but a very loud, sparky pencil. Get comfortable; you'll be holding this position for a bit.
Put on your welding helmet, take a deep breath, and position the tip of your gun about a quarter-inch from where you want to start your weld. Press the trigger! Zzzzzzzap! A glorious, miniature sun will explode at the tip of your gun. Don't flinch! You’ve just created an arc, and a tiny pool of molten metal – your golden puddle – will appear. This is the true secret, folks! Watch that puddle like a hawk. It’s like watching liquid metal lava, tiny and perfectly obedient.
Now, gently, steadily, start moving the gun. You’re either "pushing" the puddle (moving the gun forward, away from the weld you've just made) or "pulling" it (dragging it behind you). For most beginners, "pulling" is often easier to see the puddle. Keep that golden puddle consistent in size. If it gets too big, you're going too slow; too small, you're going too fast. Imagine you’re drawing a perfect, continuous line of liquid gold. You can do a tiny circular motion, or a zig-zag, or just a straight drag – experiment to find what feels right and looks good. The goal is a uniform, even bead, like a shimmering metal worm that’s just had a very good meal.
When you reach the end of your weld, release the trigger, and just like that, the miniature sun goes out, leaving behind a steaming, cooling line of metal. Don’t touch it! It’s still super hot. Give it a moment, admire your handiwork (even if it's a little wobbly, it's your wobbly!).
The Glorious Aftermath: Behold Your Creation!
Once your weld has cooled (give it a few minutes, resist the urge to poke!), you can take a wire brush to it to clean off any smoky residue. And there you have it! Your very own, strong-as-an-ox, brilliantly joined metal masterpiece. Go ahead, give it a proud pat (after it cools, obviously, unless you enjoy a good sizzle). You’ve just entered the thrilling world of making things with fire and electricity. Welcome to the club, you magnificent metal-molder, you!