So, there I was, face shield down, torch in hand, feeling like a metal-bending superhero. I was about to lay down the perfect bead on this aluminum bracket. I’d watched the YouTube tutorials, I’d even practiced on some scrap. Confidence? Through the roof! Result? A molten, cratered, embarrassing mess that looked more like abstract art gone wrong than a weld. Sigh. We’ve all been there, right?
That little debacle taught me a valuable lesson: welding aluminum with TIG (GTAW) isn't just about having a fancy machine and a cool helmet. It’s about understanding the settings. And trust me, those settings can make or break your project. I mean, you could technically *try* to weld aluminum with settings meant for steel… but you’d be in for a bad time. (Don't do it. Just... don't.)
Understanding Amperage: The Goldilocks Zone
Amperage is basically the heat you’re throwing at the metal. Too low, and you're just poking it with electricity. Nothing happens. Too high, and you'll blow a hole right through it before you can even blink. Aluminum is notoriously sensitive, so finding that "just right" amperage is crucial.
Think of it like Goldilocks and the three bears. You need the porridge that's not too hot, not too cold, but *just right*. Now, how do you find it? A good rule of thumb is about 1 amp per .001 inch of material thickness. So, for 1/8 inch (0.125") aluminum, you're looking at around 125 amps. But! (There's always a but, isn't there?) This is just a starting point. You'll need to fine-tune based on your machine, your technique, and even the ambient temperature. Seriously, a colder garage means you might need slightly more heat.
Pro Tip: Start low and slowly increase the amperage until you get a good puddle going. You want a smooth, controllable puddle, not a sizzling, spattering mess.
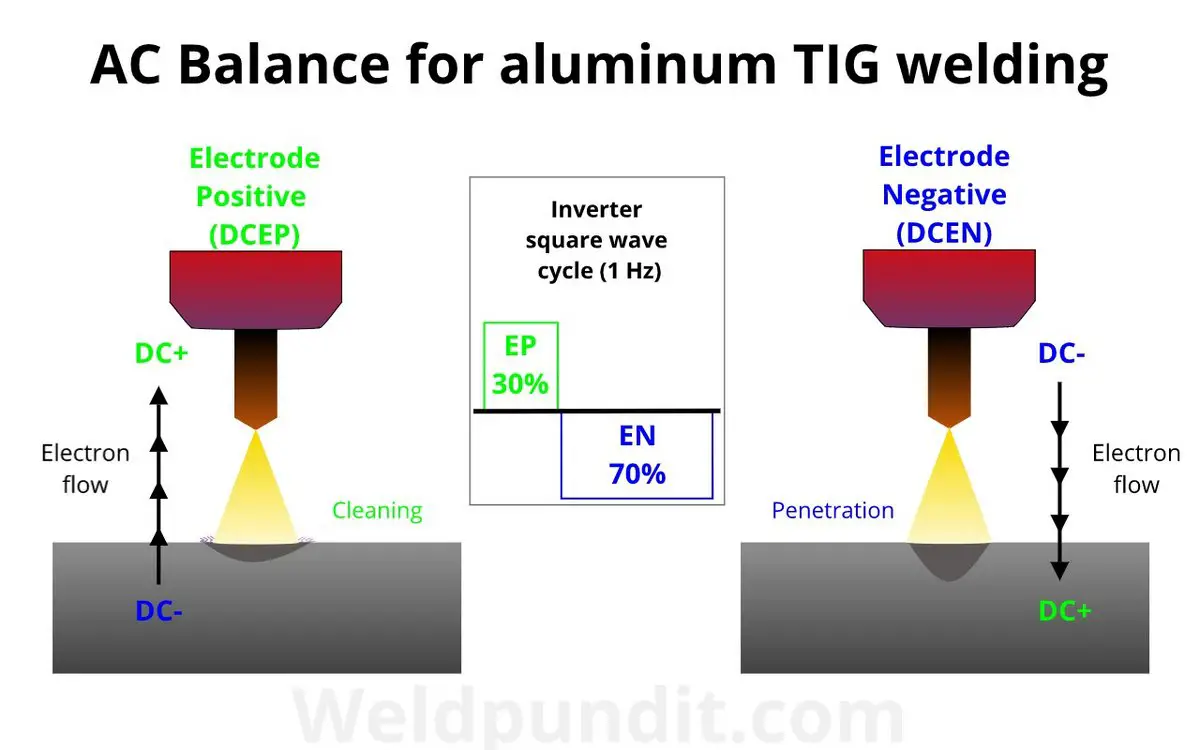
AC Balance: Cleaning vs. Penetration
TIG welding aluminum is almost always done with AC (Alternating Current). Why? Because AC has two phases: a positive phase and a negative phase. The positive phase helps clean the aluminum oxide layer (that stubborn, invisible film that prevents good welds). The negative phase provides the heat and penetration.
AC Balance allows you to adjust the ratio of positive to negative. A higher percentage of positive (cleaning action) will give you a wider, cleaner weld but less penetration. A lower percentage of positive (more penetration) will give you a narrower weld, potentially with more contaminants. I know, it’s like a balancing act. See what I did there?
Generally, a setting around 70-80% cleaning action is a good starting point for most aluminum alloys. Again, experiment! Watch your weld pool. If you see a lot of black soot around the weld, you need more cleaning action. If your weld isn't penetrating enough, reduce the cleaning action.
Frequency: Controlling the Arc
AC frequency controls how often the current switches between positive and negative. A higher frequency will result in a more focused arc, a narrower heat-affected zone (HAZ), and potentially faster travel speeds. A lower frequency will give you a wider arc, a wider HAZ, and slower travel speeds.
Modern TIG machines allow you to adjust the frequency significantly. Start with a middle-of-the-road frequency (around 120 Hz is often a good starting point). If you're struggling to control the arc, try increasing the frequency. If you need a wider weld, decrease it. Honestly, this is one setting where experimentation is key to finding what works best for *you*.
Gas Flow: Shielding Your Work
Argon gas is your best friend when TIG welding aluminum. It shields the weld pool from atmospheric contamination, preventing oxidation and porosity (those nasty little holes that weaken your weld). The proper gas flow rate is critical. Too little, and you'll get porosity. Too much, and you'll create turbulence that draws in contaminants.
A good starting point is around 15-20 cubic feet per hour (CFH). But this depends on the size of your gas lens and the size of the part you are welding, and even the air movement around you. If you're welding outdoors, you may need to increase the gas flow to compensate for the wind. Conversely, if you're welding in a confined space, you might be able to get away with a lower flow rate.
Side note: Make sure you're using pure argon. No mixes! Aluminum is picky.
Practice Makes Progress (Not Perfect, Just Progress)
Ultimately, the best way to dial in your TIG welding settings for aluminum is to practice. A lot. Get yourself some scrap aluminum, play around with the settings, and see what works best for you and your equipment. Don't be discouraged by initial failures. We all start somewhere! And hey, even a molten, cratered, embarrassing mess can be a learning experience. Just maybe don't frame it.
Happy welding!