Ever felt like you're missing out on some serious DIY fun? Like there's a secret club of handy people doing awesome stuff? Well, let me tell you, wiring a 220 breaker is like finding the secret handshake to that club!
It sounds intimidating, sure. But imagine the satisfaction of knowing you tamed the electrical beast! It's like being a superhero, but with a screwdriver.
Understanding the 220 World
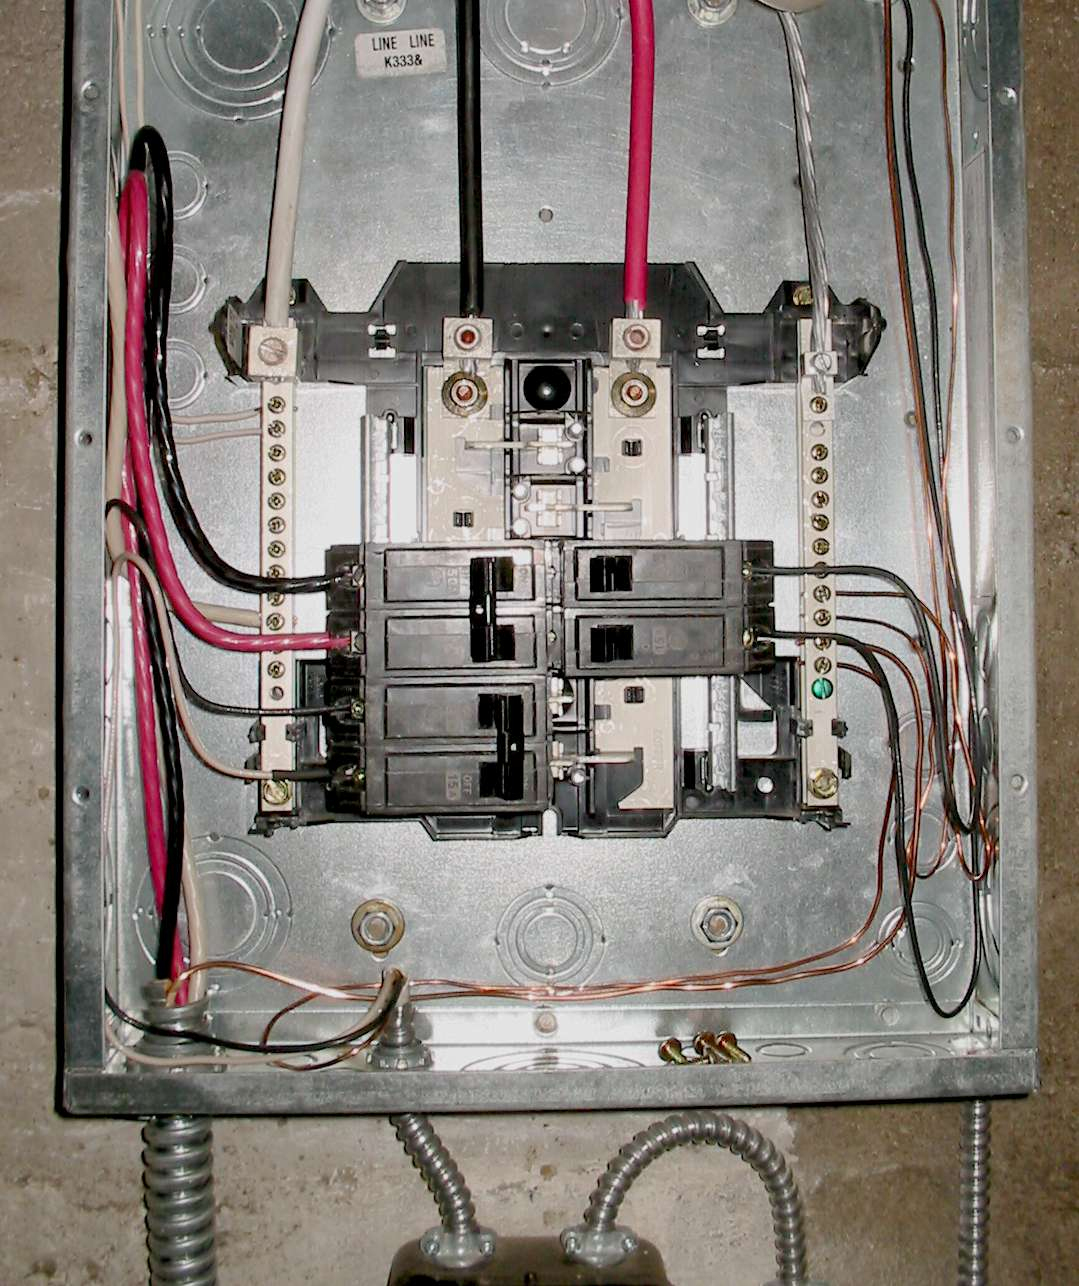
Okay, let's dive in! Think of your electrical panel as the heart of your home's power system. It's where all the circuits get their juice.
And the 220 breaker? That's like the super-powered artery, ready to pump energy to your heavy-duty appliances. Things like your dryer, your AC unit, maybe even a fancy welder if you're feeling adventurous!
These things need more oomph than your average lamp. That's where the 220 comes in.
Spotting the Right Spot
First, you need to know where you're going. Look inside your panel. Notice those empty slots?
That's where your new 220 breaker is going to live! But hold on, not just any spot will do.
You're looking for a space that spans two vertical slots. These are designed to accommodate the double-pole breakers needed for 220 circuits.
The Breaker Itself
The 220 breaker itself looks a little different than your standard 110 breaker. It's wider and has two switches connected.
It's like two breakers holding hands, working together to deliver that extra power!
Make sure you get the right amperage for your appliance. This is *super* important!
Getting Ready to Wire
Now, for the good stuff. You'll need the right tools. A screwdriver, of course. Maybe a pair of pliers.
And definitely a voltage tester! This is your best friend. Treat it with respect.
And most importantly, **turn off the main breaker** before you even *think* about touching anything inside that panel! This is non-negotiable! Electricity and carelessness don't mix.
The Wiring Dance
With the power off, you can start connecting the wires. The 220 circuit typically requires three wires: two hot wires and a ground wire.
The two hot wires usually are black and red. They connect to the screws on the breaker itself. One to each screw.
The ground wire, which is usually bare copper or green, goes to the ground bus bar in the panel. This is usually a metallic bar where all the other ground wires connect.
Connecting the Wires
Carefully strip the insulation off the ends of the wires. You want just enough copper exposed to make a solid connection.
Use your screwdriver to tighten the screws on the breaker and the ground bus bar. Make sure the wires are securely attached.
Give them a gentle tug to make sure they aren't going anywhere. We want a good connection. Not a loose one!
The Moment of Truth
Once everything is wired up, it's time to put the breaker into the panel. Align the breaker with the empty slot and push it in until it snaps into place.
Now, take a deep breath. Double check everything! Make sure all the wires are connected properly and that the breaker is securely in place.
If you're feeling unsure about anything, now is the time to call in a professional! Seriously, don't risk it!
Power Up!
Okay, brave adventurer, it's time to flip the main breaker back on. Do it slowly and deliberately.
Listen for any unusual noises. Smell for any burning smells. If anything seems off, turn the main breaker back off immediately and investigate!
If all seems well, flip the 220 breaker to the "on" position. Now, test your appliance. Does it work?
Success!
If your appliance is humming along happily, congratulations! You have successfully wired a 220 breaker.
Take a moment to bask in the glory of your accomplishment. You are now officially a member of the DIY superhero club!
Feel free to brag to your friends. They'll be impressed, or at least pretend to be.
A Few Words of Wisdom
Remember, electricity is powerful and dangerous. Always take precautions.
If you're not comfortable working with electricity, don't be afraid to call a qualified electrician.
It's better to be safe than sorry. Especially when dealing with 220 volts!
More Tips and Tricks
Use the right wire gauge for your 220 circuit. The thicker the wire, the more current it can handle.
Consult your appliance's manual or a qualified electrician to determine the correct wire gauge and breaker size.
Don't overload your circuits! If you're constantly tripping breakers, you may need to add more circuits or upgrade your electrical panel.
The Joy of DIY
Wiring a 220 breaker can be a challenging but rewarding experience.
It's a chance to learn new skills, save money, and gain a sense of accomplishment.
Plus, you'll have the satisfaction of knowing that you did it yourself!
Beyond the Breaker
Once you've mastered wiring a 220 breaker, you can tackle other electrical projects around your home.
Installing new outlets, replacing light fixtures, even wiring a whole new circuit.
The possibilities are endless! Just remember to always be safe and follow proper electrical codes.
The Bottom Line
Wiring a 220 breaker is a fun and empowering skill to have.
With a little knowledge, the right tools, and a healthy dose of caution, you can conquer the electrical beast and become the DIY superhero you were always meant to be!
So go forth and wire! Just remember to turn off the power first!
Safety First, Always!
Let's reiterate something crucial: safety is paramount. Before even *thinking* about touching wires, kill the power at the main breaker.
Double, triple, quadruple check. Use a voltage tester to confirm that the circuit is indeed dead. No shortcuts here!
If you're at all unsure about something, stop. Call a qualified electrician. Your life and your home are worth more than the cost of a professional.
Understanding Wire Gauges
Wire gauge refers to the thickness of the wire. The lower the number, the thicker the wire. Thicker wires can handle more current.
For a 220 circuit, you'll typically need a heavier gauge wire than you would for a standard 110 circuit. This is because 220 circuits draw more power.
Refer to your local electrical codes and your appliance's manual to determine the correct wire gauge for your specific application.
Decoding the Breaker Box
Your electrical panel might seem like a chaotic mess of wires and breakers, but it's actually a well-organized system.
Each breaker is labeled to indicate which circuit it controls. Take some time to familiarize yourself with your panel's layout.
This will make it easier to identify the correct breaker for your 220 circuit and to troubleshoot any electrical problems that may arise.
Grounding: A Vital Connection
The ground wire is an essential safety feature. It provides a path for electricity to flow back to the panel in the event of a fault.
This helps to prevent electrical shocks and fires. Always make sure that your 220 circuit is properly grounded.
Connect the ground wire to the ground bus bar in your electrical panel. Make sure the connection is tight and secure.
Tools of the Trade
Having the right tools can make wiring a 220 breaker much easier and safer. Invest in a good quality screwdriver, wire stripper, and voltage tester.
A pair of lineman's pliers can also come in handy for cutting and bending wires. And don't forget your safety glasses!
These tools will not only make the job easier, but they will also help to protect you from injury.
The Importance of Permits
Depending on your location, you may need to obtain a permit before wiring a 220 breaker.
Permits ensure that the work is done safely and according to local electrical codes. Contact your local building department to find out if a permit is required.
While it may seem like a hassle, obtaining a permit is a worthwhile investment in your safety and the value of your home.
Beyond the Basics
Once you've mastered the basics of wiring a 220 breaker, you can start exploring more advanced electrical concepts.
Learning about different types of circuits, voltage drops, and power calculations can help you to become a more knowledgeable and confident DIY electrician.
There are many resources available online and in libraries to help you expand your electrical knowledge.
The Learning Never Stops
Electrical work is a constantly evolving field. New technologies and techniques are always being developed.
Stay up-to-date on the latest electrical codes and best practices to ensure that you are always working safely and effectively.
Consider taking continuing education courses or joining a professional organization to further your electrical knowledge.
Share Your Knowledge
Once you've gained some experience in wiring 220 breakers, share your knowledge with others.
Help your friends and neighbors with their electrical projects. Offer advice and guidance to those who are just starting out.
By sharing your knowledge, you can help to make your community a safer and more electrically savvy place.
A Final Word of Encouragement
Wiring a 220 breaker can seem daunting at first, but with a little preparation and a lot of caution, it's a skill that anyone can learn.
Don't be afraid to take on the challenge. Just remember to always prioritize safety and to never hesitate to call in a professional if you're unsure about anything.
So go ahead, give it a try! You might just surprise yourself with what you can accomplish. And remember, turning off the main breaker is your superpower!


