Okay, so picture this: My Uncle Jerry, bless his heart, thought he could fix his rusty old lawnmower with, get this, a garden hose and some duct tape. Didn't end well. Smoke, sputtering, and a very unhappy lawnmower. That's when I realized some things just need proper tools and techniques. And that, my friends, brings us to the fiery dance of oxygen-acetylene welding!
Welding, in general, can seem intimidating. It's all sparks and heat and molten metal. But oxygen-acetylene, or gas welding, is actually a pretty accessible way to start playing with fire... responsibly, of course. Think of it as the original, analog version of welding. No fancy electronics needed, just a torch, some gas, and a little know-how.
Gearing Up for Glory (and Safety!)
First things first: safety gear. This isn't optional. Seriously. We're talking about intense heat and potentially blinding light. You'll need:
- Welding Goggles or Helmet: With the right shade lens. Your eyeballs will thank you. (Seriously, trust me on this one. Fried retinas are NOT a good look.)
- Welding Gloves: Leather gauntlets that go up your forearm. Think medieval knight, but for metal.
- Welding Apron or Jacket: Leather or flame-resistant material. Protection from sparks and spatter.
- Closed-toe Shoes: Preferably leather boots. No sandals! (Unless you're going for the "melted toe" look. Which, I assume, you aren't.)
- Proper Ventilation: You don't want to be breathing in fumes. Open a window or use a ventilation system.
Now, for the equipment:
- Oxygen and Acetylene Tanks: These are the powerhouses of the operation. Make sure they're properly secured.
- Regulators: These control the flow of gas from the tanks to the torch. Pay attention to the pressure settings.
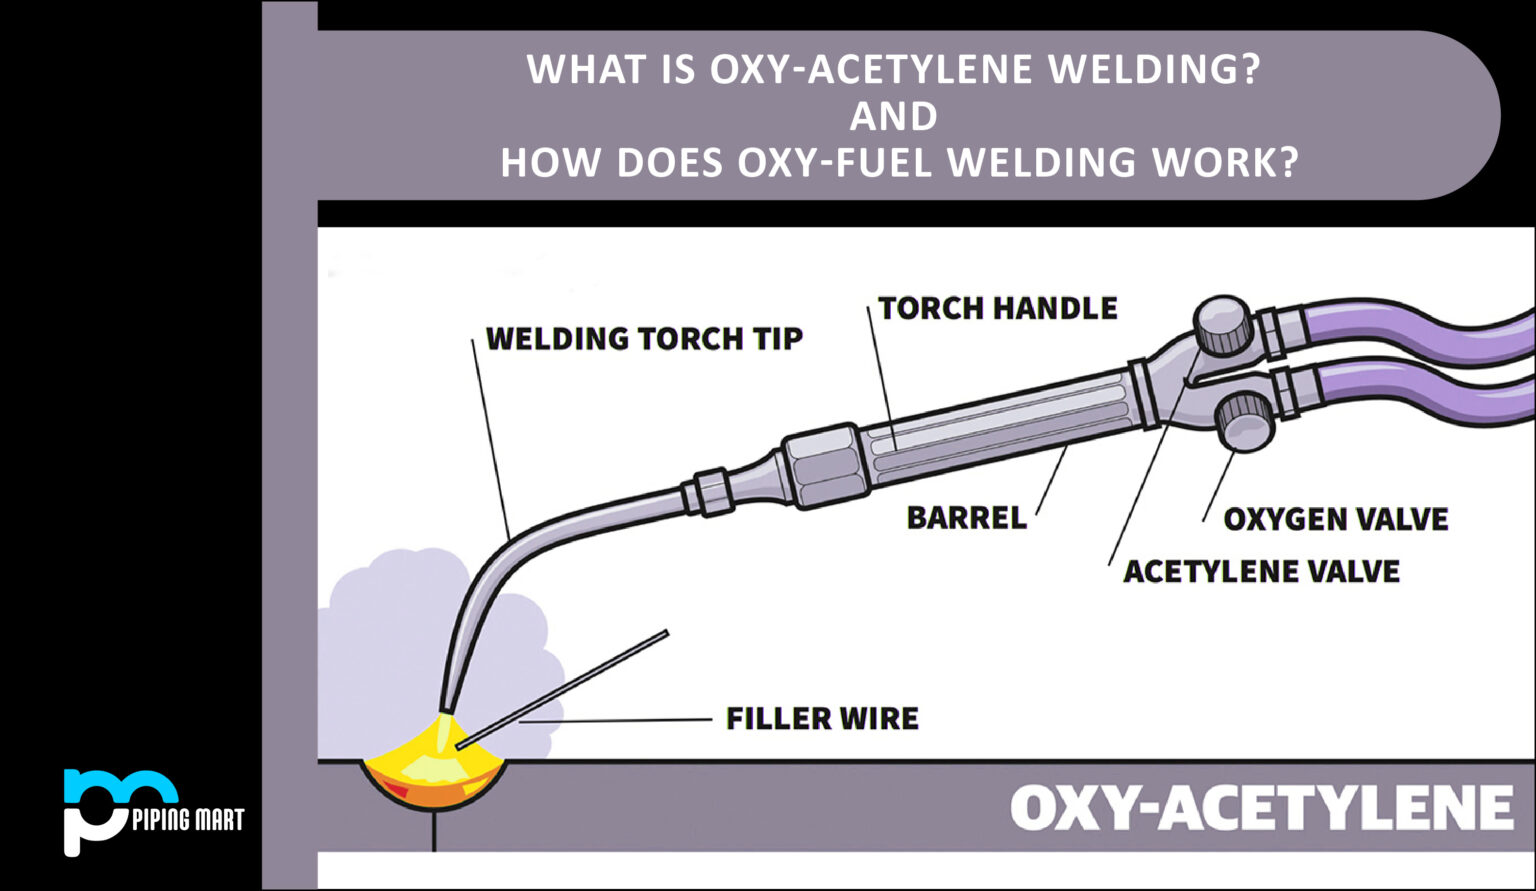
- Welding Torch: The instrument of creation! It mixes the oxygen and acetylene to create the flame.
- Welding Rod: The filler metal that you'll melt into the joint. Choose the right rod for the metals you're welding.
- Striker: To light the torch. (Lighters work in a pinch, but a striker is safer and more reliable. Plus, it looks cool.)
- Work Surface: A sturdy, fire-resistant surface to weld on.
Setting the Stage: Preparing Your Metal
Before you even think about lighting the torch, you need to prep your metal. Cleanliness is next to godliness… and good welds. Remove any rust, paint, grease, or other contaminants from the welding area. A wire brush or grinder works well for this. Think of it as giving your metal a spa day before the fiery spa day. It'll help the weld adhere properly.
Also, consider clamping your pieces together. Nothing's more frustrating than trying to weld two pieces that keep moving around.
The Dance of the Flame: Lighting and Adjusting Your Torch
This is where the magic happens! Open the acetylene valve on the torch slightly and use the striker to light the gas. Then, slowly add oxygen until you get a neutral flame. This is the sweet spot. It's not too carburizing (too much acetylene) or too oxidizing (too much oxygen). You'll know it's right when the inner cone of the flame is a bright, well-defined shape.
Different metals require different flame adjustments, so do some research before you start. (Google is your friend!)
Laying Down the Bead: The Welding Technique
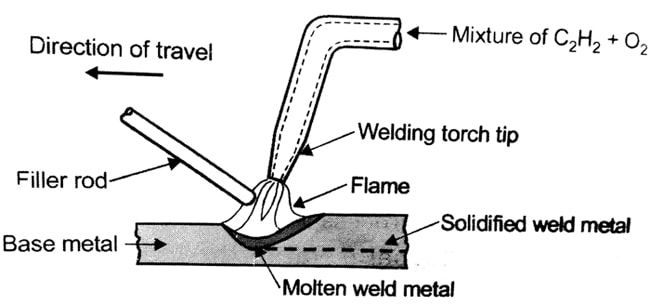
Hold the torch at a 45-degree angle to the metal and start heating the base metal where you want to make the weld. Once the metal starts to puddle, dip the welding rod into the puddle and move the torch in small, circular motions. This creates a weld bead.
The key is to maintain a consistent puddle and move at a steady pace. Don't go too fast, or the weld will be weak. Don't go too slow, or you'll burn through the metal. It's a balancing act, and it takes practice.
Pro Tip: Practice on scrap metal first. You'll make mistakes, and that's okay. That's how you learn!
Cooling Down: The Aftermath
Once you're done welding, let the metal cool down slowly. Quenching it in water can weaken the weld. You can also use a wire brush to remove any slag (the residue that forms on the surface of the weld).
Inspect your weld for any defects, such as cracks, porosity, or undercut. If you find any, you may need to grind them out and re-weld the area.
Oxygen-acetylene welding is a valuable skill to have. It's a versatile process that can be used for a variety of applications, from repairing lawnmowers (unlike Uncle Jerry's method) to creating works of art. So, grab your gear, fire up the torch, and start welding! And remember, safety first! (And maybe keep a fire extinguisher handy, just in case.)