Alright folks, gather 'round! You wanna learn how to wield the power of the oxy-acetylene torch? You've come to the right place. I’m gonna break it down for you, nice and easy, like explaining the offside rule in soccer to a cat. (Good luck with *that*, by the way.)
First things first: safety, safety, safety! Seriously, this isn't a water balloon fight. We're talking about controlled explosions here, people! Imagine a tiny, metal-melting sun held in your very hand. Wear your safety glasses! Thick ones! The kind that make you look like you're piloting a spacecraft. And gloves! Thick, fire-resistant gloves. Think oven mitts on steroids.
Why all the fuss? Well, besides the obvious fiery doom avoidance, you've also got to worry about sparks, hot metal shrapnel (affectionately known as "metal confetti of pain"), and potential blindness. Think of it like this: if you wouldn't lick it, don't let it get near your eyes when you're torching.
Now, let's get to the fun part: the equipment! You've got your oxygen tank (the blue one, usually) and your acetylene tank (the black or yellow one, often looking suspiciously like it's judging you). These tanks are like the grumpy old men of the workshop – treat them with respect, and don't go shaking them up for kicks.
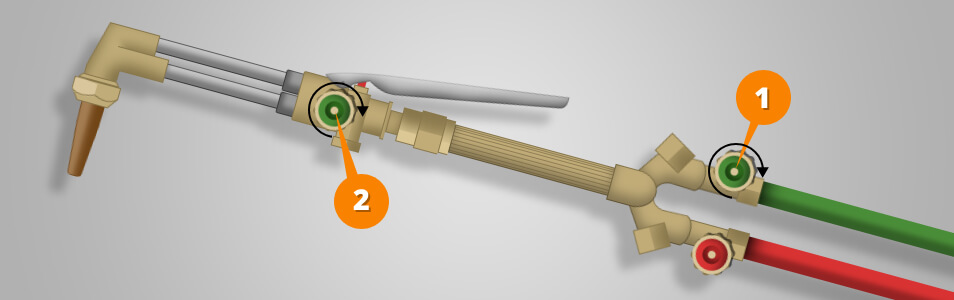
Connected to these tanks are regulators. Think of these as the volume knobs for your mini-sun. They control the pressure of the gases flowing to the torch. Too much pressure and you'll be living the "explodey" end of the spectrum; too little and you might as well be trying to melt steel with a hairdryer. (Spoiler alert: it doesn't work. Trust me, I’ve tried.)
Then there's the torch itself. It’s got two knobs – one for oxygen, one for acetylene. These knobs are your best friends. Learn to love them. Learn to whisper sweet nothings to them. Okay, maybe not. But definitely learn how to use them!
Lighting the Beast
Ready to light this bad boy up? Excellent! But hold your horses, Speedy McMelter. Here's the procedure:
- Crack the acetylene valve on the tank *slightly*. Just a smidge. We're talking about letting out a tiny sigh, not a full-blown opera.
- Open the acetylene valve on the torch handle about a quarter turn.
- Use a striker (that flinty thing that looks like a medieval lighter) to ignite the acetylene. You should get a sooty, orange flame that looks like a disgruntled candle.
- Now, *slowly* open the oxygen valve on the torch. The flame will start to change. It'll get smaller, brighter, and much, much angrier.
This is where the magic happens! Adjust the oxygen and acetylene valves until you get a *neutral flame*. A neutral flame is your goal. It's got a sharp, defined inner cone, a slightly hazy outer envelope, and it's the Goldilocks of oxy-acetylene flames – not too carburizing (too much acetylene), not too oxidizing (too much oxygen), just right.
How do you tell if it's neutral? Well, if you see feathery edges around the inner cone, you've got too much acetylene. That's a carburizing flame, and it'll add carbon to your weld, making it brittle. On the other hand, if the inner cone is short and bluish, you've got an oxidizing flame. That'll burn away important elements and weaken your weld. Remember Goldilocks: *just right*.
Welding 101 (Simplified and Slightly Exaggerated)
Now that you've got your flame dialed in, you can start welding! Welding with an oxy-acetylene torch is like drawing with fire. It takes practice, patience, and a whole lot of not setting things on fire. (Speaking from experience here.)
Hold the torch at a 45-degree angle to the metal. Start heating the metal at the point where you want to weld. Once the metal starts to melt and form a puddle (affectionately known as the "puddle of molten awesome"), start adding your filler rod (that extra metal you're using to join the pieces). Dip the filler rod into the puddle, then move the torch forward slightly, and repeat. It's like a little dance – a fiery, metal-melting dance.
Move slowly and steadily. Don't rush it. If you go too fast, you won't get good penetration, and your weld will be weak. If you go too slow, you'll burn through the metal and create a hole. (Again, speaking from experience.)
Turning it Off (Before Disaster Strikes)
Alright, you've finished your weld, and it's… well, let's just say it's "structurally sound." Time to turn off the torch before you accidentally melt your neighbor's car.
- Close the acetylene valve on the torch handle *first*.
- Then, close the oxygen valve on the torch handle.
- Next, close the valves on the tanks.
- Finally, bleed the lines by opening the torch valves *briefly* to release any remaining gas.
And that, my friends, is a crash course in oxy-acetylene torching! Remember: practice makes perfect (or at least prevents catastrophic explosions). Now go forth, be safe, and may your welds be strong and your fingers remain un-crisped!


