Alright, so you're staring at a metal bar like it owes you money, and you've got a torch in your hand. You wanna cut this thing, right? No problem. Setting up a cutting torch is like making a really fancy sandwich. You need the right ingredients, a decent technique, and a little bit of luck. Let's dive in!
First Things First: The Gear
Think of this as your pantry. You wouldn’t try to bake a cake without flour, right? Same deal here. You absolutely need the right equipment. We're talking:
- Your Cutting Torch: Obviously. Make sure it's in good working order. No leaks!
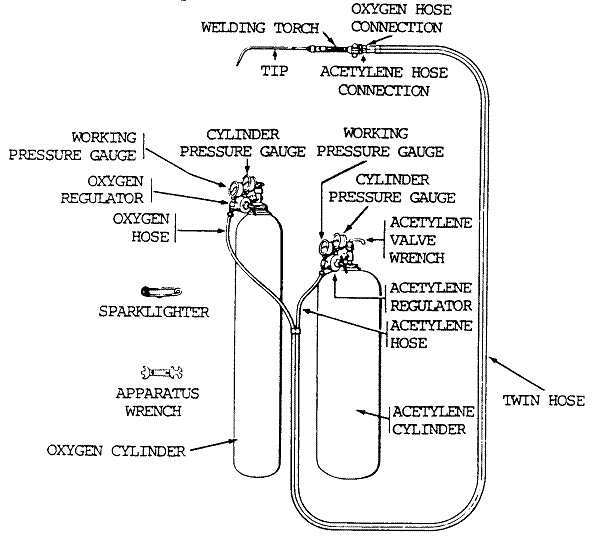
- Oxygen and Acetylene Tanks: These are your dynamic duo. Oxygen is the muscle, acetylene is the fire.
- Regulators: These are like the volume knobs on your stereo. They control the pressure coming from the tanks. Essential for safety!
- Hoses: Think of these as the arteries that deliver the lifeblood to your torch. Make sure they're in good condition and color-coded (oxygen is usually green, acetylene is usually red).
- Striker: Your trusty lighter. Don't use a regular cigarette lighter – you'll singe your eyebrows. Trust me, been there, slightly singed that.
- Safety Glasses/Goggles: Absolutely non-negotiable. You only get one set of eyes. Protecting them from sparks and intense light is crucial. Think of them as the bodyguard for your eyeballs.
- Gloves: Protect your hands from burns. Leather is your friend.
- Appropriate Clothing: No synthetic fabrics! Cotton or leather is best. You don't want your polyester shirt melting onto your skin like a sad, futuristic cheese.
- A Clear Work Area: Remove anything flammable. Seriously. This isn’t the time to be a pyromaniac (unless, you know, that’s your thing... but be safe!).
Connecting the Dots (or Rather, the Hoses)
This part's a bit like assembling IKEA furniture. It looks intimidating at first, but it's manageable if you follow the instructions (and maybe have a beer handy).
1. Secure the Regulators: Attach the regulators to the correct tanks (oxygen to oxygen, acetylene to acetylene). Make sure they’re snug but not ridiculously tight. You don't want to Hulk-smash them.
2. Attach the Hoses: Connect the hoses to the regulators and then to the torch. Again, make sure they're tight and secure.
3. Leak Test: This is super important. Use a soapy water solution to check for leaks at all connections. Bubbles mean leaks. Tighten the connections until the bubbles disappear. Imagine a tiny, insistent kid blowing bubbles – that’s what a leak looks like, only more dangerous.
Setting the Pressure: The Goldilocks Zone
Pressure is everything! Too little, and your flame will be weak. Too much, and you’ll be wrestling a fire-breathing dragon. You need to find the "just right" Goldilocks zone.
1. Consult the Manufacturer's Recommendations: Your torch and regulator should have recommended pressure settings. Start there.
2. General Guidelines: A good starting point for cutting steel is around 40 PSI for oxygen and 5 PSI for acetylene. But again, always check the manufacturer's recommendations. Every torch is a little different, like snowflakes... fiery, metal-cutting snowflakes.
3. Adjust the Regulators: Slowly open the tank valves and then adjust the regulators to the desired pressure. Do it gradually! Don’t crank them open like you're trying to win a strongman competition.
Lighting the Torch: Embrace the Inner Dragon
This is where the magic happens (or the potential for minor explosions, so be careful!).
1. Purge the Hoses: Briefly open the acetylene valve on the torch to purge any air from the hose. Do the same for the oxygen.
2. Open the Acetylene Valve: Open it a small amount, just enough to get a flame.
3. Use the Striker: Strike the striker near the tip of the torch to ignite the acetylene.
4. Adjust the Flame: Slowly open the oxygen valve on the torch until you get a neutral flame. This is a bright, well-defined inner cone with a slightly longer, less defined outer flame. Too much acetylene, and you’ll have a feathery, sooty flame. Too much oxygen, and you’ll have a short, hissing flame.
5. Final Check: Make sure the flame is stable and consistent. You're aiming for that perfect, controlled miniature sun.
And there you have it! Your torch is set up and ready to cut. Remember to always prioritize safety, and if you're unsure about anything, consult a professional. Now go forth and conquer that metal! Just, you know, safely.