Alright, gather 'round, friends! Let’s talk about something we've all probably experienced: the dreaded disappearing Excel file. One minute it’s there, a beautiful spreadsheet teeming with data, the next… poof! Gone. Vanished. Like a sock in the dryer. And on a Mac, no less! (Don't even get me started on losing socks.)
But fear not, fellow spreadsheet wranglers! Just because your precious data has seemingly taken a hike doesn't mean it's gone forever. We’re going on a recovery mission! Think of it as less "Mission Impossible" and more "Mission… Maybe Slightly Annoying But Totally Doable.”
Check the Obvious (But Often Overlooked) Places
First things first, let's start with the low-hanging fruit. Sometimes, the simplest solution is the right one. Like when you’re looking for your glasses and they're on your head. Embarrassing, right? The same principle applies here.
The Trash Can: This is the most obvious, but hey, we all make mistakes. Open that digital garbage bin and give it a good once-over. You might be surprised! If you find your file, simply right-click and choose "Put Back." Boom! You're a recovery hero.
Recently Opened: Excel has a handy "Recently Opened" feature. Go to "File" then "Open Recent" and see if your missing file is listed there. It’s like finding a twenty in your old coat pocket – pure joy!
The AutoSave Folder: This is your backup buddy! Excel is supposed to automatically save your work every few minutes. It’s not perfect (sometimes it takes coffee breaks), but it’s worth a shot. The location varies depending on your version of Excel and macOS, but you can generally find it by going to Finder, then pressing Cmd + Shift + G and typing in `/private/var/folders/`.
Time Machine: Your DeLorean for Data
Okay, things are getting a little more serious. If the simple checks didn't pan out, it’s time to crank up the big guns. Enter: Time Machine! This is macOS's built-in backup system, and it’s a lifesaver. If you've been faithfully backing up your Mac (and you should be!), Time Machine can rewind time and bring your file back from the brink.
How to Use Time Machine:
- Open the folder where your Excel file *used* to live. If it was on your Desktop, go to your Desktop. If it was in a specific folder, navigate there.
- Launch Time Machine. You can find it in your Applications folder or via Spotlight search (Cmd + Space, then type "Time Machine").
- Time Machine will open a window that looks like you’re gazing into a starfield. Use the timeline on the right to travel back in time to a point *before* you deleted the file.
- Look for your missing Excel file! If you find it, select it and click "Restore." Voila! Your data is back from the future! (Okay, the past, but you get the idea.)
Pro Tip: If you don’t see the "Restore" button, make sure you’ve selected the file. Sometimes, Time Machine can be a little finicky.
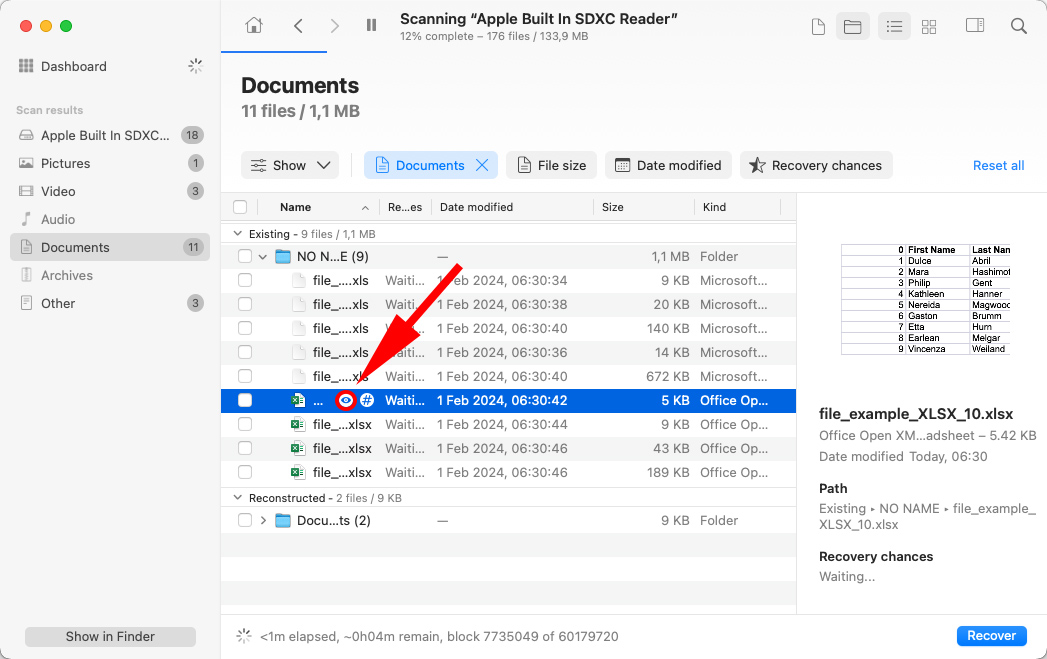
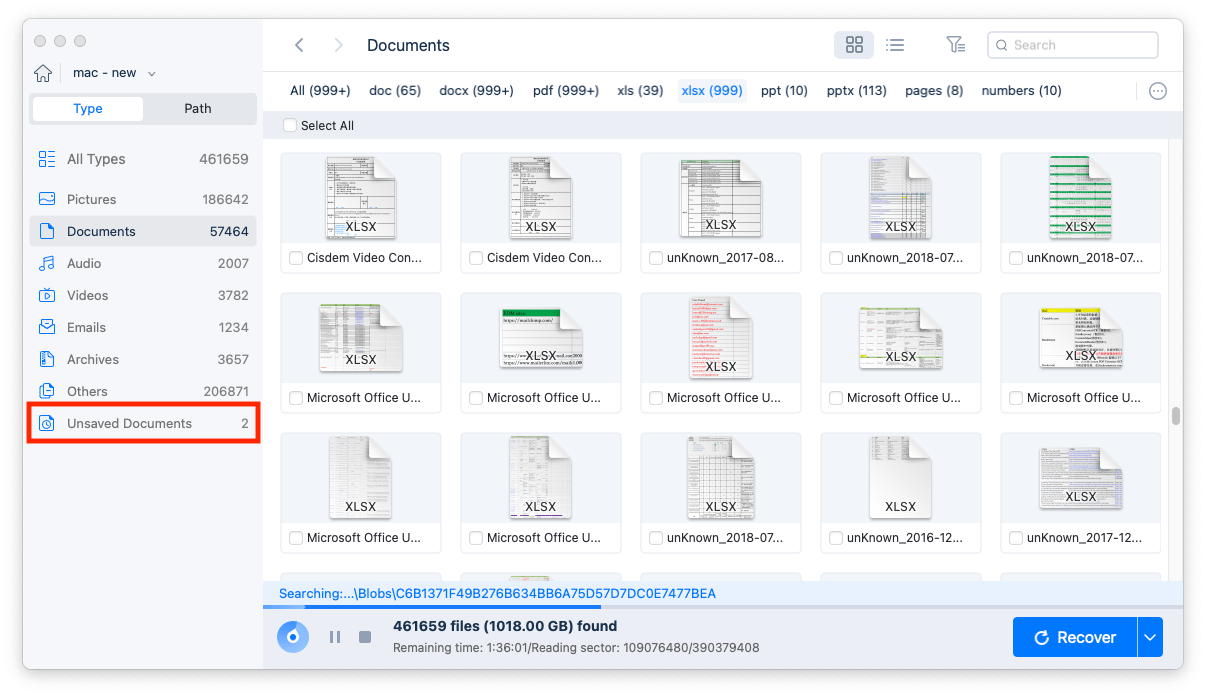
Third-Party Data Recovery Software: When All Else Fails
Alright, deep breaths. If you've exhausted the above options and your Excel file is still AWOL, it’s time to call in the professionals… or at least, professional-grade software. There are several third-party data recovery programs available for Mac that can dig deeper than Time Machine and potentially recover your file. Think of them as digital archaeologists.
Popular Options:
- EaseUS Data Recovery Wizard for Mac: This is a popular choice with a good track record.
- Disk Drill: Another solid option with a user-friendly interface.
- Recoverit Data Recovery for Mac: Worth considering for its comprehensive scanning capabilities.
Important Considerations:
- Act Fast: The longer you wait after deleting a file, the lower your chances of recovery. The more you use your computer, the more likely the deleted file’s space will be overwritten with new data. It's like trying to find a specific grain of sand after a whole beach has been dumped on it.
- Free vs. Paid: Most data recovery software offers a free trial or a free version, but they often have limitations on the amount of data you can recover. If your file is large, you might need to purchase a license.
- Read Reviews: Before downloading and installing any software, read reviews to make sure it's reputable and safe. You don't want to accidentally download malware along with your recovered spreadsheet!
Prevention is Better Than Cure (And Cheaper Than Therapy)
Okay, you've hopefully recovered your file. But let's learn from this traumatic experience. (Okay, maybe "traumatic" is a bit dramatic. But losing data *is* stressful!) The best way to avoid this whole mess in the future is to be proactive. Think of it like flossing your teeth – annoying in the moment, but saves you a lot of pain (and money) down the road.
Tips for Preventing Data Loss:
- Regular Backups: Use Time Machine! Set it and forget it! It's seriously the easiest thing you can do.
- Cloud Storage: Save your important files to cloud storage services like iCloud Drive, Google Drive, or Dropbox. This provides an extra layer of protection in case your Mac gets lost, stolen, or spontaneously combusts (it happens!).
- Enable AutoSave: Make sure AutoSave is turned on in Excel. Check your Excel settings to confirm it's active and set to save frequently.
- Save Often: Get into the habit of pressing Cmd + S every few minutes. It's a simple habit that can save you a world of pain.
So there you have it! Your comprehensive guide to recovering deleted Excel files on a Mac. Remember to stay calm, take it one step at a time, and maybe invest in a good stress ball. And most importantly, back up your data! Now go forth and conquer those spreadsheets!