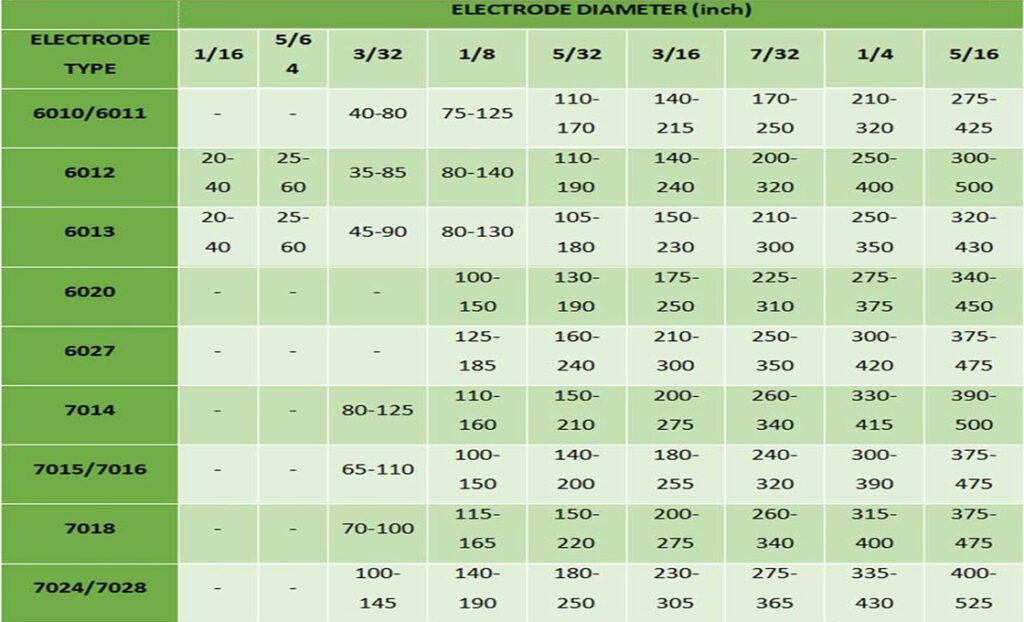
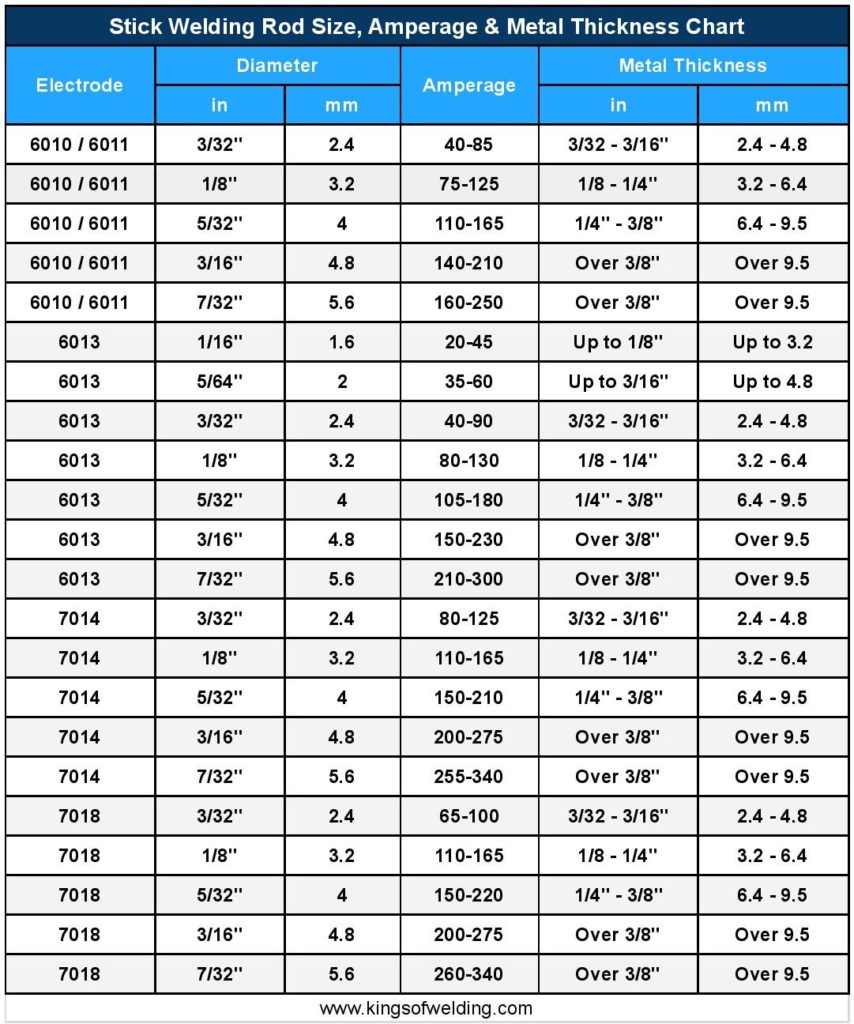
Amperage For 6013 Welding Rod
Alright, let’s talk about something that often makes new welders (and even some seasoned ones) scratch their heads: amperage when you’re dealing with a 6013 welding rod. Now, if you’ve ever felt like you’re trying to decode ancient hieroglyphs just to set your welder, relax. The 6013 rod is like that chill friend who’s always up for anything – super forgiving, easy to get along with, and generally just wants to have a good time. But even the chillest friend needs the right amount of coffee to really shine, right? And for our 6013, that coffee is amperage.
Think of amperage as the heat dial on your welding machine. It’s what gives your arc its punch, its sizzle, its… well, its heat! Too little, and it’s like trying to cook a steak with a matchstick. Too much, and you’re basically wielding a plasma torch meant for cutting through alien spacecrafts. For the glorious 6013, finding that sweet spot isn’t about rocket science; it's more about knowing your ingredients and trusting your gut.
When the Amperage is Playing Hard to Get (Too Low!)
Ever tried to light a campfire with damp wood and a single, sad match? That’s kind of what welding with too low amperage feels like. Your rod will be sticky, sticky, sticky! It’ll want to glue itself to your workpiece like a toddler refusing to let go of their favorite toy. You'll get a sputtery, grumpy arc that barely wants to start, and when it does, it fizzles out faster than a New Year’s resolution.
Must Read
The bead you do manage to lay will look like a sad, lumpy caterpillar trying to crawl across the metal. It won’t penetrate properly, which means your weld is basically just sitting on top, silently judging your choices. We call that a cold weld, and it's about as strong as a wet paper bag. No good for anything you want to actually hold together!
When the Amperage Thinks It's a Rock Star (Too High!)
On the flip side, crank that dial too far, and you’re inviting a whole different kind of chaos to the party. Too much amperage with a 6013 is like giving a hyperactive squirrel an espresso IV drip. Things get wild! Your arc will be super loud, angry even, spitting molten metal everywhere like a grumpy dragon with a bad case of indigestion. Spatter will fly, making your workshop look like a metallic Jackson Pollock painting.
And your workpiece? Oh boy. Instead of a nice, controlled puddle, you'll be burning through it faster than you can say "oops!" Especially on thinner materials, you’ll end up with big, gaping holes – affectionately known as blow-through. Your beautiful bead will be wide, flat, and likely undercut at the edges, looking more like a squashed pancake than a strong joint. Plus, the rod will melt so fast you’ll feel like you’re constantly feeding it, like trying to keep up with a teenager’s appetite.
The Goldilocks Zone: Just Right!
So, what’s the magic number? For most 6013 rods, especially your standard 1/8-inch (3.2mm) diameter, you’re usually looking at something in the ballpark of 70 to 120 amps. But here’s the kicker: it’s not a hard and fast rule set in stone by the welding gods. It’s more of a guideline, a friendly suggestion.
The "just right" amperage will give you a beautiful, steady arc that sounds like bacon frying happily in a pan. Your puddle will be easy to control, flowing smoothly and looking like a shiny, wet eye staring back at you. It’ll have good penetration without blowing through, and the slag (that crusty stuff on top) will peel off easily, sometimes even curling up on its own like a perfectly roasted marshmallow. That’s when you know you’ve hit the sweet spot!

Factors to Keep in Mind (It's Not Just the Rod)
Your material thickness is a biggie. Thinner metal, less amperage. Thicker metal, more amperage. Simple as that! Also, your welding position matters. Welding overhead or vertical will often require a slightly lower amperage than flat or horizontal to help control that molten puddle from dripping all over the place.
And don’t forget your technique! A faster travel speed might need a touch more heat, while a slower, more deliberate pass might need a little less. It's a delicate dance, really.
How to Find Your Happy Place: Practical Tips
So, how do you find this elusive sweet spot without guessing games? Start by checking the rod manufacturer’s recommendations on the box – they're usually a good starting point. Then, begin at the lower end of that recommended range on your machine and run a test bead on some scrap metal of the same thickness. If it’s sticky and cold, crank it up by 5-10 amps. Run another bead. Still sticky? More amps!
If it starts blowing through or spitting like crazy, dial it back down. You'll literally feel and see the difference. Listen to the arc; a steady, consistent hum is music to a welder's ears. Watch the puddle; it should flow nicely behind the arc without dragging or running away.
Ultimately, getting the amperage right for your 6013 rod is less about memorizing numbers and more about developing an eye and an ear for what "good" looks like. It’s like learning to ride a bike – you might wobble and fall a few times, but soon you’ll be cruising along, laying down beautiful, strong welds with that forgiving 6013. So grab some scrap, adjust that dial, and have some fun!
